
If you love cozy sewing projects, cute handmade accessories, and anything cat-inspired, these DIY chunky cat paw plushie slippers are about to become your new favorite weekend project.
These oversized DIY plush slippers are soft, warm, squishy, and designed with adorable paw pads on the soles. They make a fun handmade gift, a cozy fall or winter accessory, or even a cute addition to a pajama set.
The best part? This free cat paw slipper sewing pattern is beginner-friendly and can be made with fleece, minky, sherpa, faux fur, or other soft fabrics you may already have in your fabric stash.
Materials You Will Need
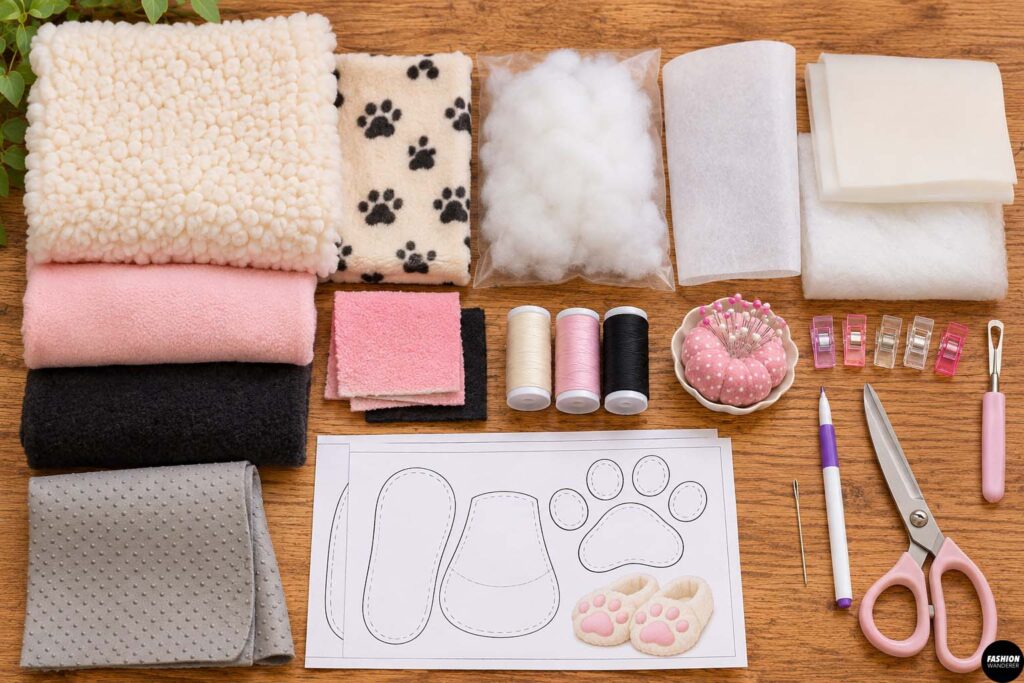
To make one pair of chunky cat paw slippers, gather:
- 1/2 yard fleece, minky, sherpa, or plush fabric
- 1/4 yard lining fabric
- 1/4 yard anti-slip fabric or faux suede for the soles
- Small scraps of pink, black, or contrasting fleece for paw pads
- Polyester fiberfill
- Medium-weight fusible interfacing
- Optional foam or quilt batting
- Coordinating thread
- Sewing machine
- Fabric scissors
- Pins or sewing clips
- Fabric marker
- Hand-sewing needle
- Turning tool
- Free cat paw slipper sewing pattern
For an extra chunky look, choose a plush fabric with a little loft, such as minky, fleece, teddy sherpa, or faux fur.
DIY Chunky Cat Paw Plushie Slippers
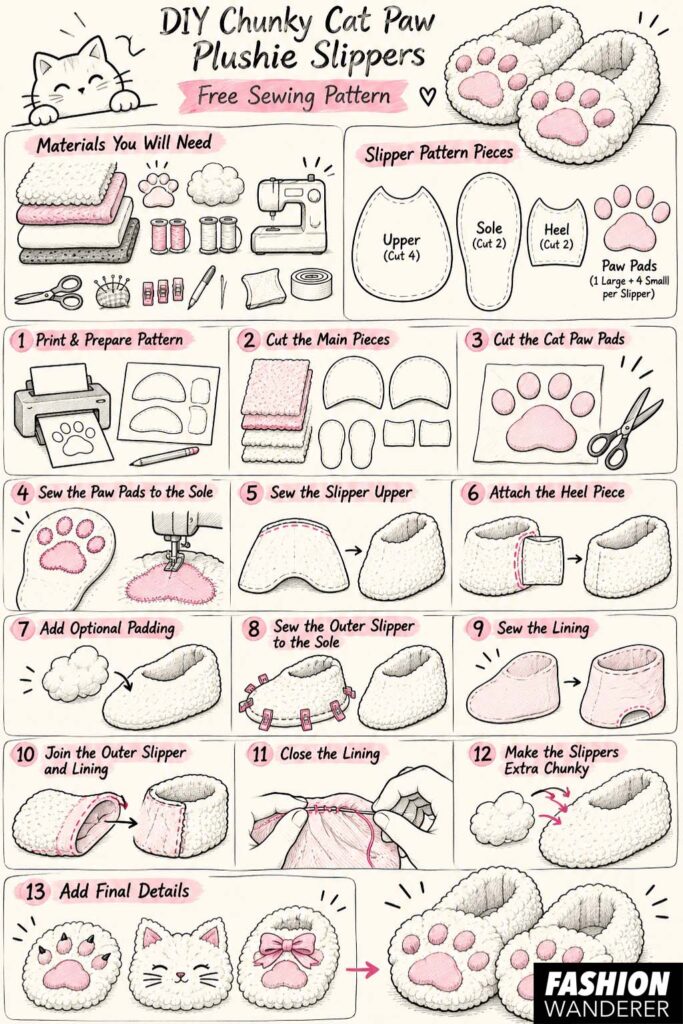
Step 1: Print and Prepare the Free Slipper Pattern
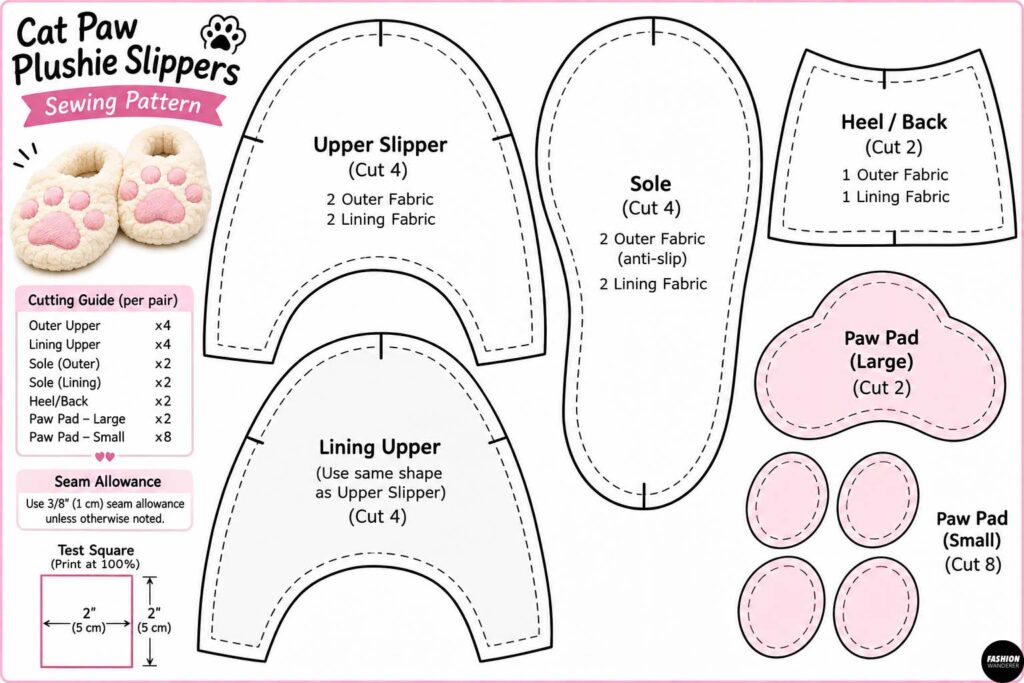
Print your free slipper sewing pattern at 100% scale.
The pattern should include:
- Upper slipper piece
- Sole piece
- Heel or back piece
- Lining pieces
- Paw pad templates
Cut out the pattern pieces in your size.
If you want a looser, extra-puffy slipper, add approximately 1/4 inch around the outer edges of the upper slipper pieces before cutting.
Make sure the slipper pattern fits comfortably around your foot before cutting your final fabric.
Step 2: Cut the Main Slipper Pieces
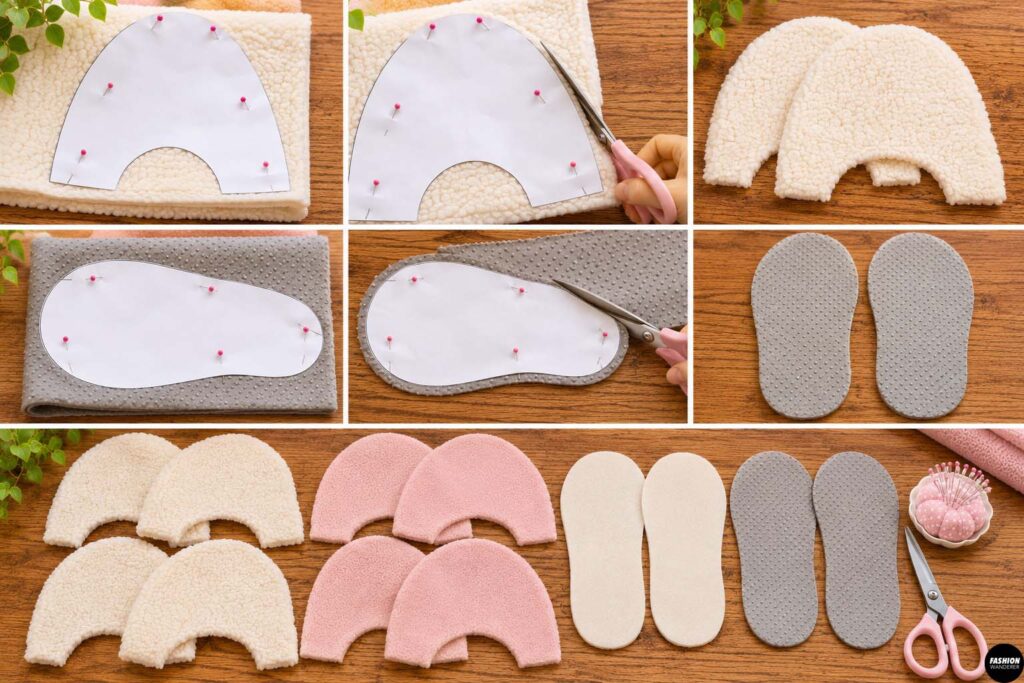
Fold your plush fabric with right sides together.
Pin the slipper pattern pieces in place.
Cut two mirrored upper pieces for each foot.
You will generally need:
- 4 outer upper pieces
- 2 outer sole pieces
- 4 lining upper pieces
- 2 lining sole pieces
Cut the outer soles from anti-slip fabric, faux suede, or sturdy fleece.
For extra warmth, cut an additional sole layer from quilt batting or foam.
Keep the left and right slipper pieces organized so they do not get mixed up while sewing.
Step 3: Cut the Cat Paw Pads
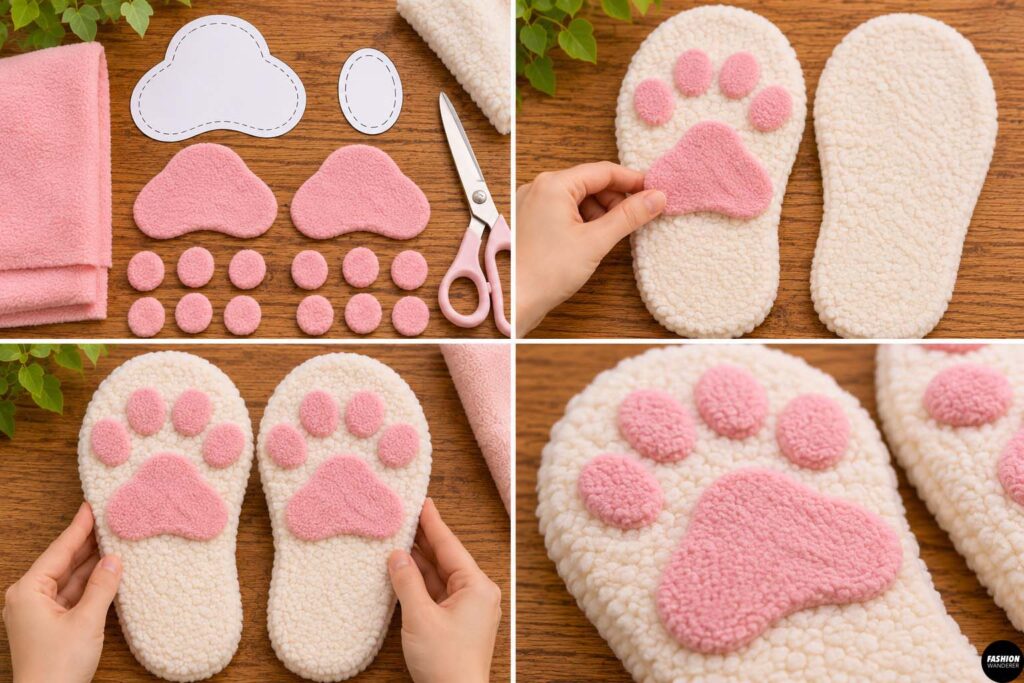
Use the paw pad templates to cut the decorative pieces.
For each slipper sole, cut:
- 1 large center paw pad
- 4 small toe pads
Pink fleece creates a classic cute cat paw look, but black, brown, cream, or pastel colors also work beautifully.
Arrange the paw pads on the bottom sole before sewing.
The large paw pad should sit toward the center or heel area, while the four smaller pads should sit near the toe.
Step 4: Sew the Paw Pads to the Sole
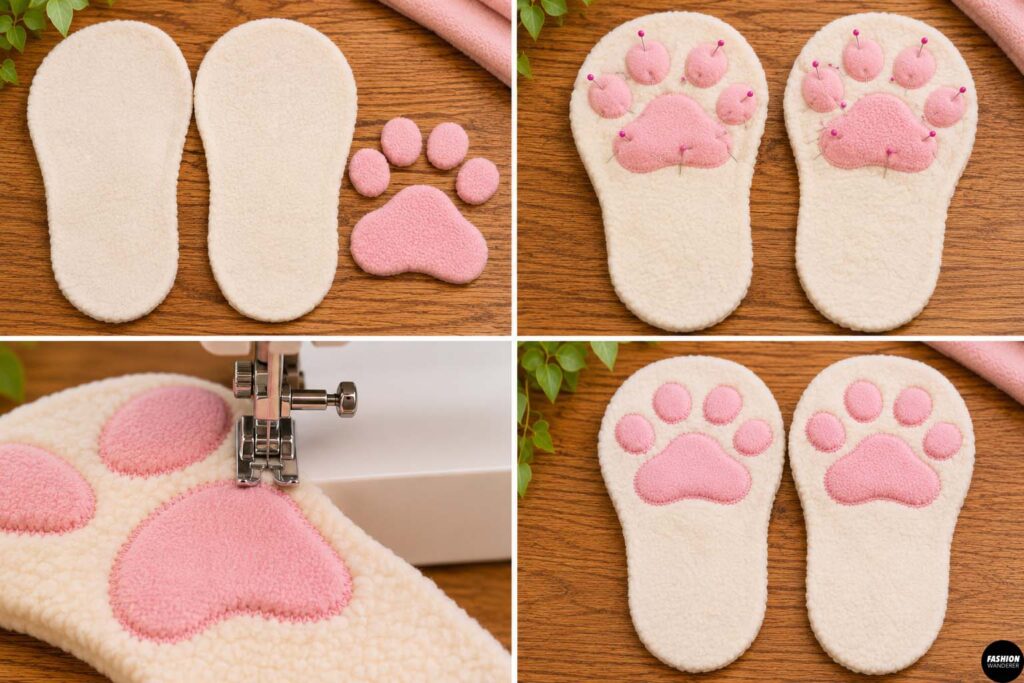
Pin or clip each paw pad in place.
Use a narrow zigzag stitch around the outer edge of each shape.
Go slowly around the curved edges.
If your fabric stretches while sewing, place lightweight stabilizer underneath the sole temporarily.
Another option is to use a short straight stitch close to the edge if your fleece does not fray.
Repeat for both slipper soles.
Step 5: Sew the Slipper Upper
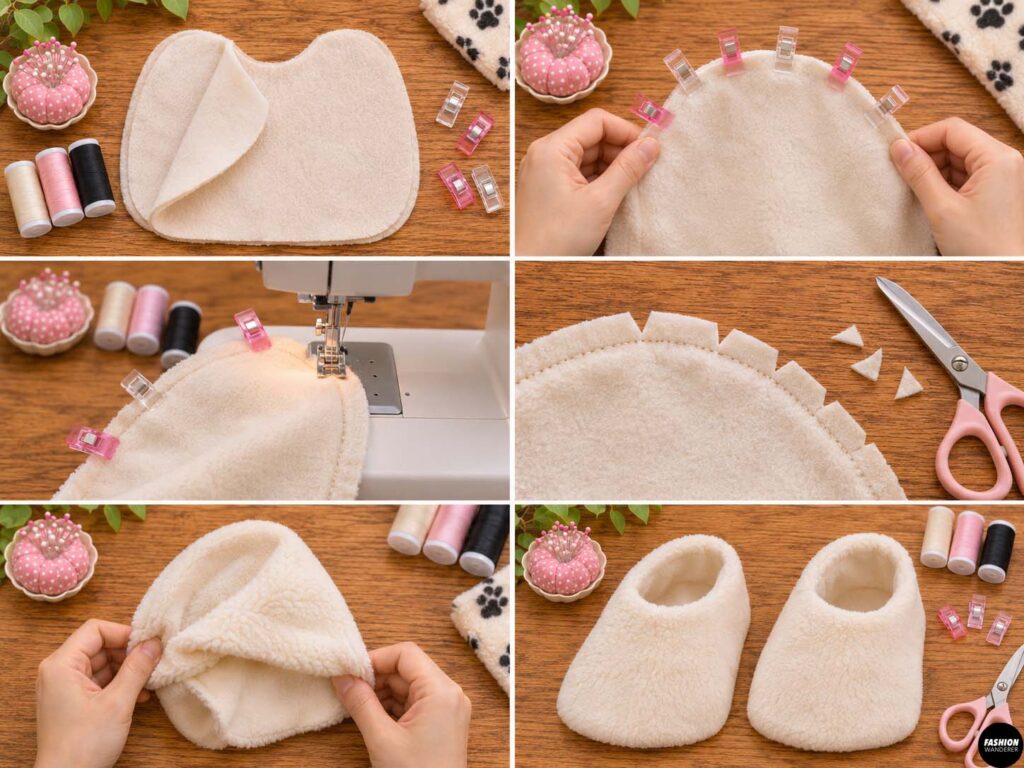
Place two outer slipper upper pieces right sides together.
Match the center front and curved upper edge.
Pin around the seam.
Sew using approximately a 3/8-inch seam allowance.
Repeat for the second slipper.
Clip small notches along curved seam allowances without cutting through your stitches.
Turn the upper pieces right side out temporarily to make sure the shape looks smooth.
Step 6: Attach the Heel Piece
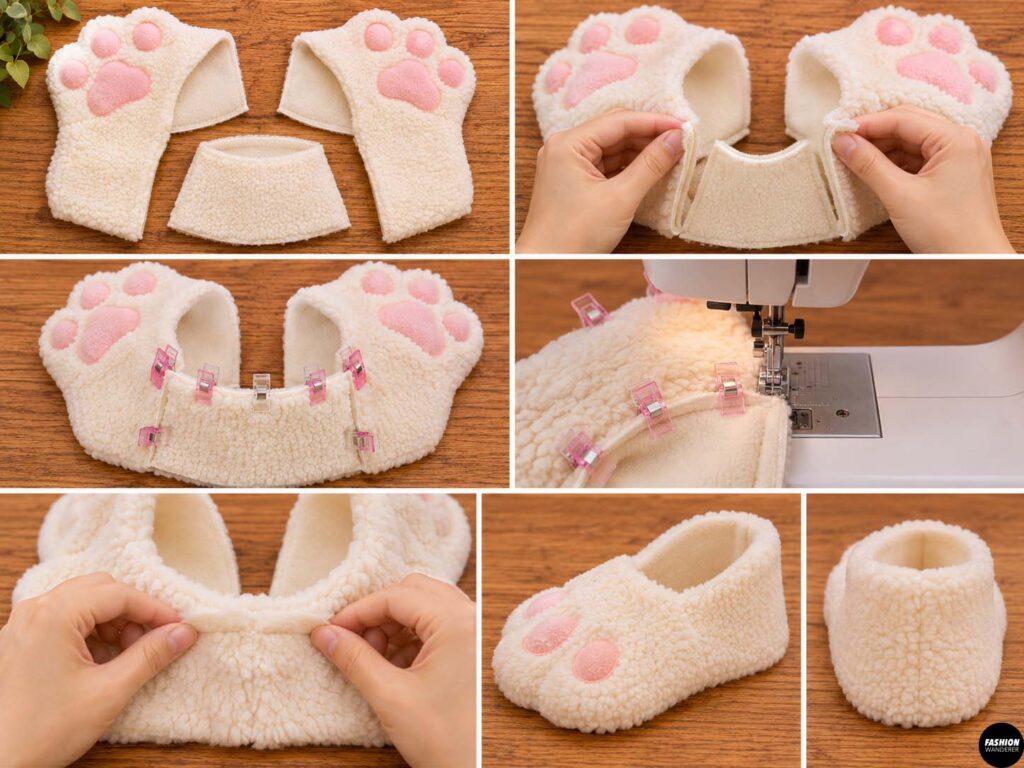
If your pattern includes a separate heel or back section, position it between the two sides of the slipper upper.
Match the raw edges.
Pin or clip carefully.
Sew the heel piece in place using the same seam allowance.
The slipper should now begin to resemble a soft bootie shape.
For an extra plush appearance, avoid pressing the fabric flat.
Simply finger-press the seams open.
Step 7: Add Optional Padding
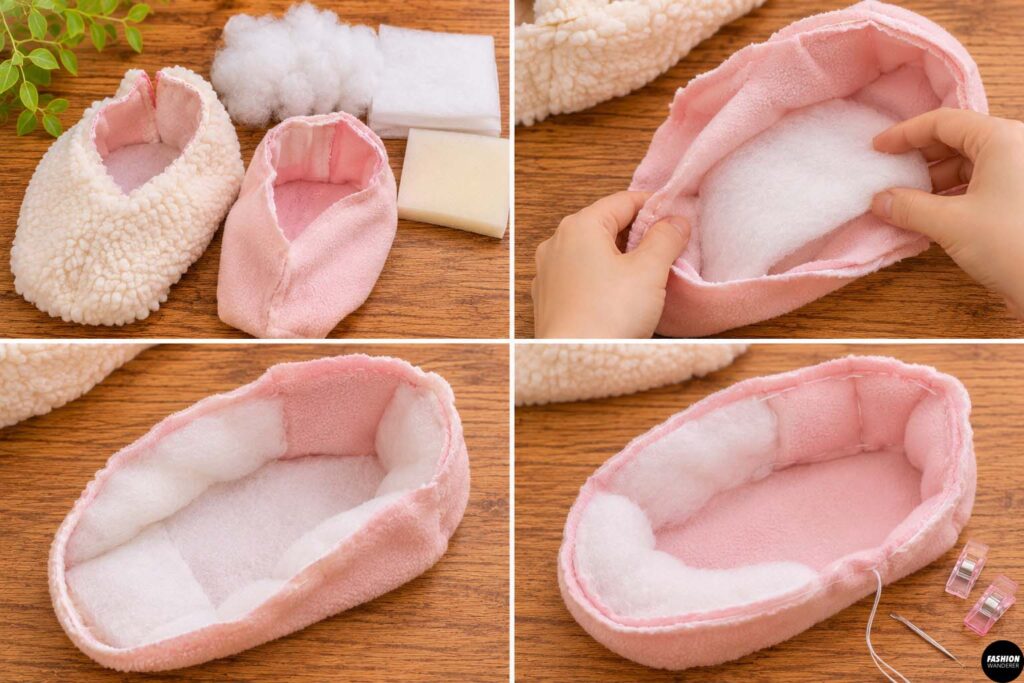
For truly chunky plushie slippers, add a thin layer of polyester fiberfill, batting, or foam between the outer slipper and lining.
Place the padding along the toe, sides, and heel.
Keep the padding away from the seam allowance so the slipper is easier to sew.
Do not overstuff.
You want the slippers to feel squishy and oversized without becoming stiff.
Use a few hand stitches to hold the padding in place if necessary.
Step 8: Sew the Outer Slipper to the Sole
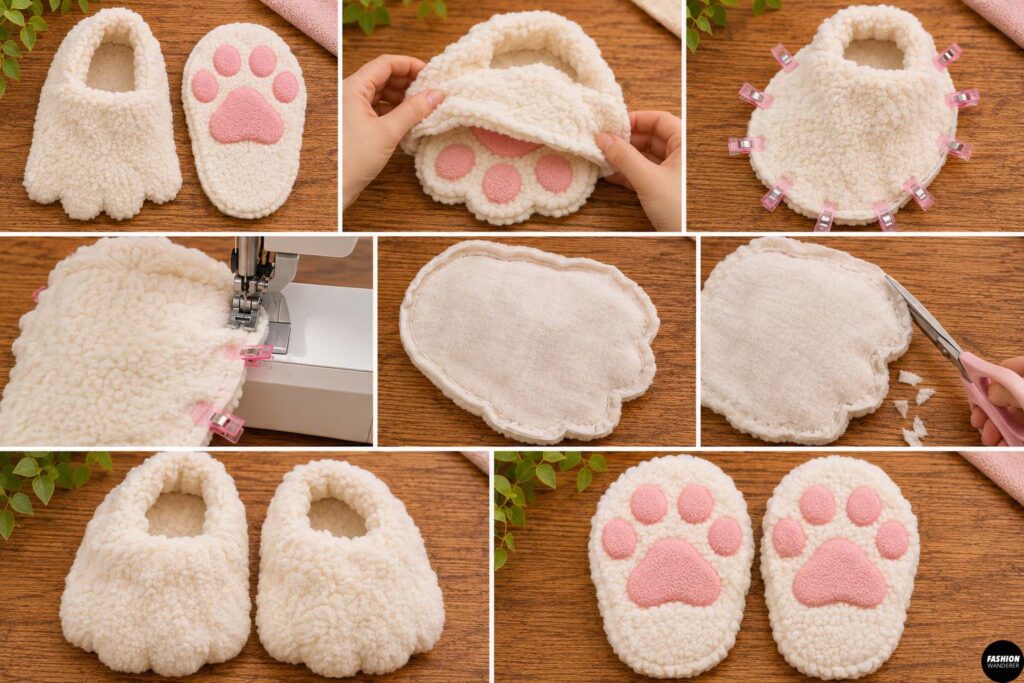
Place the outer slipper upper right sides together with the decorated sole.
Match the toe, heel, and side points first.
Clip around the entire edge.
Sew slowly around the sole using a 3/8-inch seam allowance.
Because the slipper is curved, you may need to stop occasionally with the needle down and reposition the fabric.
Repeat for the second slipper.
Trim bulky seam allowances if necessary.
Step 9: Sew the Lining
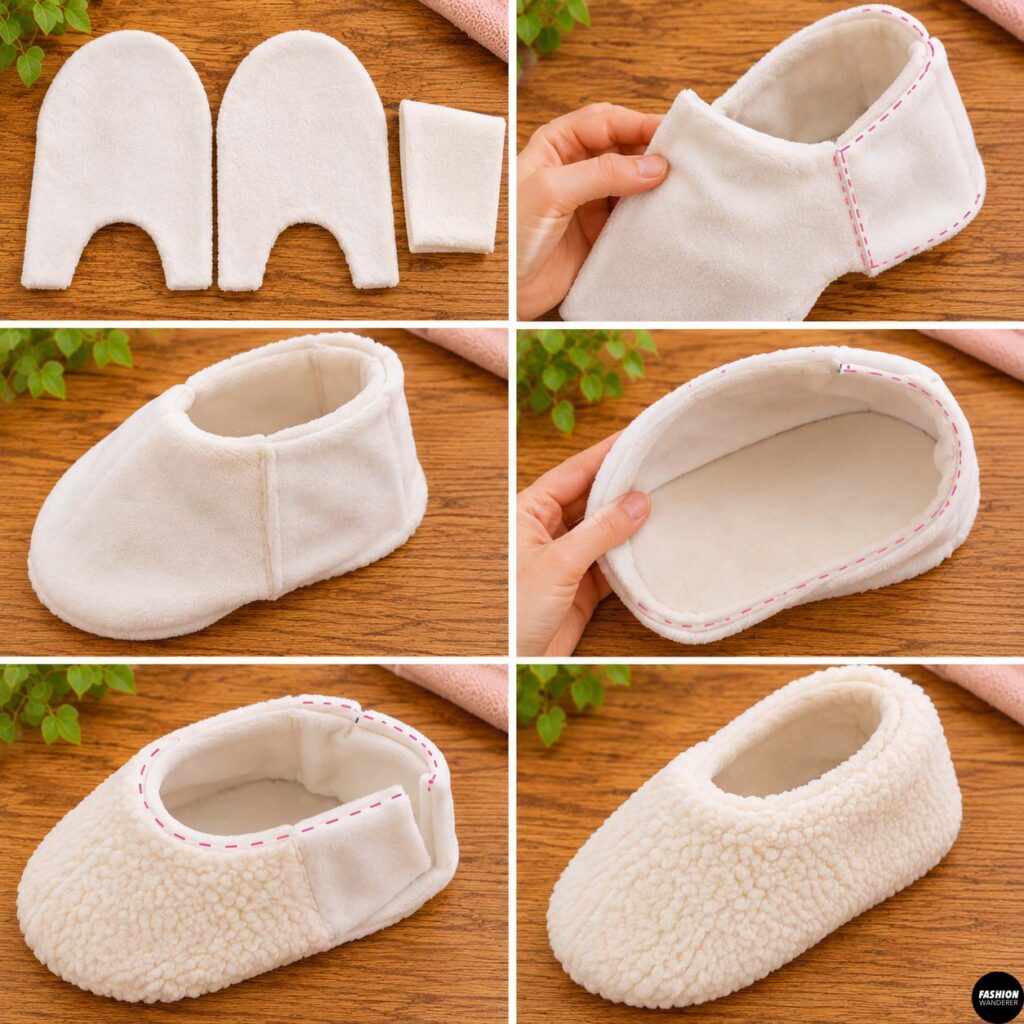
Assemble the lining pieces using the same steps you used for the outer slipper.
Sew the upper lining pieces together.
Attach the heel section.
Then sew the lining sole to the slipper lining.
Leave approximately a 3-inch opening along one side of the lining.
This opening will be used to turn the finished slipper right side out.
Step 10: Join the Outer Slipper and Lining
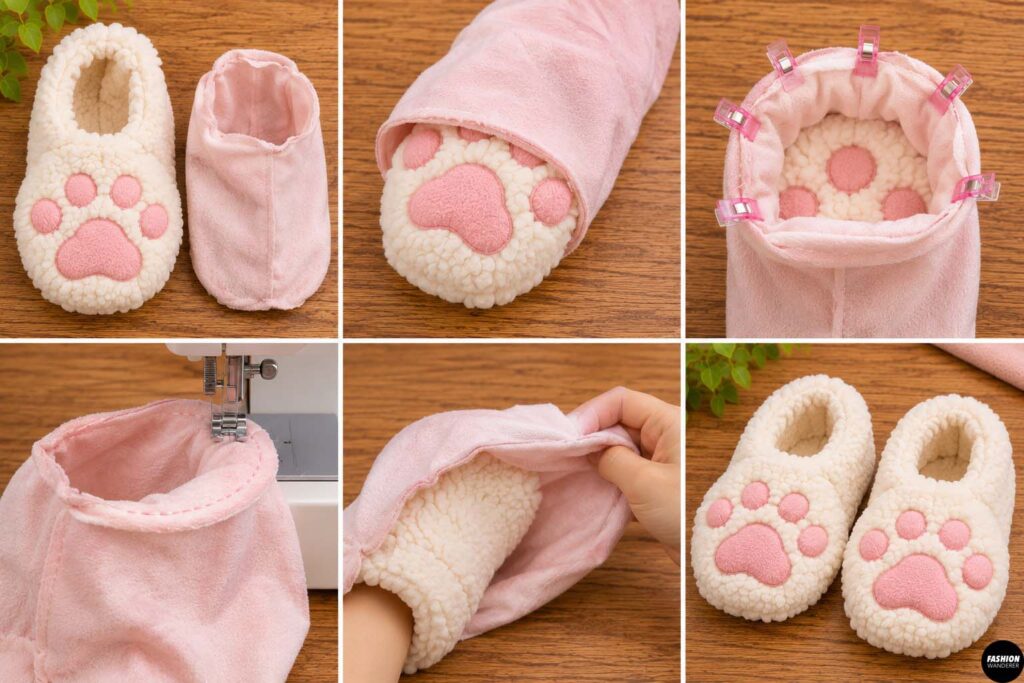
Turn the outer slipper right side out.
Keep the lining wrong side out.
Insert the outer slipper inside the lining so the right sides of the fabrics are facing each other.
Match the opening around the top edge.
Pin or clip evenly.
Sew around the entire opening.
Pull the outer slipper through the opening left in the lining.
Continue pulling until the slipper is completely right side out.
Step 11: Close the Lining
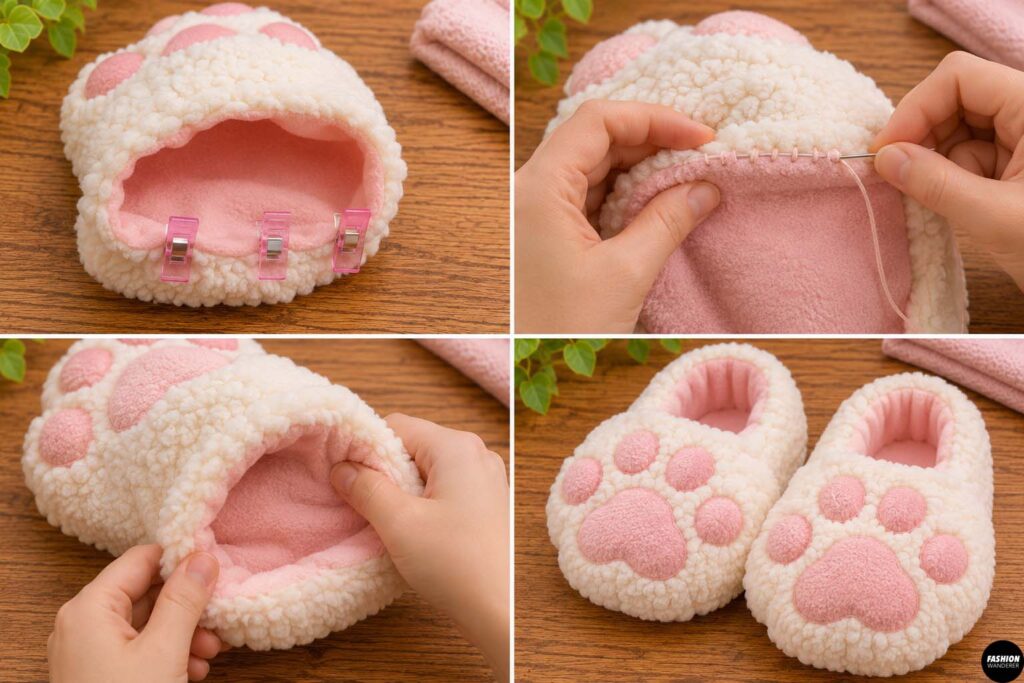
Fold the raw edges of the lining opening toward the inside approximately 3/8 inch.
Hand sew the opening closed using a ladder stitch.
Push the lining neatly inside the slipper.
Use your fingers to shape the toe and heel.
If needed, gently fluff the plush fabric around the seams.
Step 12: Make the Slippers Extra Chunky
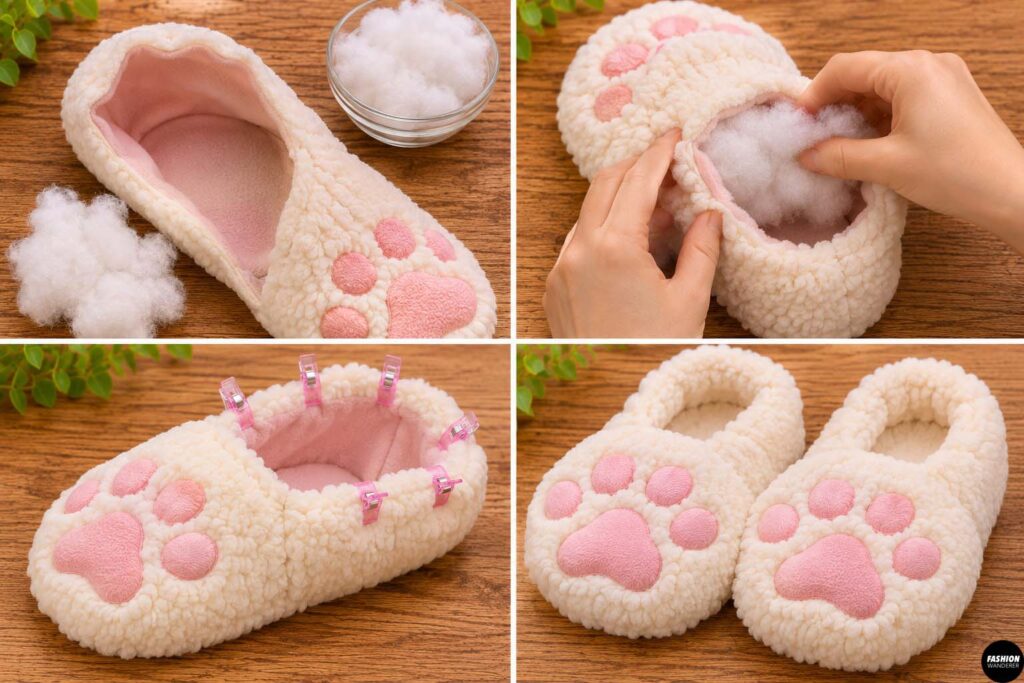
For a fun plushie-inspired shape, add small amounts of polyester fiberfill between the outer slipper and lining.
Concentrate the stuffing around:
- Toe area
- Side walls
- Heel
- Top opening
Avoid adding too much stuffing beneath the foot.
Keeping the sole relatively flat makes the slippers safer and more comfortable to walk in.
Step 13: Add Final Details
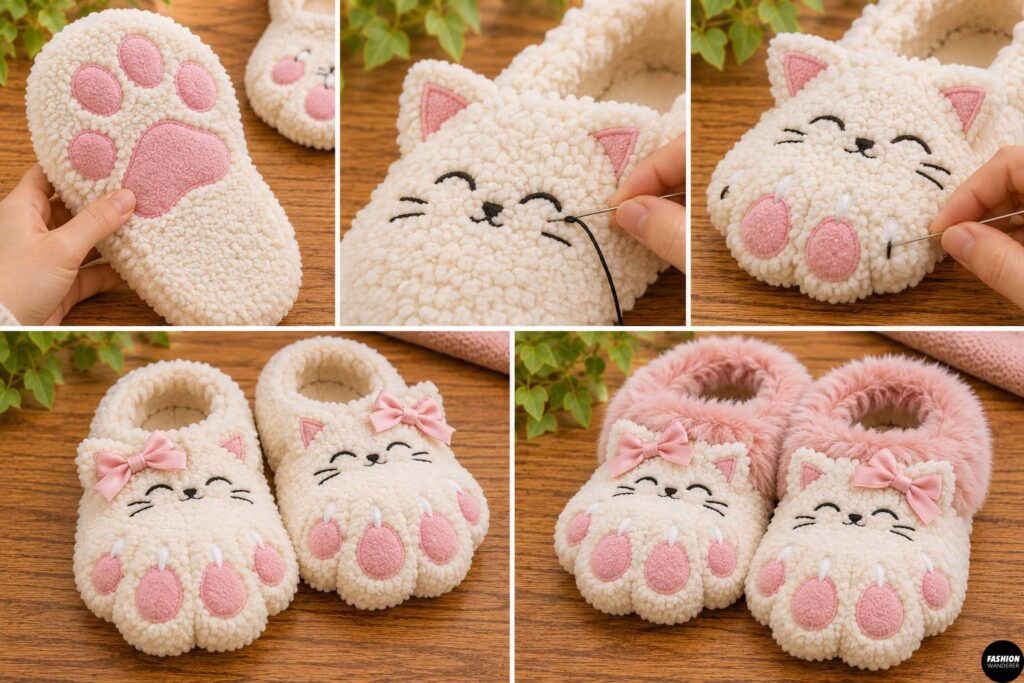
Once both slippers are finished, check that the paw pads are secure.
You can also add extra cute details such as:
- Embroidered claws
- Small fabric ears
- Tiny bows
- Contrast trim
- Faux fur cuffs
- Embroidered cat faces
For a kawaii-style version, add a simple embroidered cat face near the toe.
Tips for Making Plush Slippers
Use sewing clips instead of pins when working with thick fleece or minky.
Reduce your sewing machine speed when attaching the sole.
A walking foot can also help feed bulky layers more evenly.
If the bottom feels slippery, use anti-slip fabric, faux suede, or fabric grip dots on the sole.
For washable slippers, choose polyester fleece and removable or machine-washable padding.
Final Thoughts
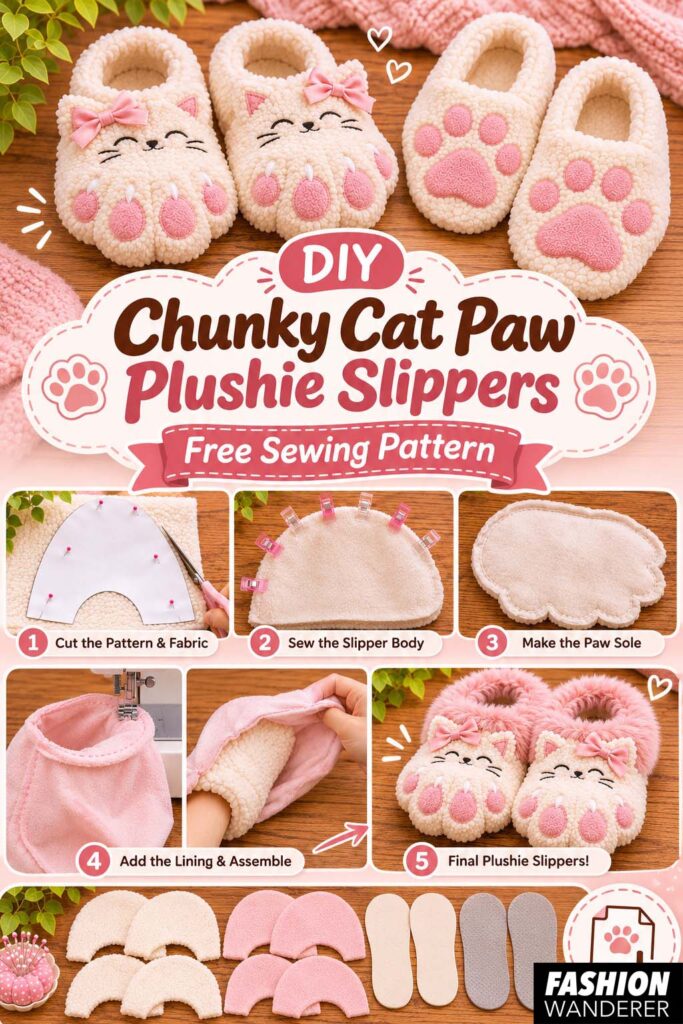
These DIY chunky cat paw plushie slippers are one of those sewing projects that look complicated but are surprisingly manageable once you break the construction into simple steps.
With plush fabric, a few scraps for the paw pads, and a little stuffing, you can transform a basic slipper pattern into an adorable cozy accessory that looks almost like a stuffed animal for your feet.
Make them in classic gray, white, black, cream, pink, or even pastel colors. Once you make one pair, you may want to sew a whole collection for gifts, sleepovers, holiday baskets, or cozy winter weekends.
Save this free cat paw slipper sewing pattern and make a pair whenever you need an easy, cute, and practical sewing project.