
A Quilted Diaper & Wipes Clutch is one of the most practical baby accessories you can sew. Perfect for keeping diapers, wipes, and small essentials organized, this compact clutch slips easily into a diaper bag, stroller basket, or tote. It’s also ideal for quick trips when you don’t want to carry a full diaper bag.
Whether you’re sewing for your own little one or creating a thoughtful handmade baby shower gift, this beginner-friendly project is stylish, functional, and easy to customize. In this tutorial, you’ll learn how to sew a quilted diaper and wipes clutch with step-by-step instructions, quilting tips, and finishing techniques that give it a professional look.
You don’t need years of sewing experience to make a beautiful handmade gift for a baby. These beginner-friendly sewing projects are quick, practical, and perfect for turning soft fabrics and fun prints into thoughtful gifts.
Why You’ll Love This Project
- Beginner-friendly sewing project
- Great baby shower gift
- Holds diapers, wipes, and cream
- Lightweight and portable
- Easy to personalize
- Perfect for using quilting cotton
- Makes beautiful handmade gifts or products to sell
Materials You’ll Need
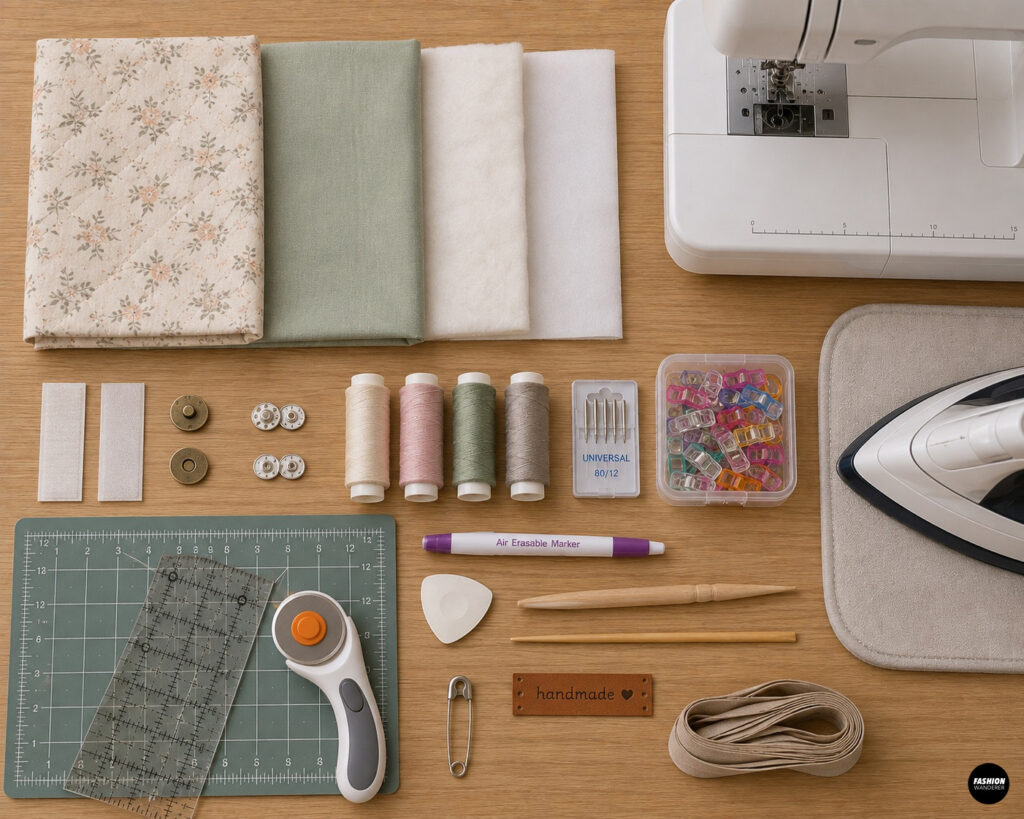
- Exterior quilting cotton (½ yard)
- Lining cotton fabric (½ yard)
- Fusible fleece or quilt batting (½ yard)
- Medium-weight fusible interfacing (optional for extra structure)
- Hook-and-loop tape, magnetic snap, or sew-on snap
- Coordinating polyester thread
- Sewing machine
- Universal needle (80/12)
- Rotary cutter or fabric scissors
- Cutting mat and acrylic ruler
- Iron and ironing board
- Sewing clips or pins
- Fabric marker or tailor’s chalk
- Point turner or chopstick
- Optional: Decorative label or faux leather tag
- Optional: Bias tape for finishing inside seams
Finished Size
Approximately:
- Closed: 10″ × 6½”
- Open: 10″ × 13″
Holds approximately:
- 3–5 diapers
- Travel wipes case
- Small diaper cream
- Disposable changing bags
Cutting Guide
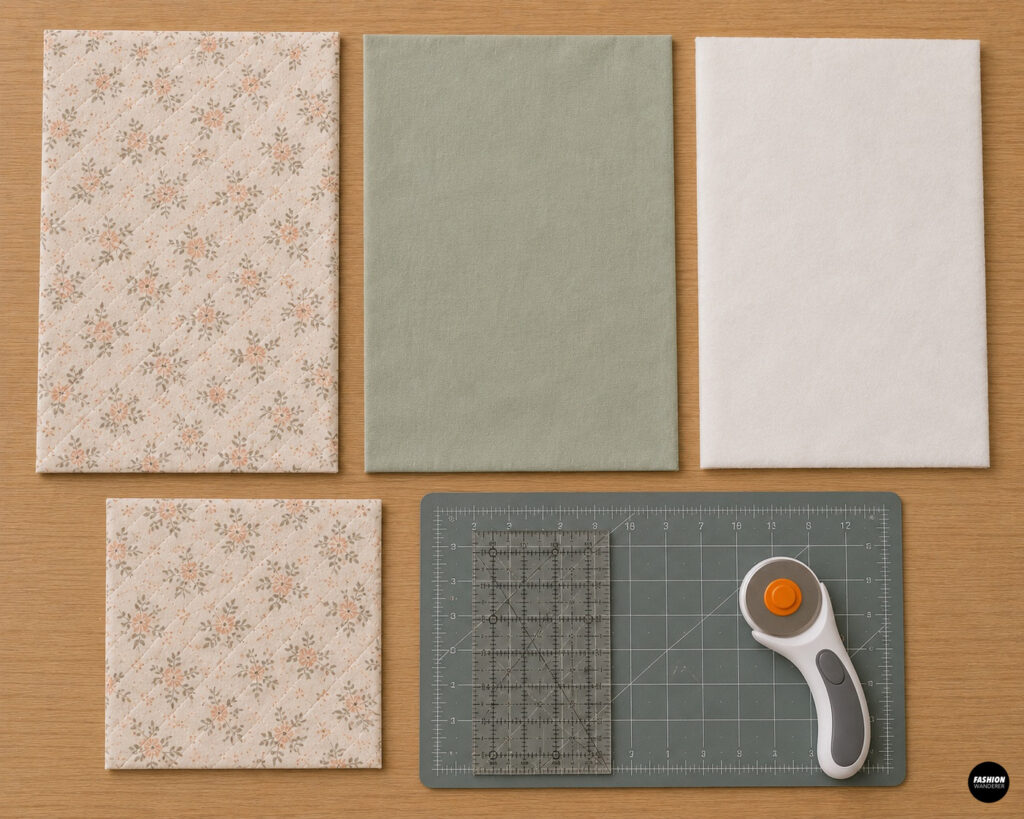
Exterior Fabric
- Main Body – Cut 1 (11″ × 14″)
Lining Fabric
- Main Body – Cut 1 (11″ × 14″)
Fusible Fleece
- Main Body – Cut 1 (11″ × 14″)
Optional Pocket
- Pocket – Cut 1 (8″ × 10″)
DIY Baby Diaper and Wipes Clutch
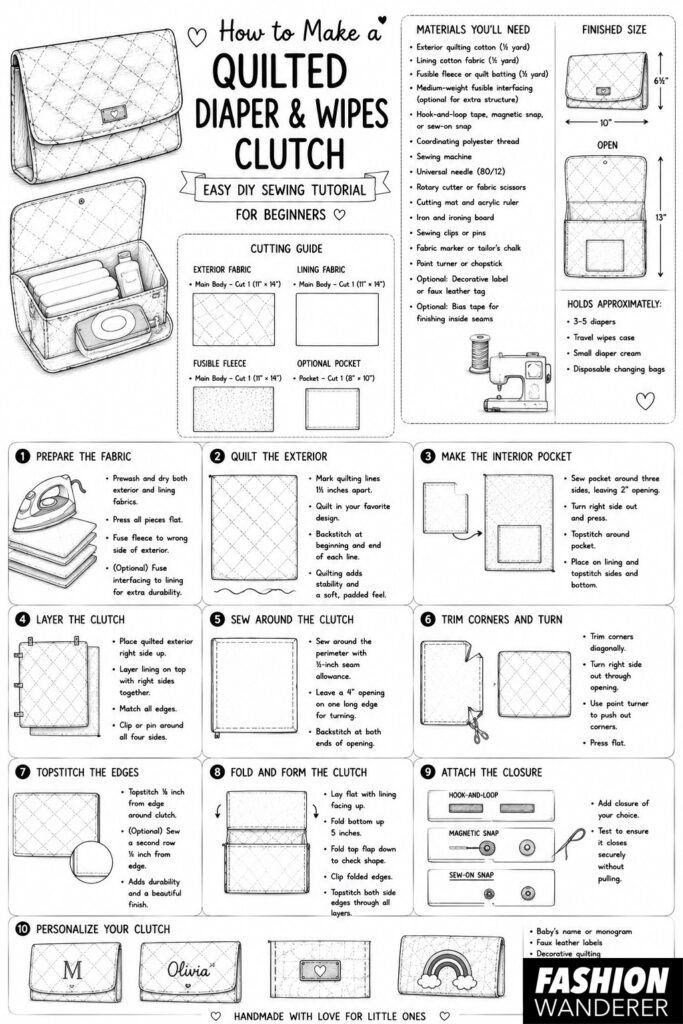
Step 1: Prepare the Fabric
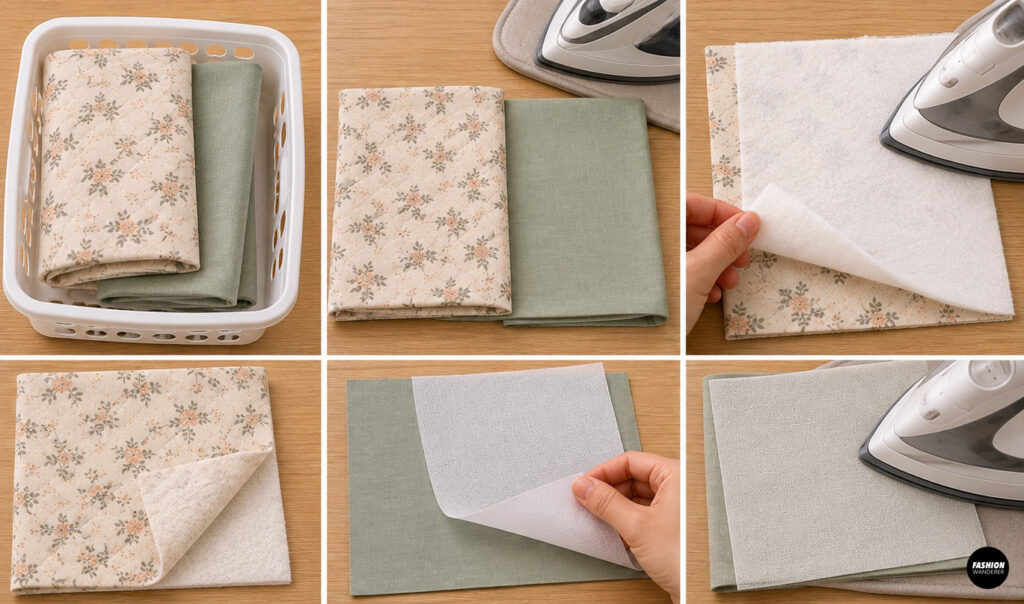
Prewash and dry both exterior and lining fabrics to prevent future shrinkage.
Press all fabric pieces flat.
Fuse the fleece to the wrong side of the exterior fabric following the manufacturer’s instructions.
If using interfacing, fuse it to the lining for extra durability.
Step 2: Quilt the Exterior
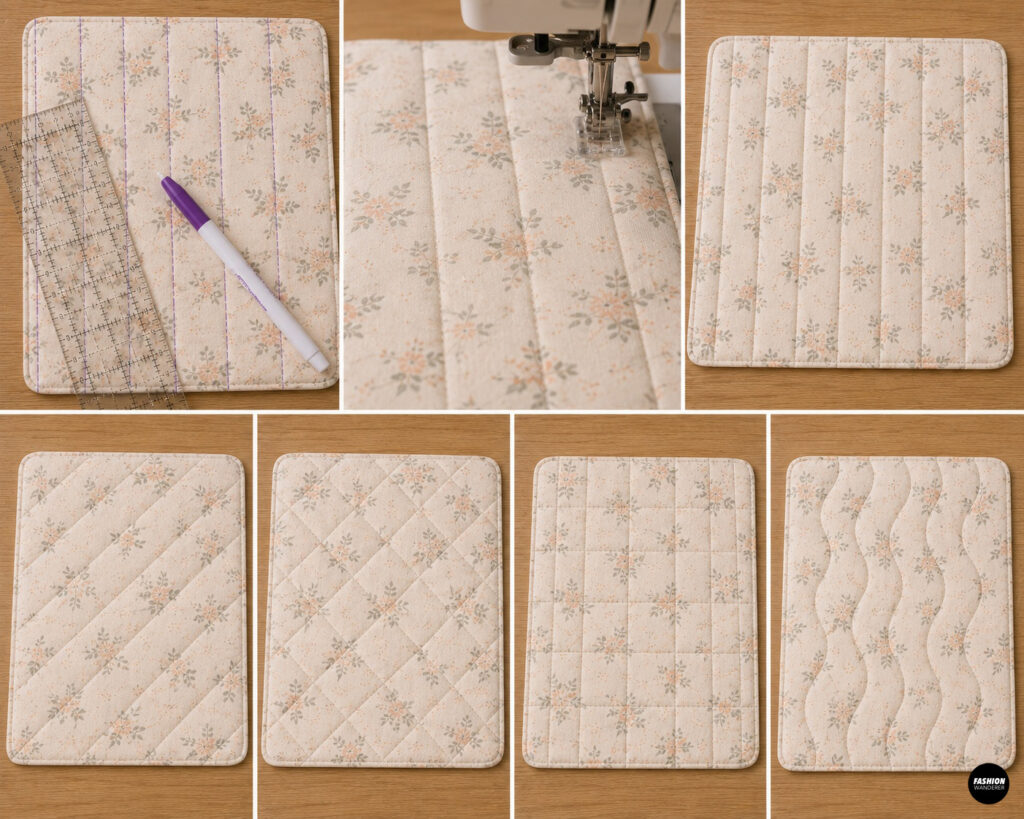
Lay the quilted exterior fabric right side up.
Using a removable fabric marker, draw evenly spaced quilting lines about 1½ inches apart.
You can quilt in several designs, including:
- Straight lines
- Diagonal lines
- Diamond pattern
- Crosshatch
- Wavy lines
Sew along each marked line, backstitching at the beginning and end.
Quilting helps stabilize the fabric while giving the clutch a soft, padded feel.
Step 3: Make the Interior Pocket
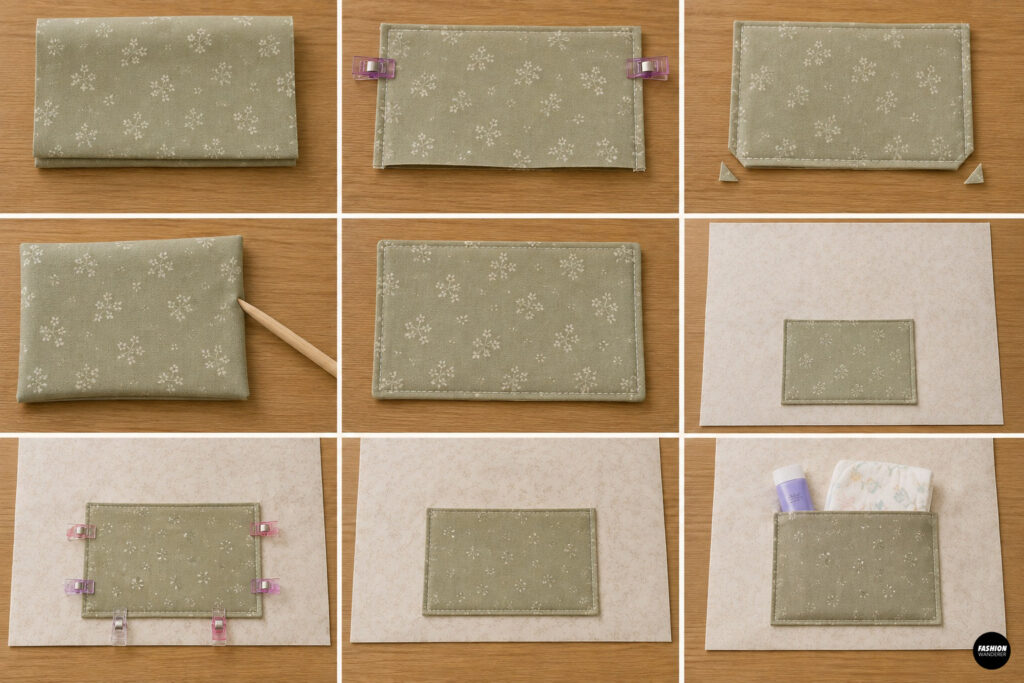
Fold the pocket piece in half with right sides together.
Sew around three sides using a ⅜-inch seam allowance, leaving a 2-inch opening for turning.
Trim the corners to reduce bulk.
Turn the pocket right side out and press it flat.
Topstitch around the entire pocket approximately ⅛ inch from the edge, closing the turning opening.
Place the finished pocket on the right side of the lining fabric, centered near the bottom.
Topstitch the sides and bottom, leaving the top edge open.
This pocket is perfect for holding diaper cream, disposable bags, or a small changing pad.
Step 4: Layer the Clutch
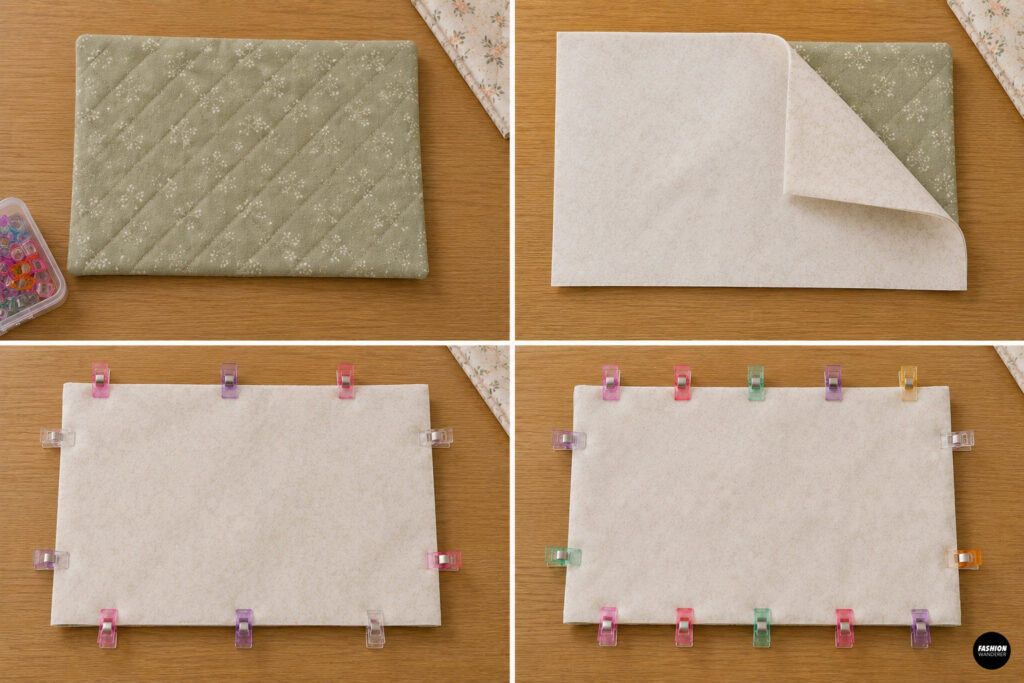
Place the quilted exterior fabric right side up.
Lay the lining fabric on top with right sides together.
Match all edges carefully.
Clip or pin around all four sides.
Step 5: Sew Around the Clutch
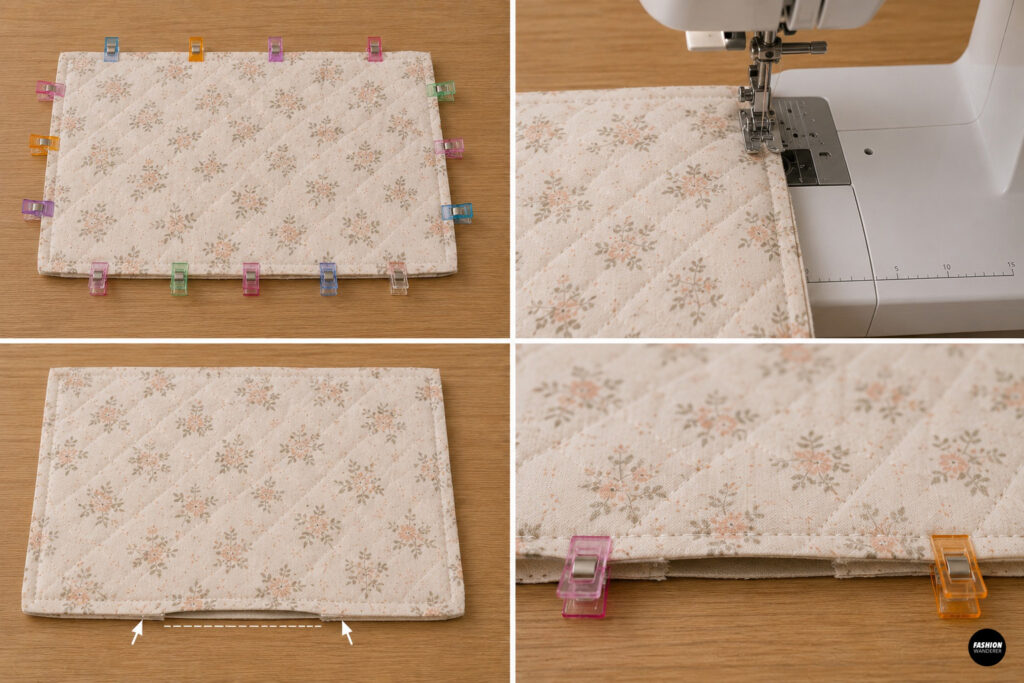
Using a ½-inch seam allowance, sew around the perimeter.
Leave a 4-inch opening along one long edge for turning.
Backstitch at both ends of the opening.
Sew slowly through the quilted layers to keep the stitches even.
Step 6: Trim the Corners and Turn
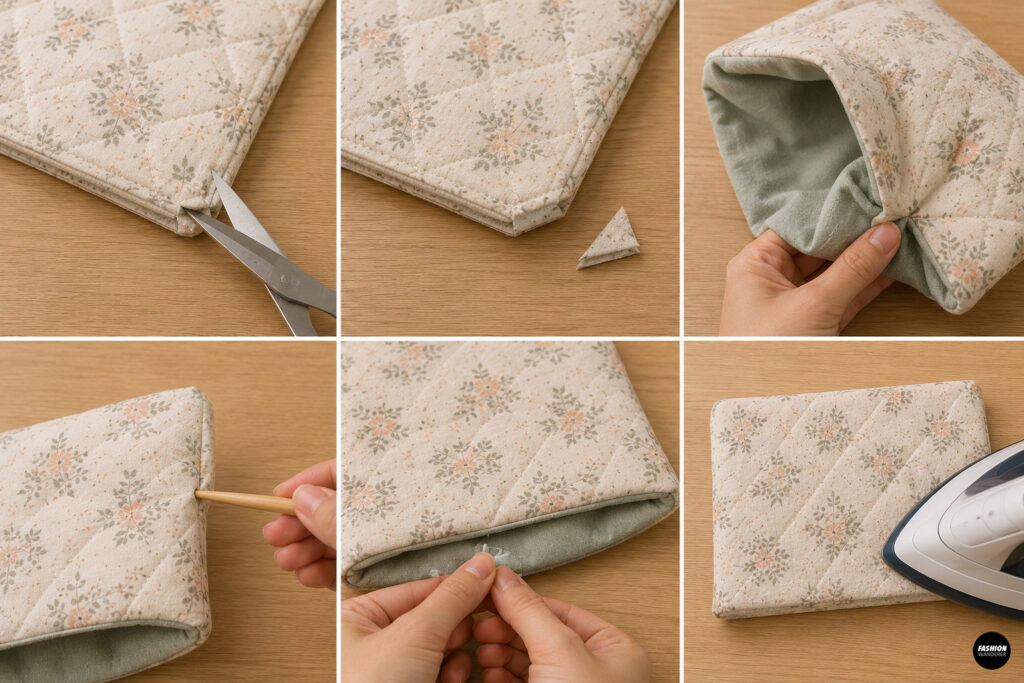
Trim each corner diagonally without cutting through the stitching.
This removes excess bulk and helps create crisp corners.
Turn the clutch right side out through the opening.
Use a point turner or chopstick to gently push out each corner.
Fold the raw edges of the opening inward.
Press the entire clutch until smooth and flat.
Step 7: Topstitch the Edges
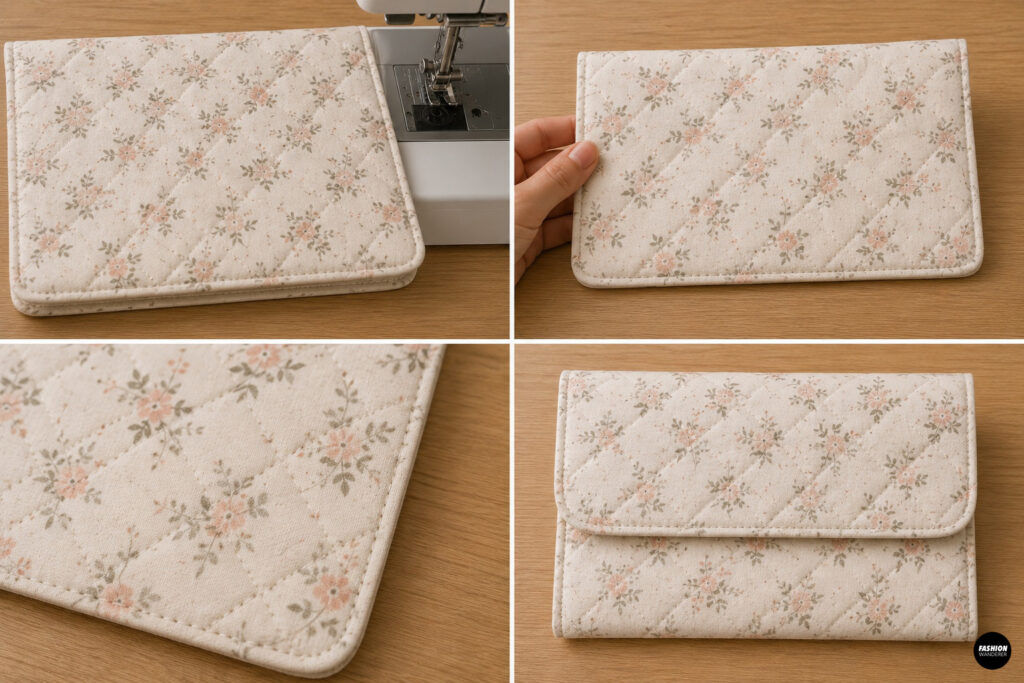
Topstitch around the entire clutch approximately ⅛ inch from the edge.
This closes the turning opening while strengthening the edges.
For a more professional finish, sew a second row of topstitching about ¼ inch from the edge.
The double stitching adds durability and decorative detail.
Step 8: Fold and Form the Clutch
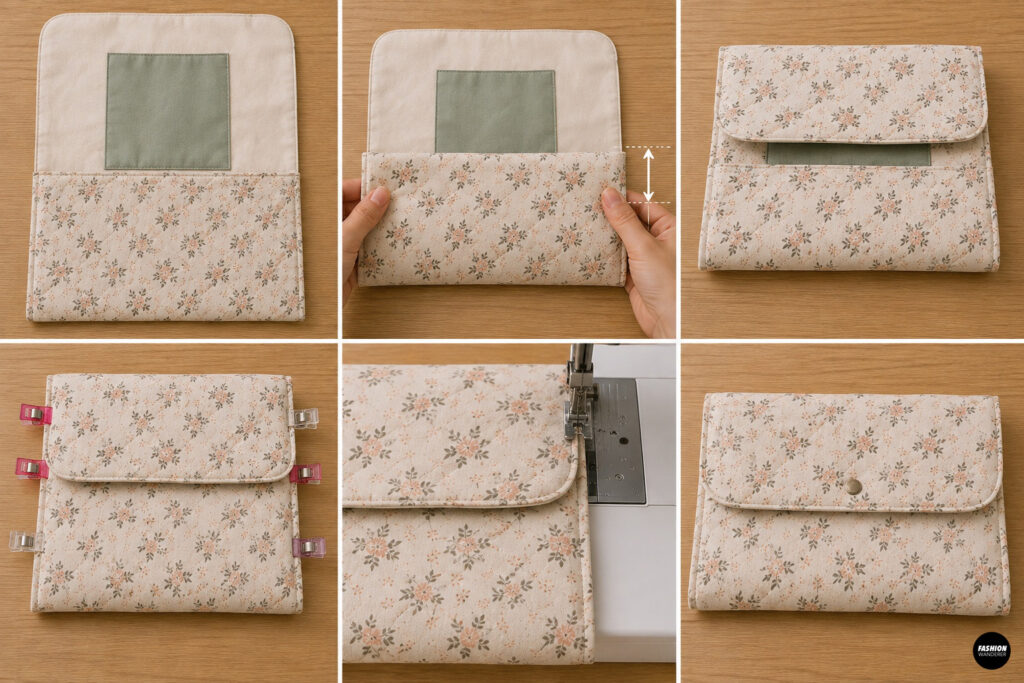
Lay the clutch flat with the lining facing up.
Fold the bottom edge upward approximately 5 inches to create the main storage pocket.
Fold the top flap down to check the finished shape.
Clip the folded edges in place.
Topstitch along both side edges through all layers.
These seams create the main compartment for diapers and wipes.
Step 9: Attach the Closure
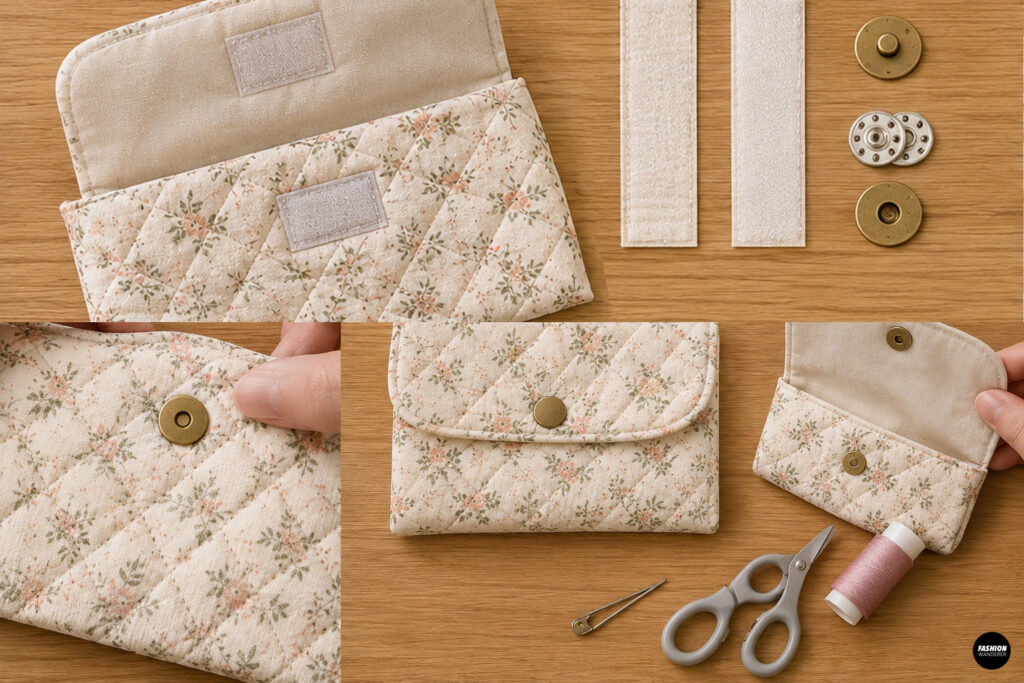
Choose your preferred closure.
Hook-and-Loop Tape
Sew one strip to the front flap and the matching strip to the body of the clutch.
Magnetic Snap
Install the snap before sewing the lining if your hardware requires hidden backing.
Sew-On Snap
Hand sew one half of the snap to the flap and the other half to the front pocket.
Test the closure to ensure the clutch closes securely without pulling.
Step 10: Personalize Your Clutch
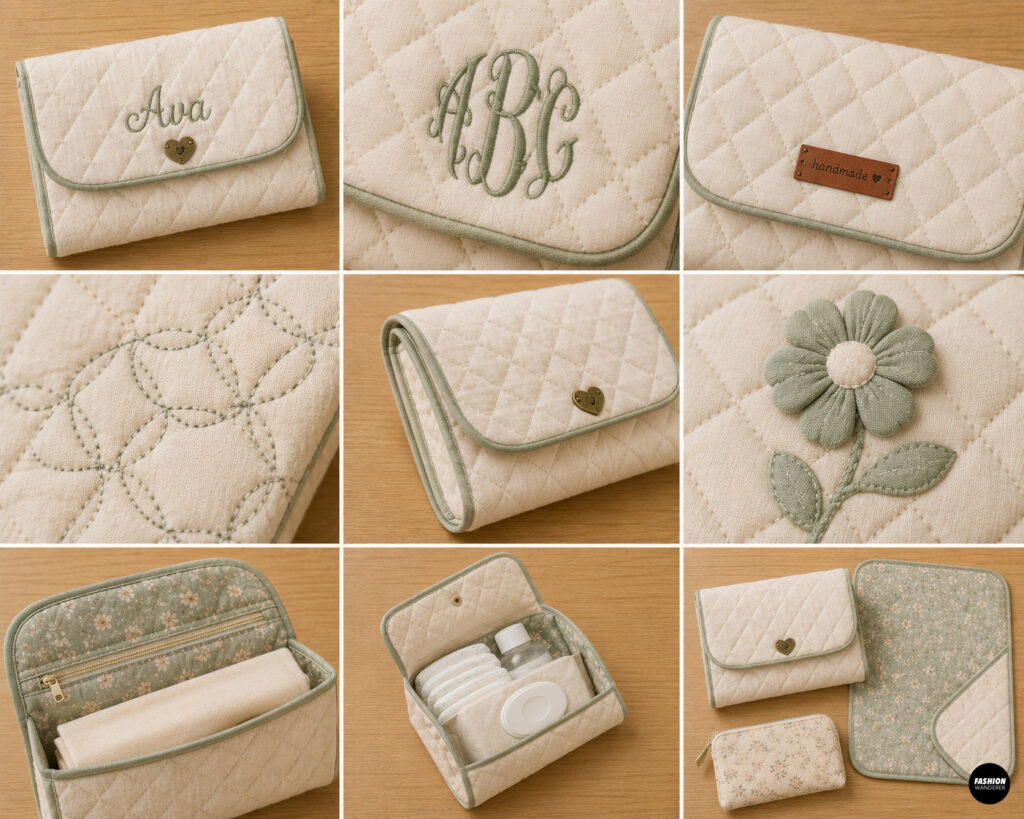
Add your own creative touches to make the clutch unique.
Popular ideas include:
- Baby’s embroidered name
- Monogram
- Faux leather labels
- Decorative quilting patterns
- Colorful piping
- Contrast topstitching
- Fabric appliqués
- Handmade woven labels
- Matching zipper pouch
- Coordinating changing pad
These details transform a simple clutch into a treasured keepsake.
Tips for Success
- Quilt before assembling the clutch.
- Use clips instead of pins on thick layers.
- Press after every sewing step.
- Trim corners for crisp edges.
- Choose high-quality hook-and-loop tape for durability.
- Test magnetic snaps before final installation.
- Sew slowly through quilted sections.
Best Fabric Choices
For the Exterior
- Quilting cotton
- Canvas
- Cotton linen blends
- Lightweight denim
For the Lining
- Quilting cotton
- Waterproof PUL (optional)
- Cotton poplin
- Cotton twill
For Padding
- Fusible fleece
- Cotton batting
- Foam stabilizer for a more structured clutch
Care Instructions
Machine wash on a gentle cycle using cold water.
Reshape while damp and lay flat to dry.
If using fusible fleece, avoid high heat in the dryer.
Press with a warm iron as needed.
The quilted construction helps the clutch maintain its shape through repeated washing.
Frequently Asked Questions
How many diapers fit inside?
Most finished clutches comfortably hold 3 to 5 diapers, a travel-size wipes pack, and a small tube of diaper cream.
Is this a beginner-friendly sewing project?
Yes! If you’re comfortable sewing straight seams and topstitching, this project is suitable for beginners. The quilting step is simple and a great way to practice sewing evenly spaced lines.
Can I sell handmade diaper clutches?
Absolutely! Quilted diaper and wipes clutches are popular at craft fairs, baby boutiques, and Etsy shops. Offering personalized embroidery, modern fabric collections, or matching accessories can help your handmade products stand out.
Final Thoughts
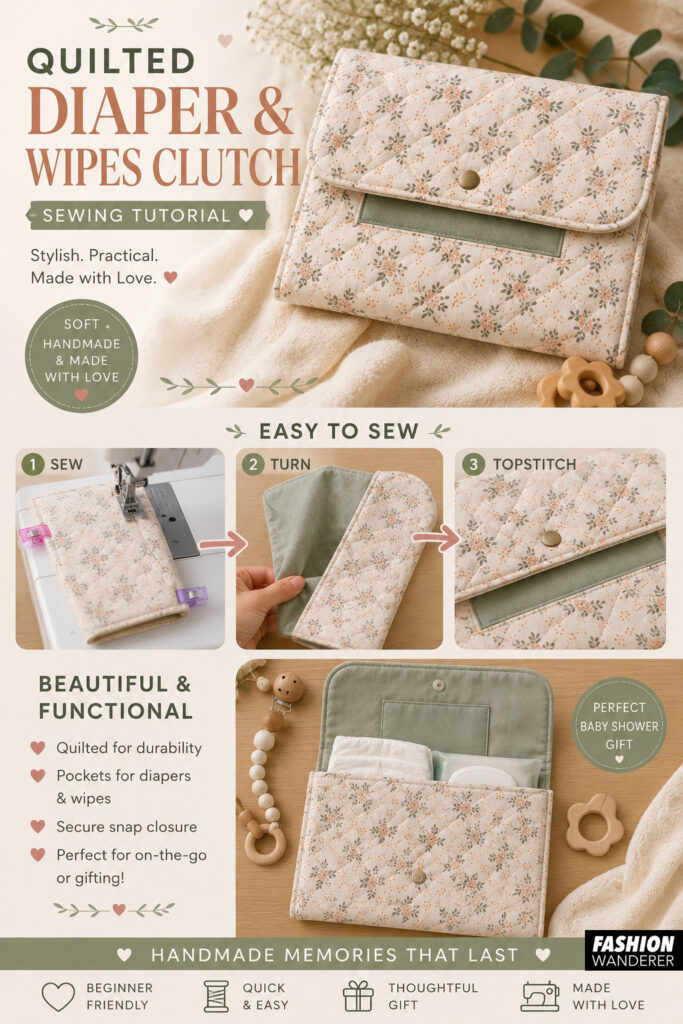
Learning how to make a quilted diaper and wipes clutch is a rewarding sewing project that combines style, organization, and practicality. With a few pieces of quilting cotton, soft batting, and basic sewing supplies, you can create a compact organizer that’s perfect for everyday outings with baby.
Whether you’re sewing a thoughtful baby shower gift, adding a useful accessory to your diaper bag, or creating handmade products for your business, this beginner-friendly project is quick to make, easy to customize, and designed to be used and appreciated for years to come.