
Looking for a cute crochet bottle carrier project that is practical, giftable, and perfect for using colorful yarn scraps? This DIY Floral + Daisy Bottle Bag is an easy crochet accessory designed to carry a reusable water bottle while adding a cheerful handmade touch to your everyday outfit.
This crochet bottle holder features a sturdy round base, a simple textured body, decorative daisy flowers, and a comfortable shoulder strap. It is ideal for walks, festivals, farmers markets, travel days, school, or casual errands when you want to keep your hands free.
The pattern is beginner-friendly and uses basic crochet stitches, making it a great project if you already know how to chain, single crochet, double crochet, and work in the round.
Finished Size
The finished crochet bottle bag is approximately:
- 4 to 4½ inches wide
- 8 to 10 inches tall
- 38 to 48-inch shoulder strap
The exact size will depend on your yarn, hook, tension, and water bottle.
This pattern fits most standard 20- to 32-ounce reusable bottles.
Materials You Will Need
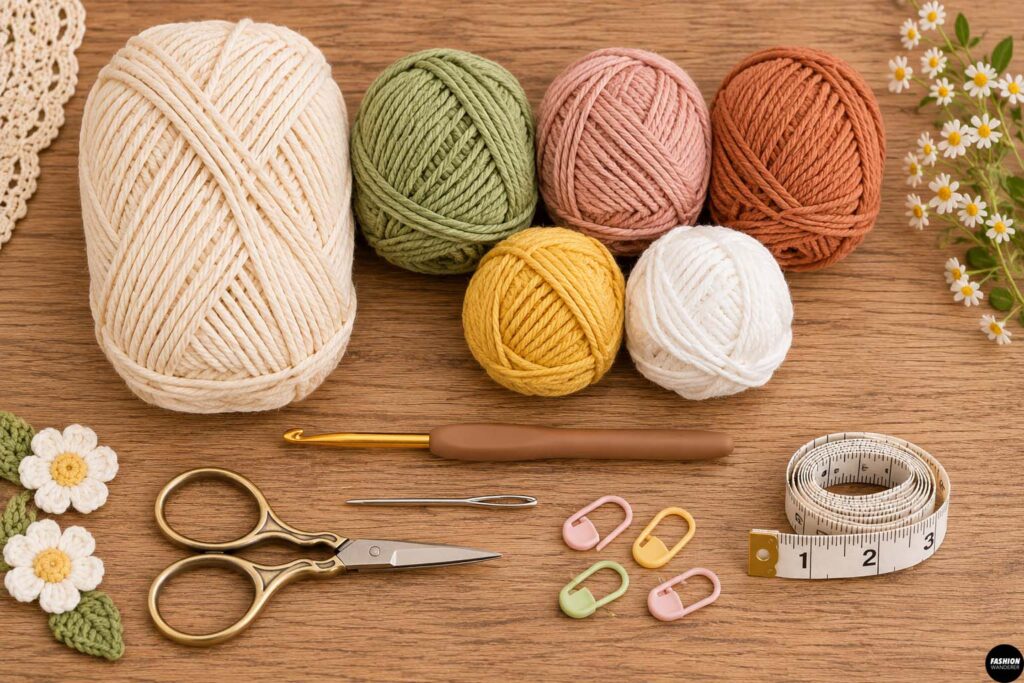
- 150–200 yards medium-weight cotton yarn
- Small amounts of yellow, white, pink, orange, or green yarn for flowers
- 4 mm or 4.5 mm crochet hook
- Yarn needle
- Scissors
- Stitch marker
- Measuring tape
Cotton yarn works especially well because it is durable, washable, and does not stretch as much as softer acrylic yarn.
For a boho look, use cream, beige, sage, terracotta, or dusty pink for the bottle bag base.
Crochet Stitches Used
You will mainly use:
- Chain stitch — ch
- Slip stitch — sl st
- Single crochet — sc
- Half double crochet — hdc
- Double crochet — dc
- Magic ring
You can easily substitute similar stitches if you prefer a different texture.
Crochet Flower Bottle Bag Pattern
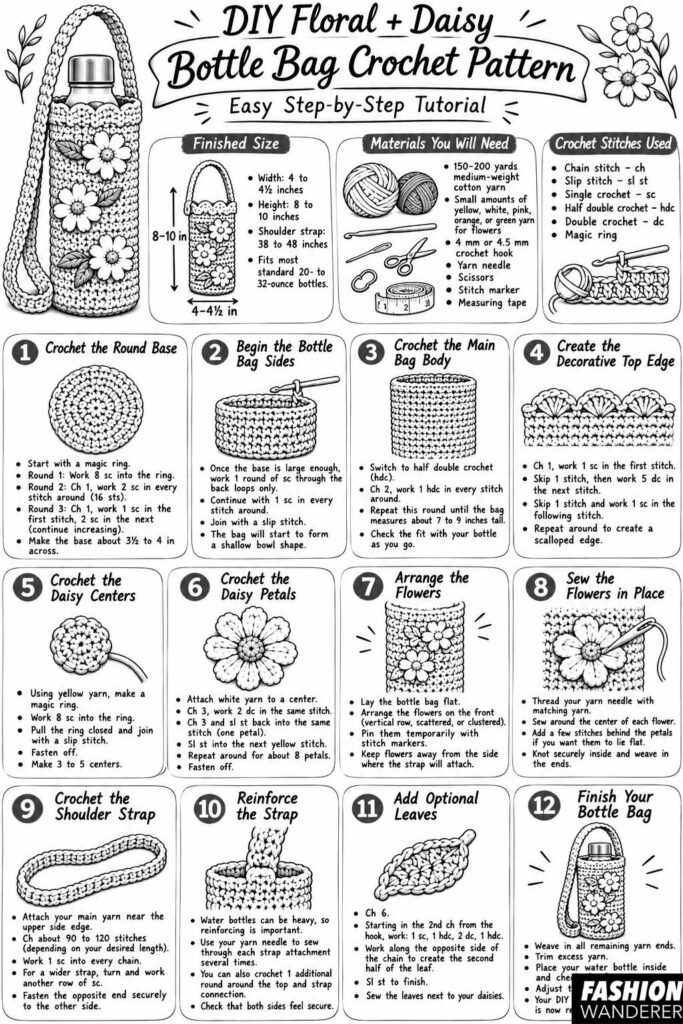
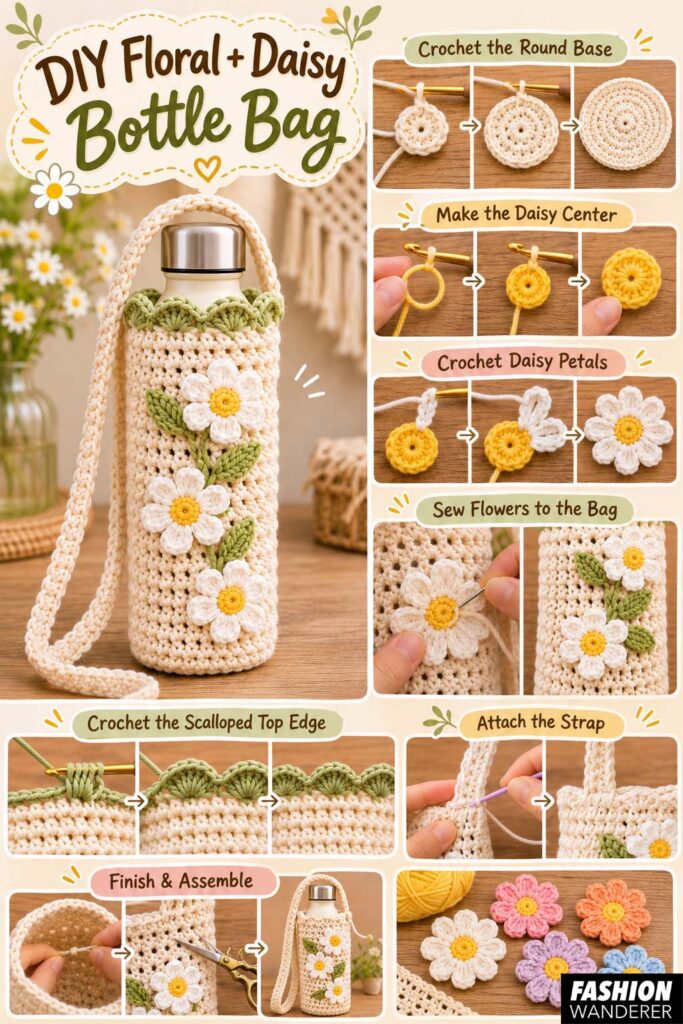
Step 1: Crochet the Round Base
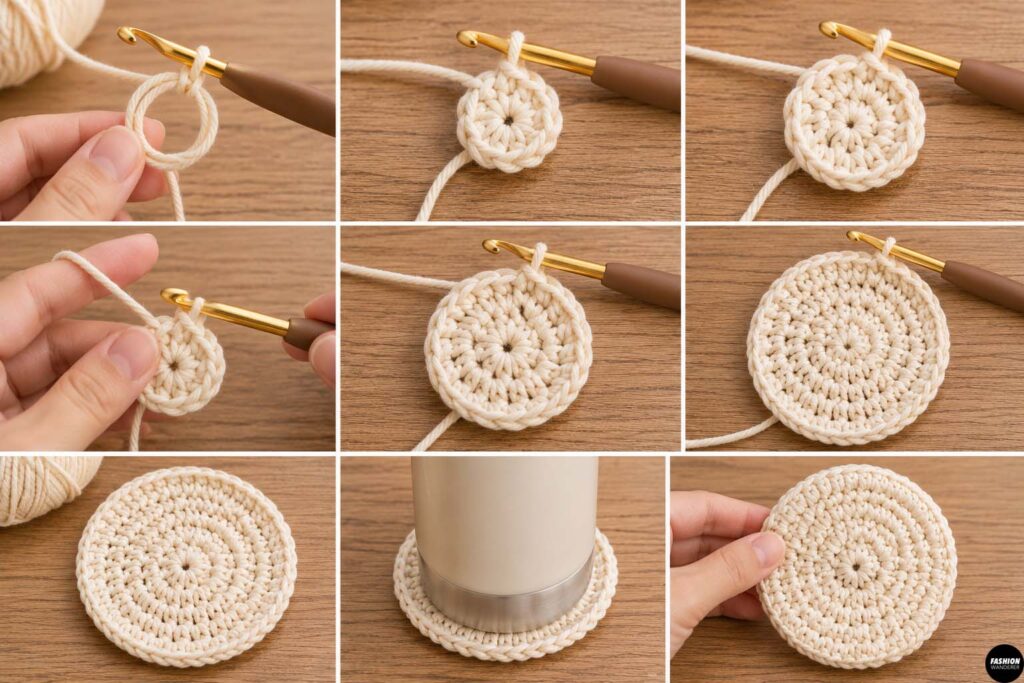
Start with a magic ring.
Round 1: Work 8 single crochet stitches into the magic ring.
Pull the center closed and join with a slip stitch.
Round 2: Chain 1. Work 2 single crochet stitches into every stitch around.
You should now have 16 stitches.
Round 3: Chain 1. Work 1 single crochet into the first stitch, then 2 single crochet into the next stitch.
Repeat around.
Continue increasing evenly until your circle measures approximately 3½ to 4 inches across.
Place your water bottle on top of the circle to check the size.
The crochet base should be slightly wider than the bottom of the bottle.
Step 2: Begin the Bottle Bag Sides
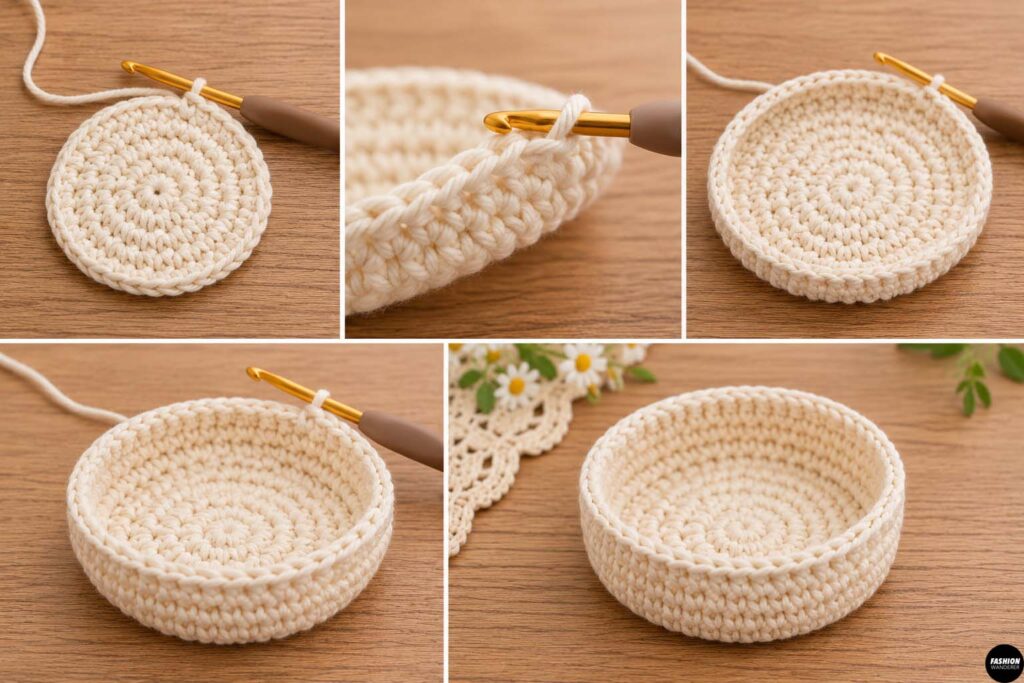
Once your base is large enough, stop increasing.
Work one round of single crochet through the back loops only.
This creates a subtle ridge where the bottom transitions into the sides.
Continue crocheting one single crochet into every stitch around.
Join with a slip stitch.
Your crochet should now start forming a shallow bowl shape.
Step 3: Crochet the Main Bottle Bag Body
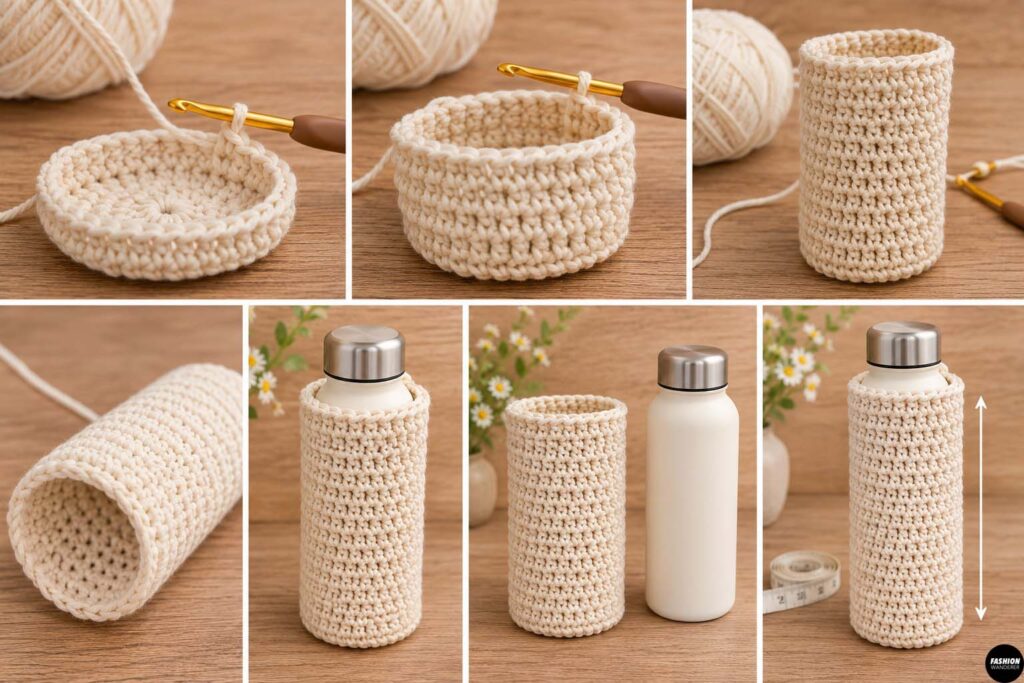
Switch to half double crochet for a slightly softer, faster-growing texture.
Chain 2.
Work one half double crochet into every stitch around.
Join with a slip stitch.
Repeat this round until the bag measures approximately 7 to 9 inches tall.
Periodically place your bottle inside the bag to check the fit.
The bag should be snug enough to hold the bottle securely but loose enough that the bottle can easily slide in and out.
If your bottle is especially tall, simply add more rounds.
Step 4: Create the Decorative Top Edge
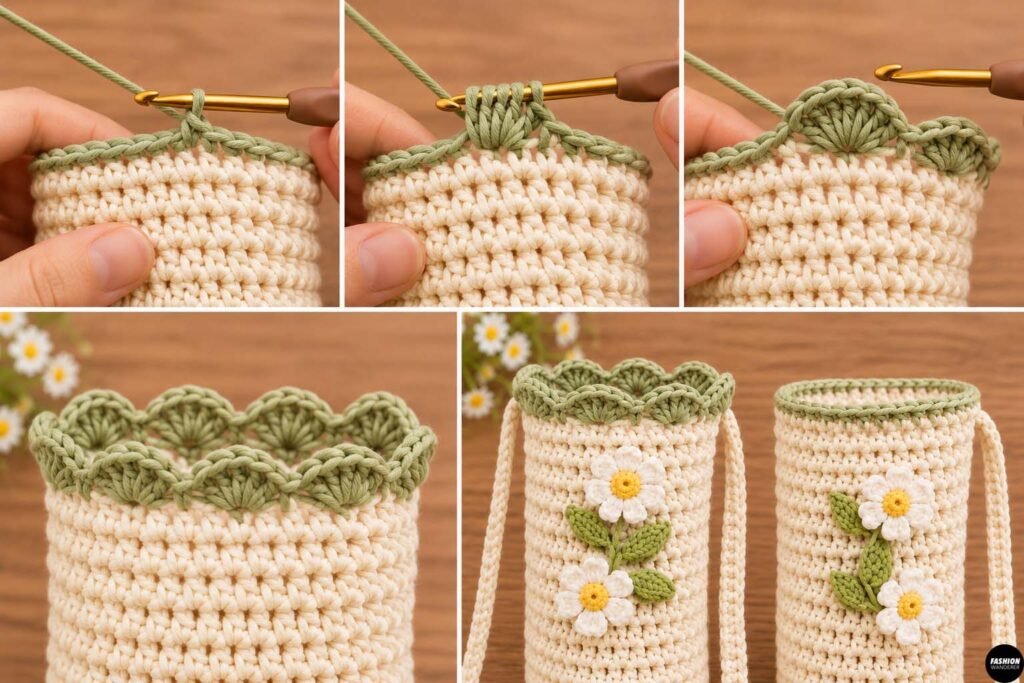
Once the bag reaches the desired height, add a simple decorative border.
Chain 1.
Work one single crochet into the first stitch.
Skip one stitch, then work five double crochet stitches into the next stitch.
Skip one stitch and work one single crochet into the following stitch.
Repeat around.
This creates a soft scalloped edge.
For a simpler minimalist version, finish with one round of single crochet instead.
Fasten off and weave in the yarn tail.
Step 5: Crochet the Daisy Centers
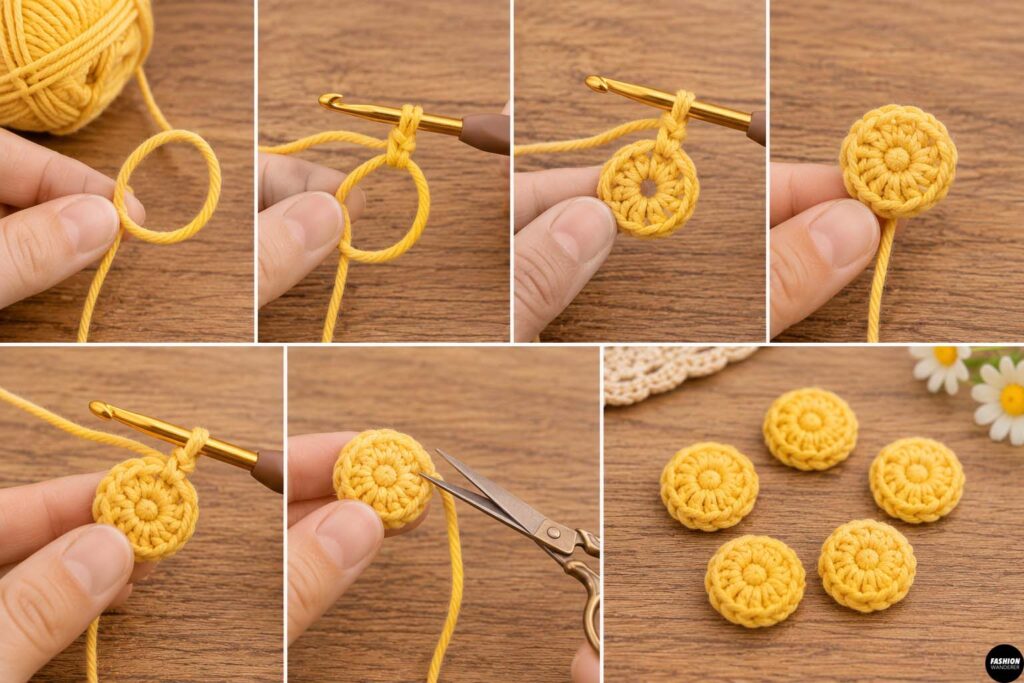
Now it is time for the fun part: the flowers.
Using yellow yarn, make a magic ring.
Work 8 single crochet stitches into the ring.
Pull the ring closed.
Join with a slip stitch.
Fasten off.
Make three to five yellow centers depending on how many flowers you want to decorate your bag with.
Step 6: Crochet the Daisy Petals
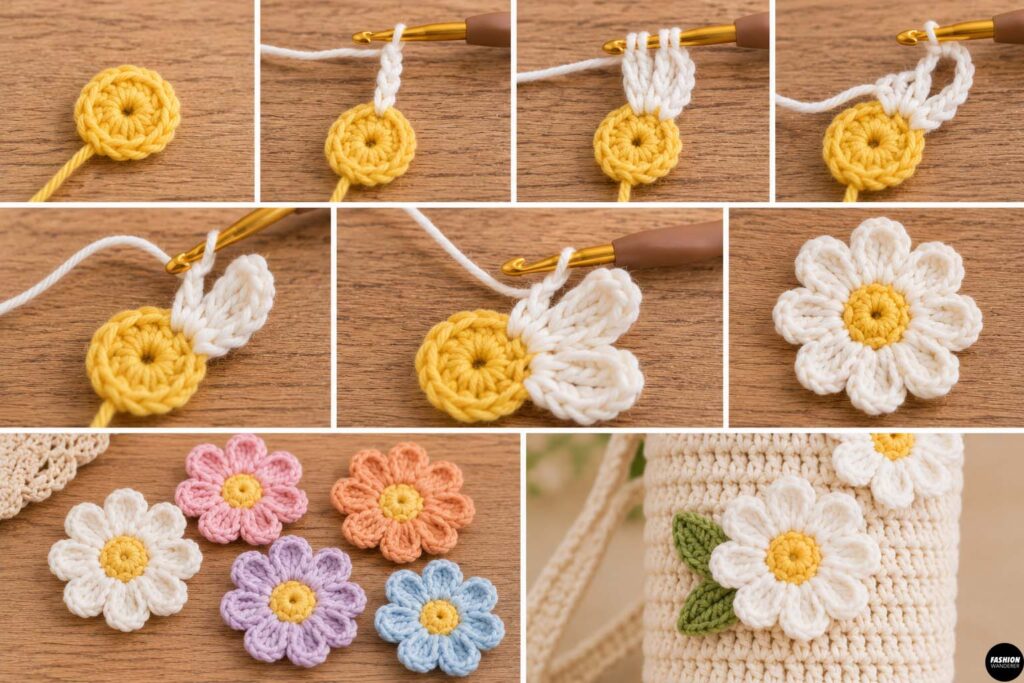
Attach white yarn to one yellow center.
Chain 3.
Work 2 double crochet stitches into the same stitch.
Chain 3 and slip stitch back into the same stitch.
This creates one petal.
Slip stitch into the next yellow stitch.
Repeat the petal sequence around the entire flower.
You should have approximately eight petals.
Fasten off and weave in the yarn tails.
Repeat for the remaining daisies.
You can also create colorful flowers using pink, coral, lavender, orange, or blue yarn.
Step 7: Arrange the Flowers on the Bottle Bag
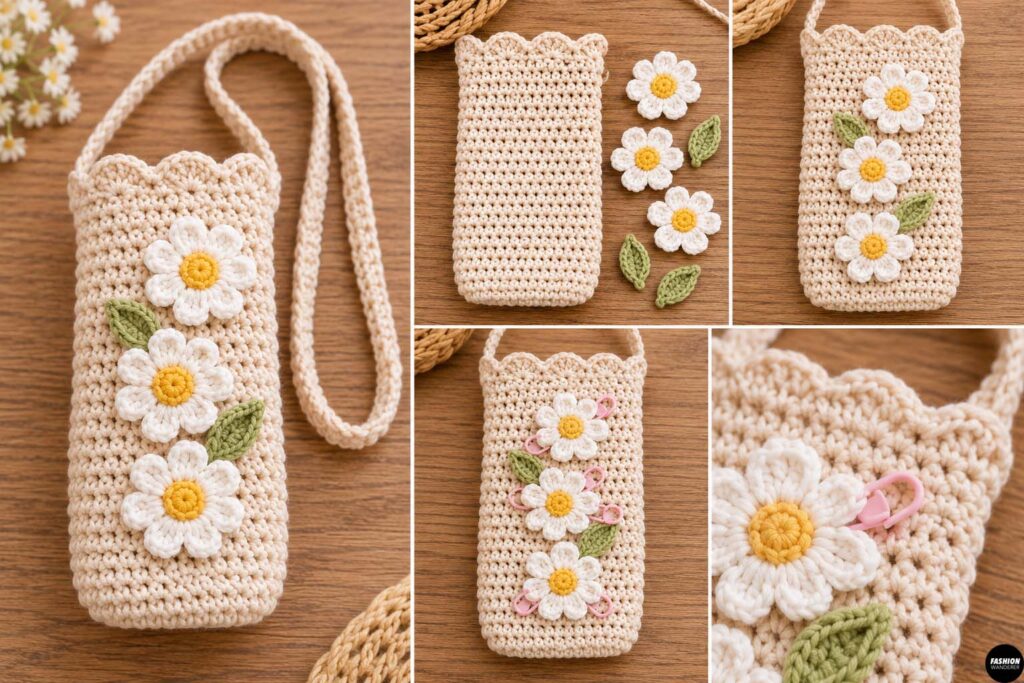
Lay the bottle bag flat.
Arrange the crochet flowers across the front.
You can create a vertical row of daisies, scatter them randomly, or cluster three flowers near the lower corner.
Once you are happy with the placement, pin the flowers temporarily with stitch markers.
Try to keep the flowers away from the side area where the strap will be attached.
Step 8: Sew the Flowers in Place
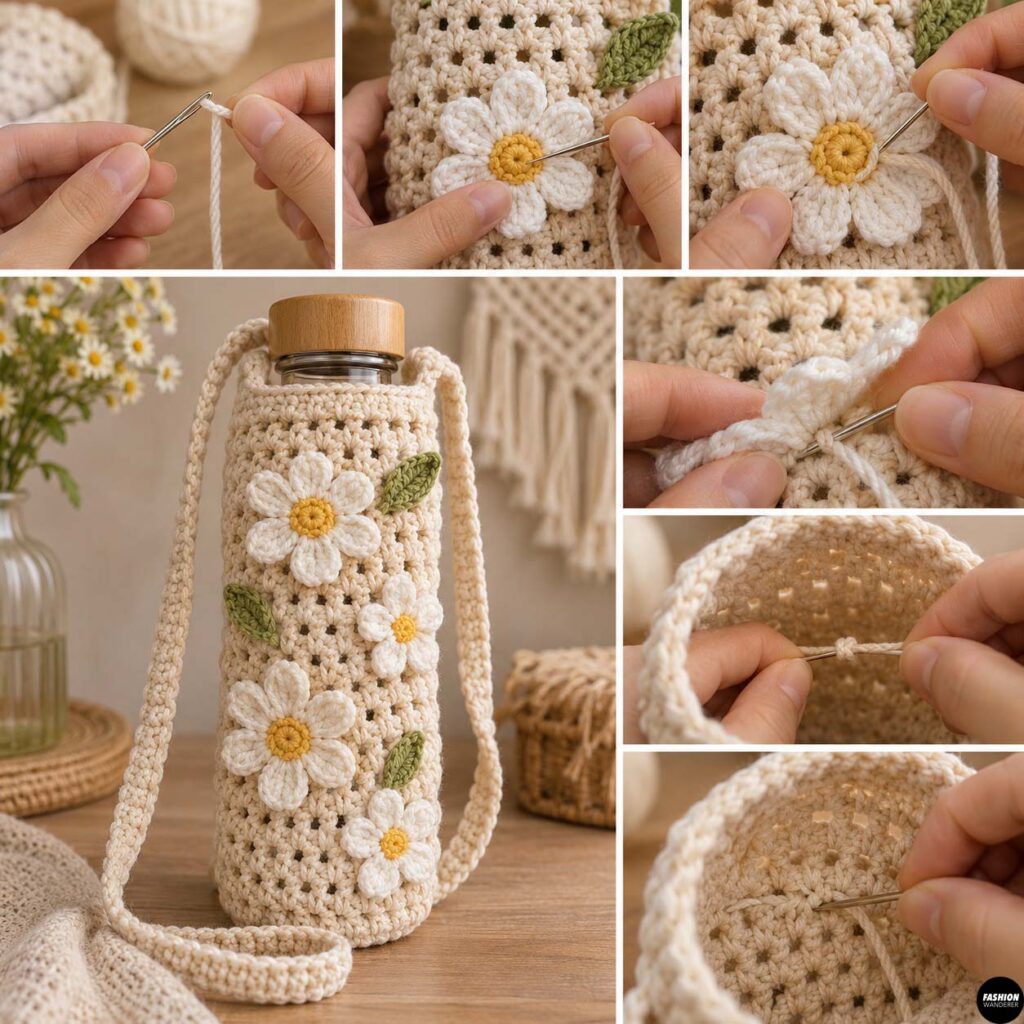
Thread your yarn needle with matching yarn.
Sew around the center of each flower.
Add a few small stitches behind the petals if you want them to lie completely flat.
If you prefer a slightly dimensional look, leave the outer petals loose.
Knot the yarn securely inside the bottle bag and weave in the ends.
Repeat until every flower is attached.
Step 9: Crochet the Shoulder Strap
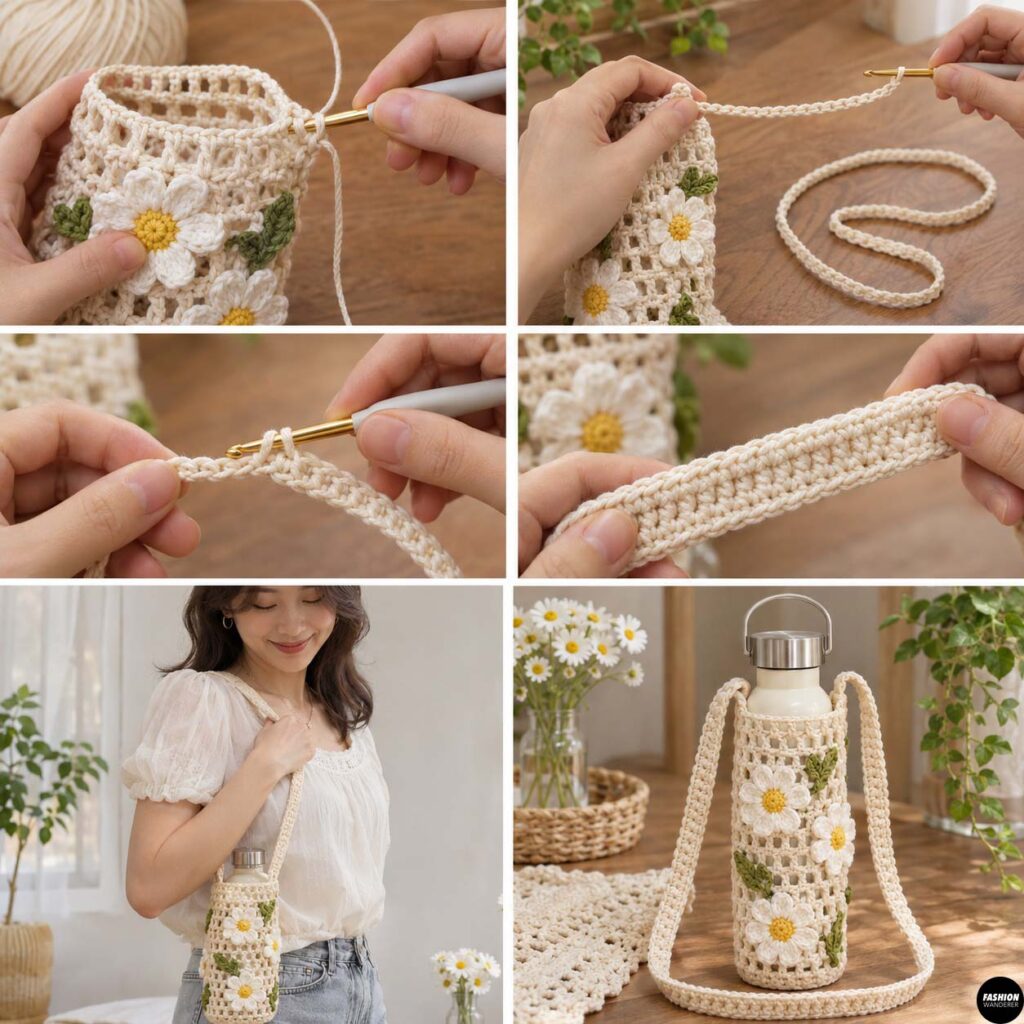
Attach your main bag yarn near the upper side edge.
Chain approximately 90 to 120 stitches.
The exact length depends on whether you want a short shoulder strap or a longer crossbody bottle bag.
Before continuing, hold the strap against your body to check the length.
Once you are satisfied, work one single crochet into every chain.
For a wider strap, turn and work another row of single crochet.
A two- or three-row strap will feel more comfortable when carrying a heavier bottle.
Fasten the opposite end securely to the other side of the bag.
Step 10: Reinforce the Strap
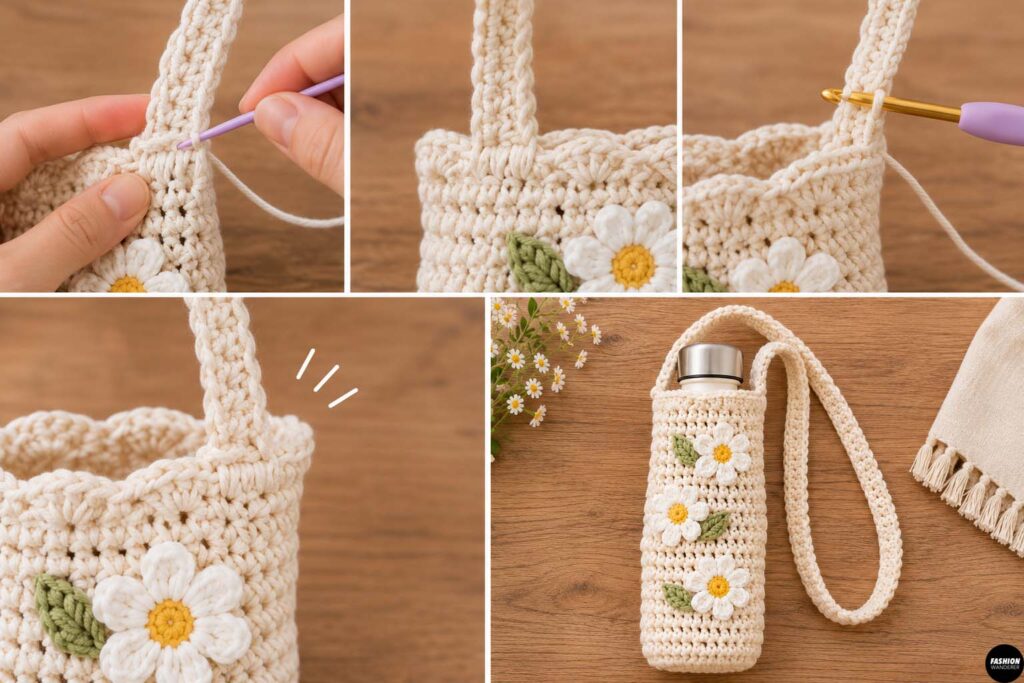
Water bottles can become surprisingly heavy once filled, so reinforcing the strap is important.
Using your yarn needle, sew through each strap attachment several times.
You can also crochet one additional round around the top of the bag and strap connection.
Check that both sides feel secure before using the bottle holder.
Step 11: Add Optional Leaves
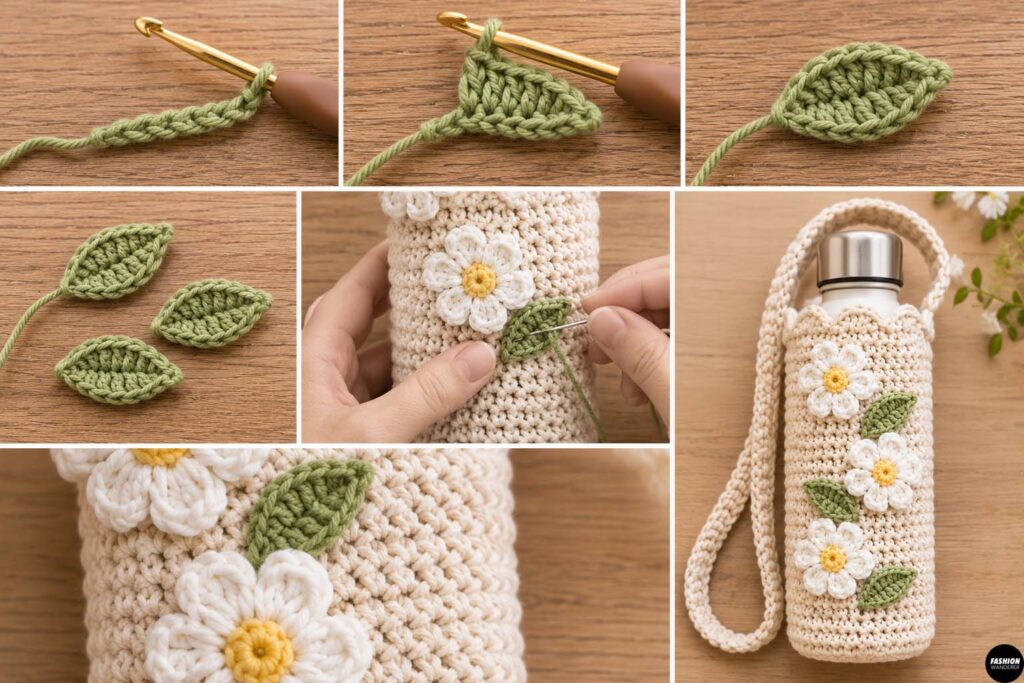
For an extra floral detail, crochet a few tiny green leaves.
Chain 6.
Starting in the second chain from the hook, work:
1 single crochet, 1 half double crochet, 2 double crochet, 1 half double crochet.
Work along the opposite side of the chain to create the second half of the leaf.
Slip stitch to finish.
Sew the leaves next to your daisies.
Step 12: Finish Your Crochet Bottle Bag
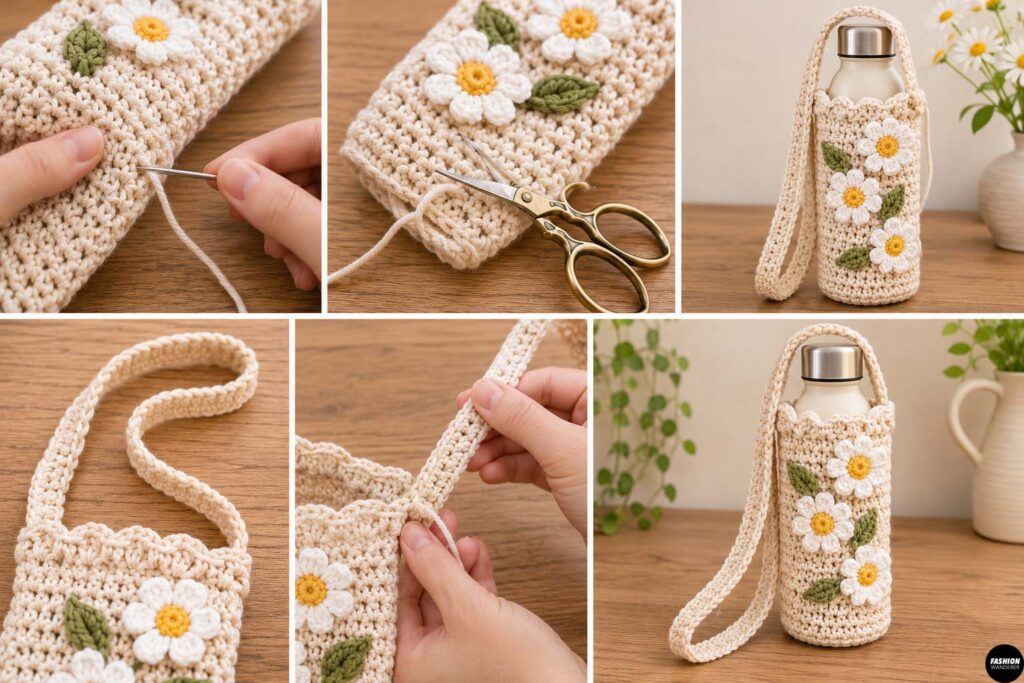
Weave in all remaining yarn ends.
Trim excess yarn carefully.
Place your water bottle inside and check the fit.
Adjust the strap if necessary.
Your DIY Floral + Daisy Bottle Bag is now ready to use.
Tips for Customizing Your Crochet Bottle Holder
There are endless ways to personalize this project.
Try a neutral cream bottle bag with bright daisies for a cottagecore look. Use sage green with white flowers for a botanical style, or crochet the entire bag in pastel colors for a playful spring accessory.
You can also add:
- Crochet strawberries
- Sunflowers
- Tiny mushrooms
- Hearts
- Granny squares
- Wooden beads
- Tassels
- Fringe
- Decorative buttons
Final Thoughts
This crochet floral bottle bag pattern is a simple way to combine a practical everyday accessory with cheerful handmade details.
Because the basic bag uses repetitive stitches, it is an excellent beginner crochet project that can easily be completed over a weekend. Once you understand the basic construction, you can adapt the size for coffee tumblers, larger water bottles, kids’ bottles, or even small thermoses.
Make one for yourself, crochet matching versions for friends, or use different floral combinations to create handmade gifts. The daisy details make each bottle bag feel unique, colorful, and perfect for spring, summer, festivals, and everyday outings.