
Zip-off cargo pants were a 90s and early 2000s staple—and now they’re back in style! With a few simple sewing techniques, you can transform any pair of cargo pants into versatile DIY zip-off pants that convert to shorts. This upcycle project is perfect for outdoor lovers, travelers, or anyone who wants a multifunctional, trendy look.
In this tutorial, you’ll learn how to add a removable hem with zippers so you can switch between full-length cargo pants and shorts in seconds. Don’t worry—this DIY is beginner-friendly and requires only basic sewing skills.
Why Make DIY Zip-Off Cargo Pants?
Before we dive into the tutorial, let’s talk about why this project is worth your time:
- Two-in-One Clothing – Get pants and shorts in one garment, saving space in your closet or suitcase.
- Budget-Friendly – Upcycle old cargo pants instead of buying new ones.
- Custom Fit – Choose your shorts length and zipper placement.
- On-Trend – Utility fashion and cargo styling are big in streetwear right now.
- Practical – Perfect for hiking, festivals, or travel when the weather changes throughout the day.
Materials You’ll Need

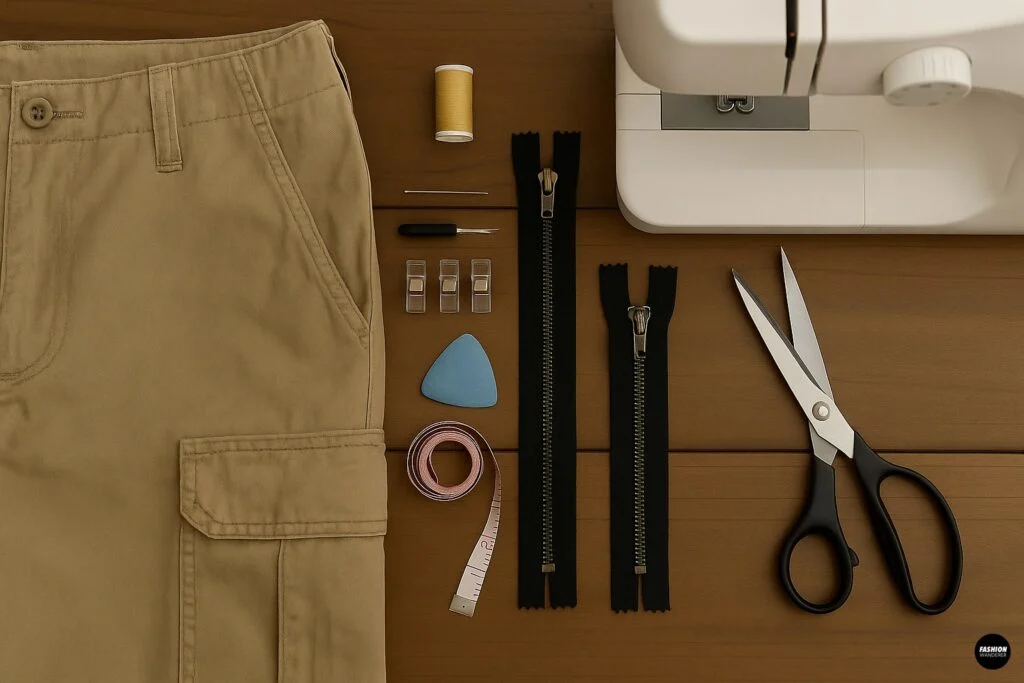
- 1 pair of cargo pants (loose or relaxed fit works best)
- Fabric scissors
- Seam ripper (optional, for removing seams neatly)
- Measuring tape or ruler
- Tailor’s chalk or washable fabric marker
- 2 separating zippers (length should match pant leg width at cutting point)
- Sewing pins or clips
- Sewing machine (or hand sewing needle if you prefer slow stitching)
- Matching thread
Optional: Extra fabric scraps for reinforcing seams.
How to DIY Zip-Off Cargo Pants into Shorts
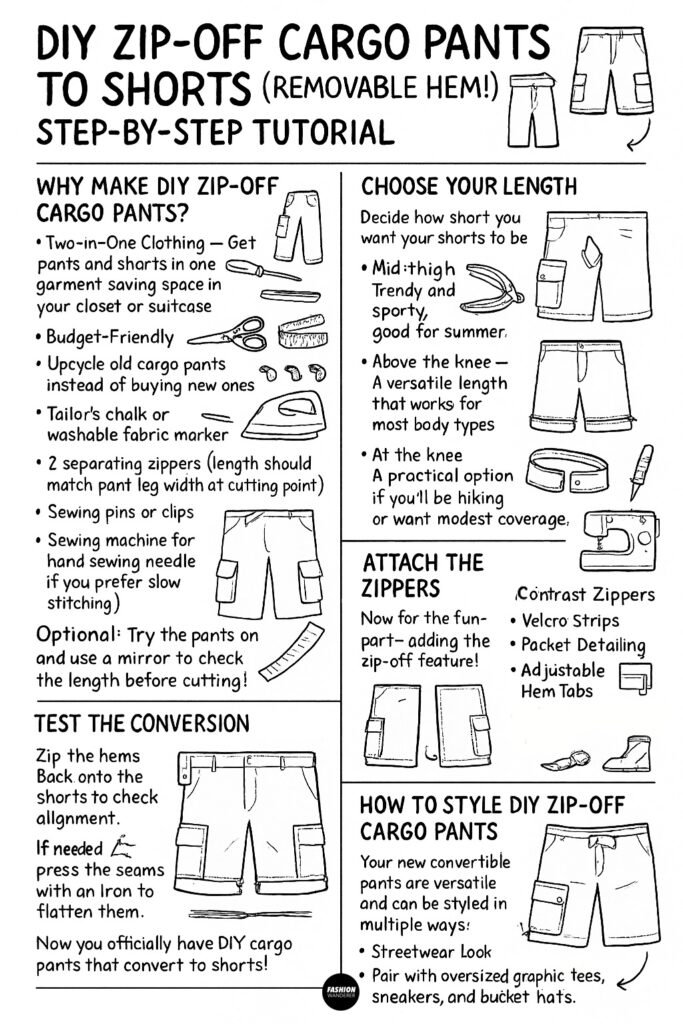
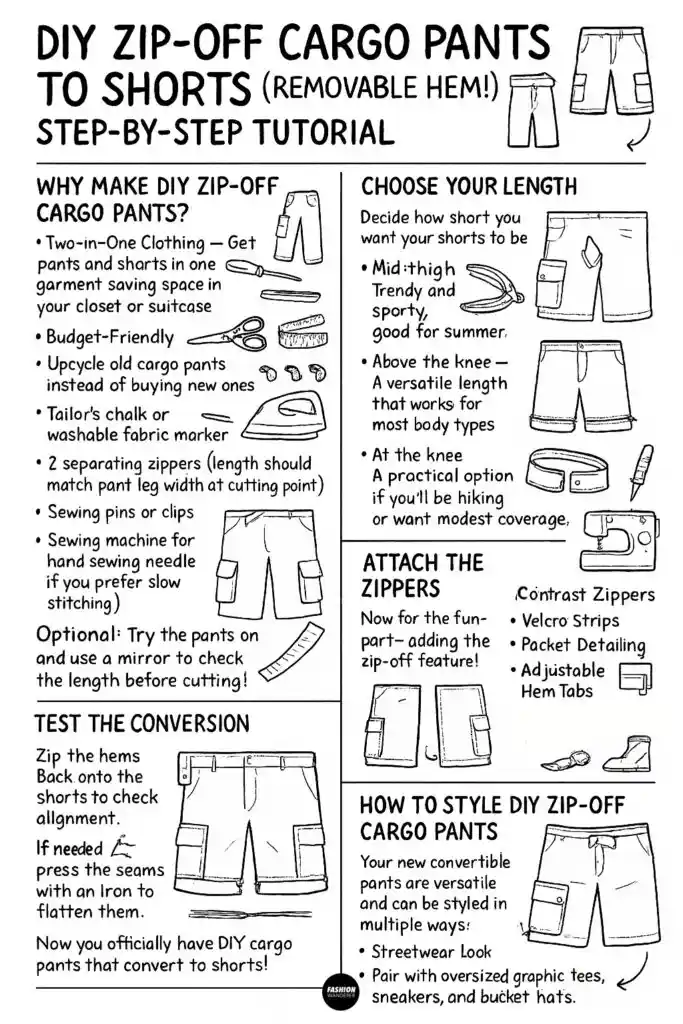
Step 1: Choose Your Length

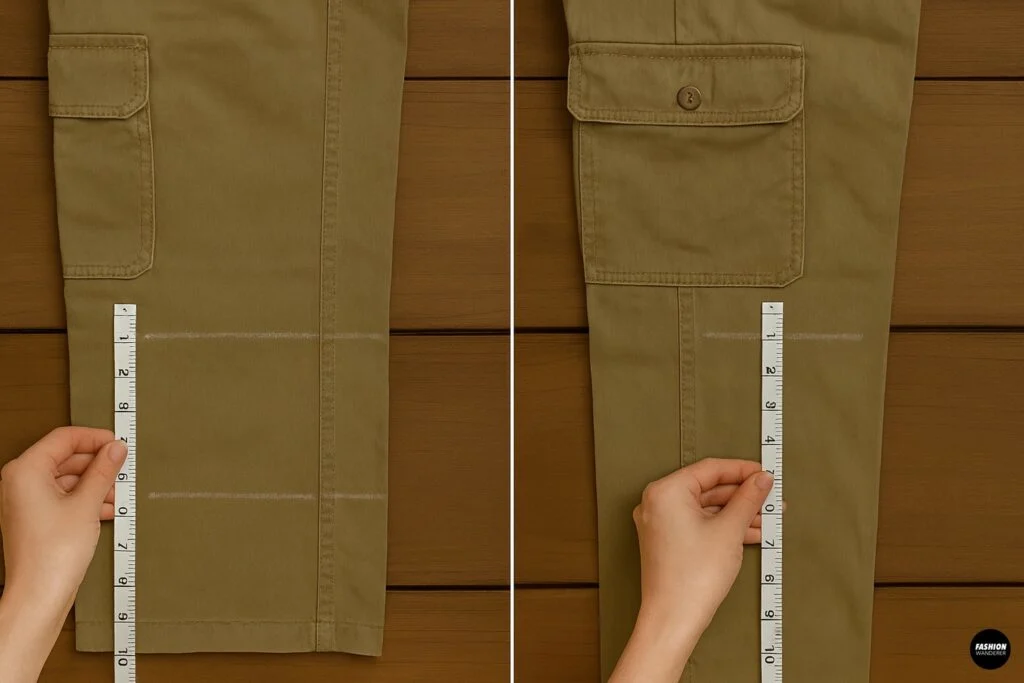
Decide how short you want your shorts to be. The most common lengths for zip-off cargos are:
- Mid-thigh – Trendy and sporty, good for summer.
- Above the knee – A versatile length that works for most body types.
- At the knee – A practical option if you’ll be hiking or want modest coverage.
Use a measuring tape to mark the same distance from the crotch seam down each pant leg. Mark with tailor’s chalk or washable marker.
Pro Tip: Try the pants on and use a mirror to check the length before cutting!
Step 2: Cut the Pant Legs

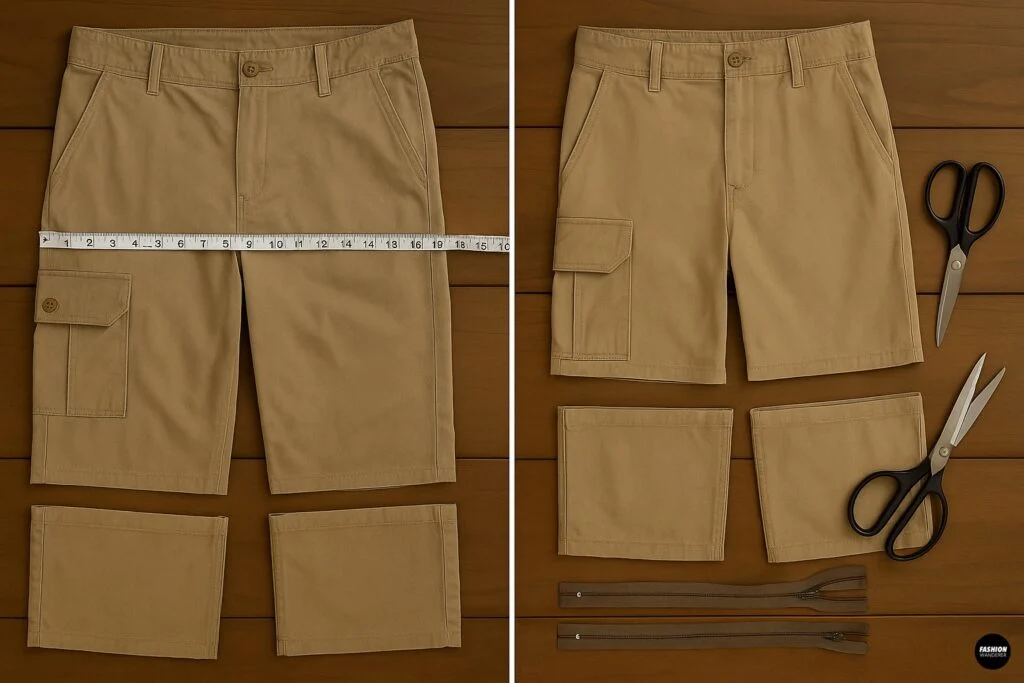
Lay the pants flat on a table. Carefully cut straight across each leg at your marked line. These cut pieces will become the removable bottom hems that you can reattach with zippers.
Don’t throw away the fabric you cut off—you’ll need it later to install the zippers.
Step 3: Prepare the Edges

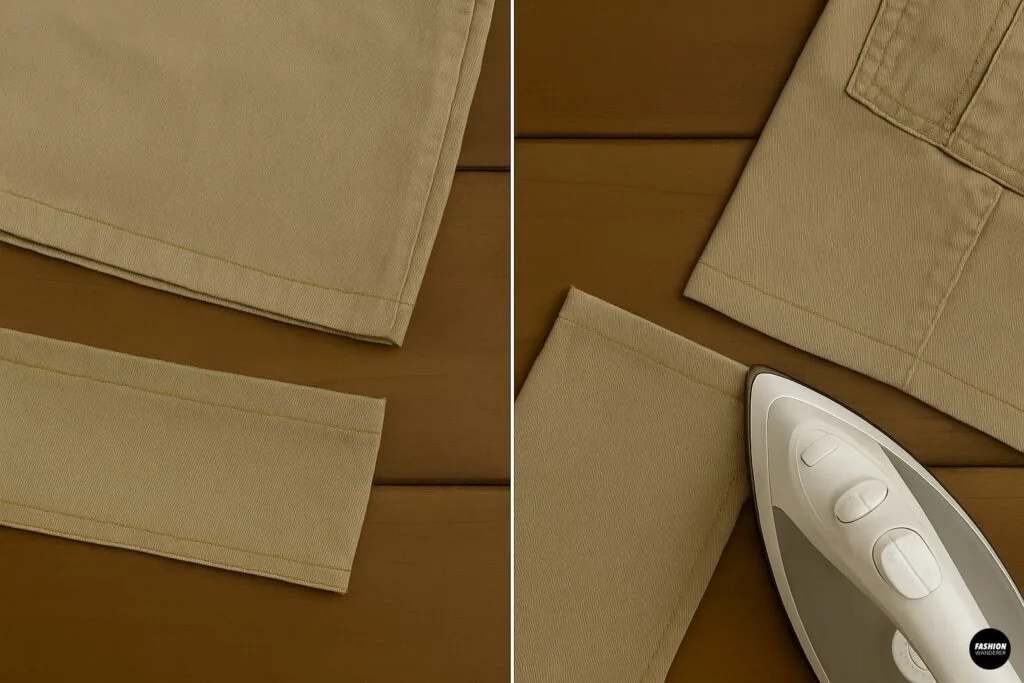
Cargo pants are usually made of cotton twill or heavy-duty fabric, which frays easily. To prevent fraying:
- Fold the raw edge of each cut section (both shorts and hem pieces) inward about ½ inch.
- Press with an iron.
- Sew a straight stitch around the folded edge to secure.
This creates a clean finish and makes zipper installation easier.
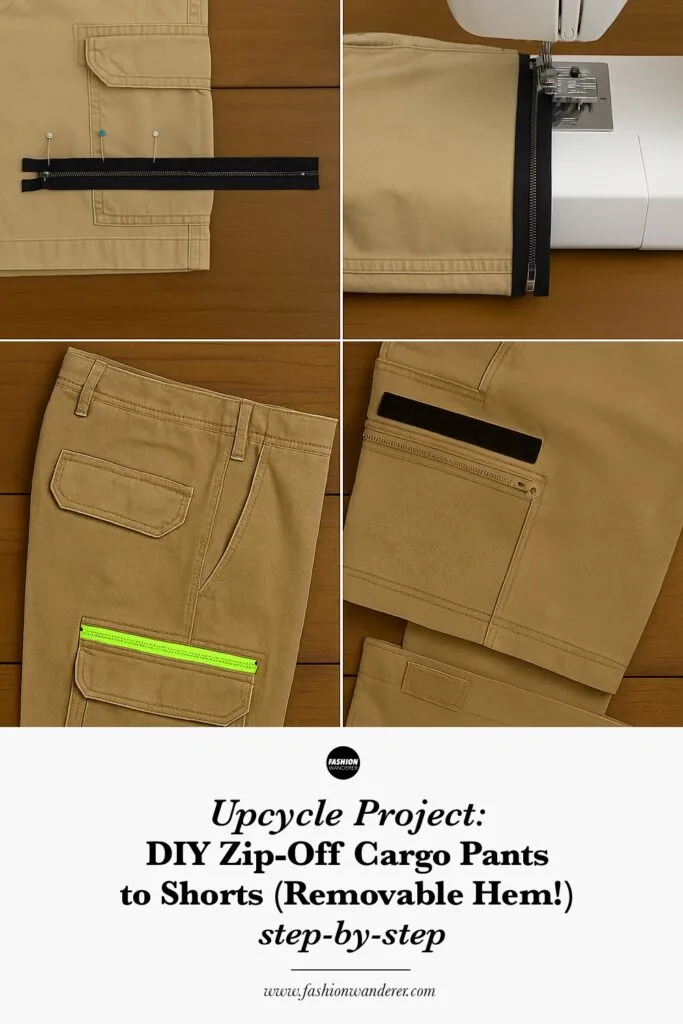
Step 4: Attach the Zippers

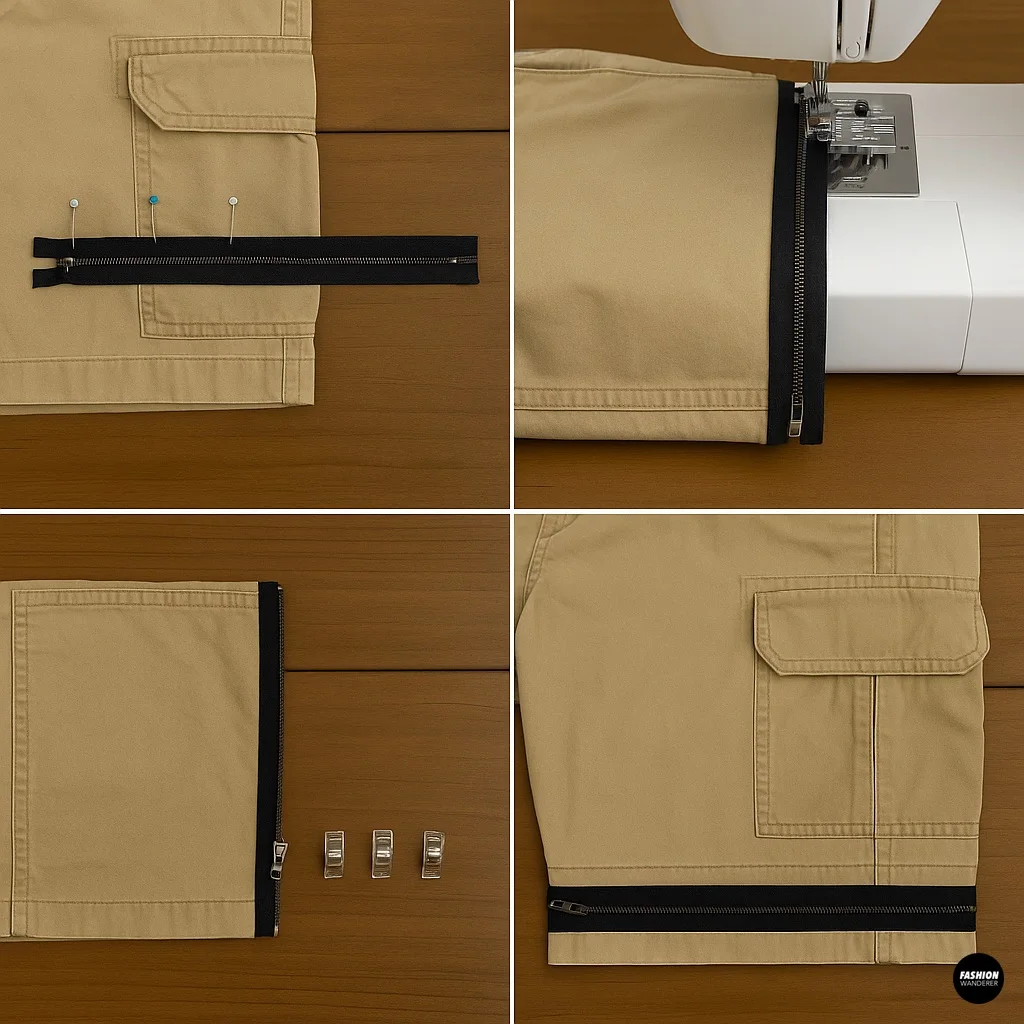
Now for the fun part—adding the zip-off feature!
- Align the Zipper – Place one side of the separating zipper along the hem of your shorts. The zipper teeth should face outward.
- Pin or Clip in Place – Use sewing pins or clips to secure the zipper evenly.
- Sew the Zipper – Stitch the zipper onto the shorts using a zipper foot on your sewing machine. Go slowly to keep the line straight.
- Repeat on the Hem Piece – Sew the other half of the zipper onto the bottom pant leg piece you cut off earlier.
Repeat this process for the other leg. When finished, you’ll be able to zip the pant legs back onto the shorts!
Pro Tip: For extra durability, reinforce the ends of each zipper with a few backstitches. This prevents the zipper from splitting during wear.
Step 5: Test the Conversion

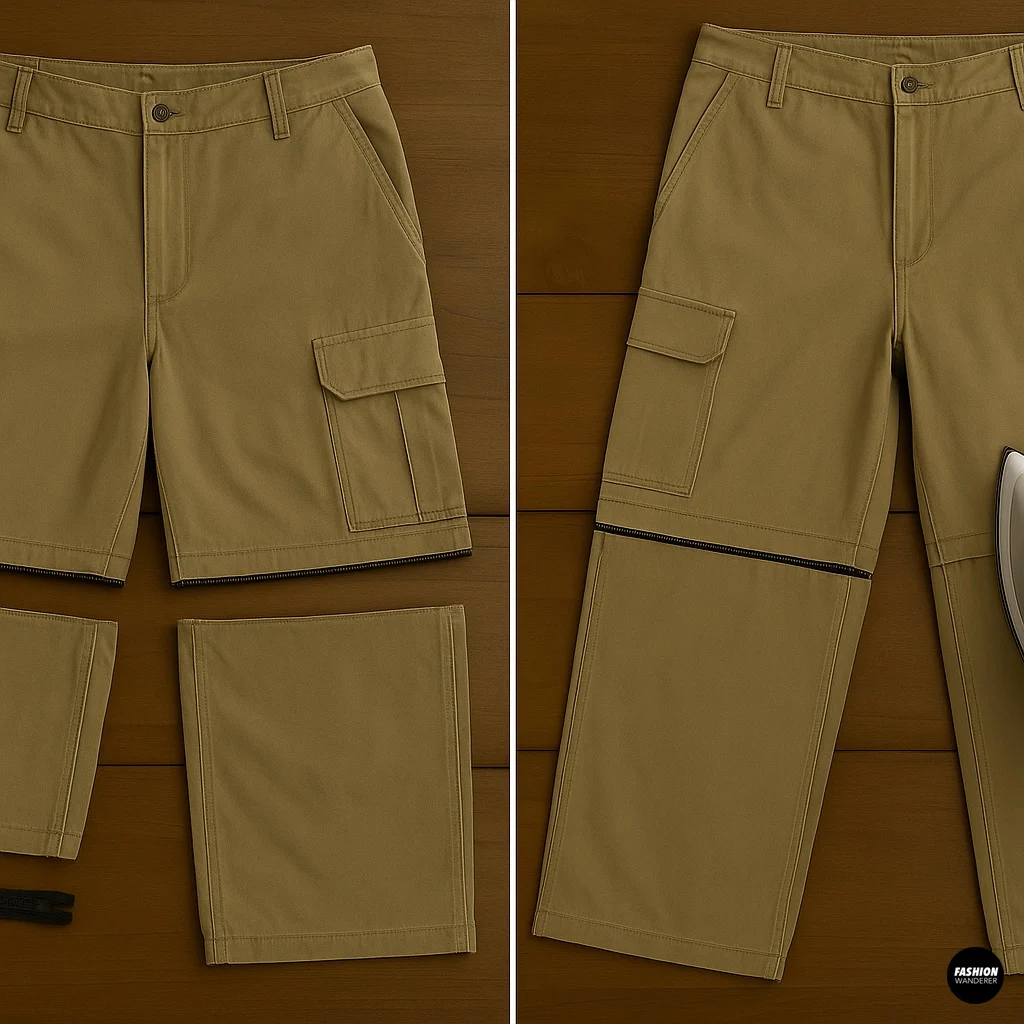
Zip the hems back onto the shorts to check alignment. The zippers should run smoothly without puckering. If needed, press the seams with an iron to flatten them.
Now you officially have DIY cargo pants that convert to shorts!
Step 6: Optional Add-Ons

Want to make your zip-off pants even more stylish and functional? Try these customizations:
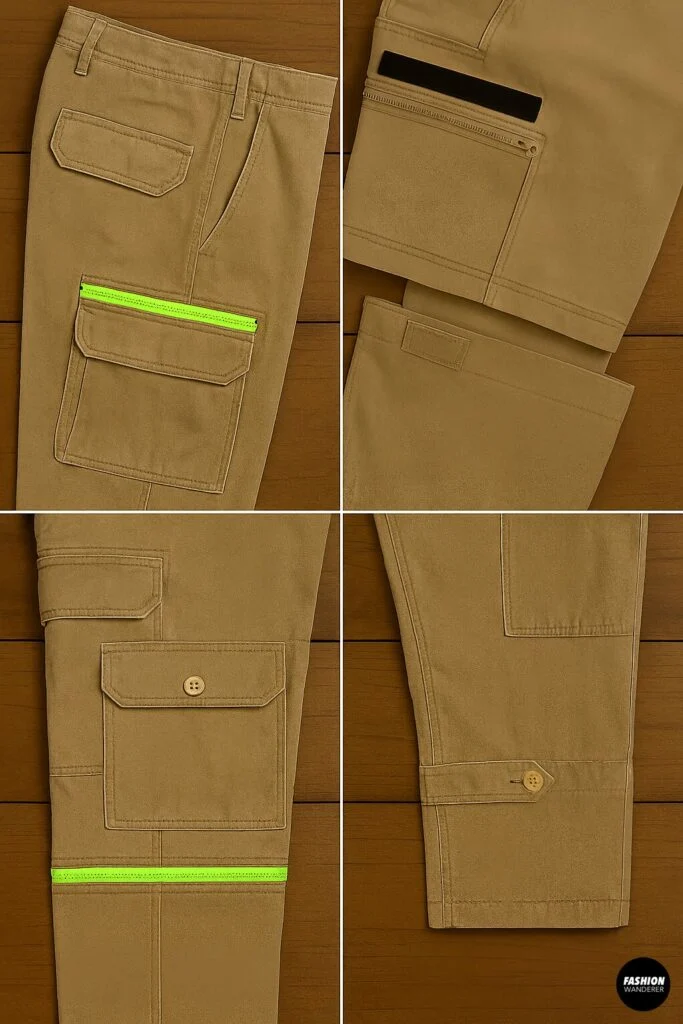
- Contrast Zippers – Use bold colors like neon green or red for a fashion-forward look.
- Velcro Strips – Add Velcro above the zipper for extra reinforcement.
- Pocket Detailing – Sew extra cargo pockets onto the removable hem sections.
- Adjustable Hem Tabs – Add button tabs at the ankle for a tapered fit.
How to Style DIY Zip-Off Cargo Pants

Your new convertible pants are versatile and can be styled in multiple ways:
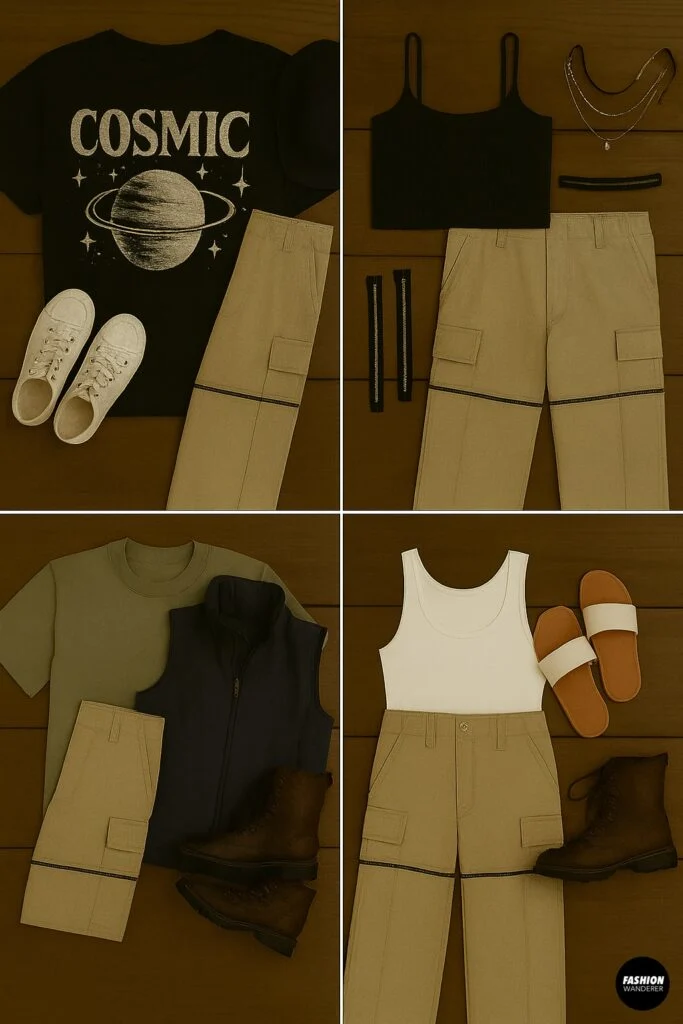
- Streetwear Look – Pair with oversized graphic tees, sneakers, and bucket hats.
- Festival Vibes – Add chunky boots, crop tops, and layered jewelry.
- Hiking Ready – Wear with moisture-wicking tees, hiking boots, and a utility vest.
- Casual Everyday – Style with a basic tank top and slides for summer.
The removable hem also gives you freedom—wear long pants in the morning when it’s cool, then zip them off into shorts when the sun comes out.
Care Tips for Zip-Off Cargo Pants
To keep your DIY project looking fresh and lasting longer:
- Wash in cold water on a gentle cycle.
- Zip the legs back on before washing to keep seams strong.
- Hang dry or tumble dry on low heat.
- Avoid bleaching or overwashing—cargo fabric can fade.
Final Thoughts

Turning regular cargo pants into DIY zip-off pants with removable hems is an easy way to upcycle and personalize your wardrobe. This project gives you the best of both worlds—pants and shorts in one! With just a couple of zippers and some basic sewing, you’ll create a piece that’s practical, stylish, and totally unique.
Next time you spot a pair of thrifted cargos, don’t pass them by—turn them into the ultimate multifunctional piece with this step-by-step tutorial.
Trendy, Affordable Sewing Patterns for All Sizes


Tie Shoulder Jumpsuit Pattern


Palazzo Pants Sewing Pattern


Pocket Overall Romper Pattern


Wrap Maxi Skirt Sewing Pattern


Tie Back Top Sewing Pattern