
Looking to breathe new life into plain T-shirts? Reverse appliqué is an innovative, budget-friendly technique that lets you create eye-catching graphic tees by layering fabrics and cutting away top layers to reveal pops of color beneath.
Whether you’re aiming for geometric shapes, retro-inspired logos, or intricate motifs, reverse appliqué transforms basic tees into wearable works of art. I
n this DIY fashion tutorial, we’ll walk through every step—from choosing fabrics to finishing touches—so you can craft your own one-of-a-kind graphic tee.
What Is Reverse Appliqué?
Reverse appliqué is a sewing method where you layer two or more pieces of fabric, then cut away shapes from the top layer(s) to expose the fabric beneath. Unlike traditional appliqué, which stitches shapes onto a base fabric, reverse appliqué creates depth and dimension by carving into the top layer.
The result? Bold, professional-looking designs without the bulk of overlapping fabrics.
Why Try Reverse Appliqué on Tees?
- Custom Graphic Tees: Achieve intricate designs—logos, text, illustrations—without screen printing equipment.
- Eco-Friendly Upcycle: Revamp thrifted or stained T-shirts by layering on scraps of cotton, jersey, or knit.
- Budget-Friendly: Use leftover fabric scraps, old T-shirts, and basic sewing supplies you already own.
- Beginner-Friendly: No advanced embroidery or digital cutting machines required—just scissors, fabric, and a sewing machine.
- Durable Design: Built-in layers resist fading and lifting, giving your tees longevity through washes.
DIY Reverse Appliqué Custom Graphic T-Shirts

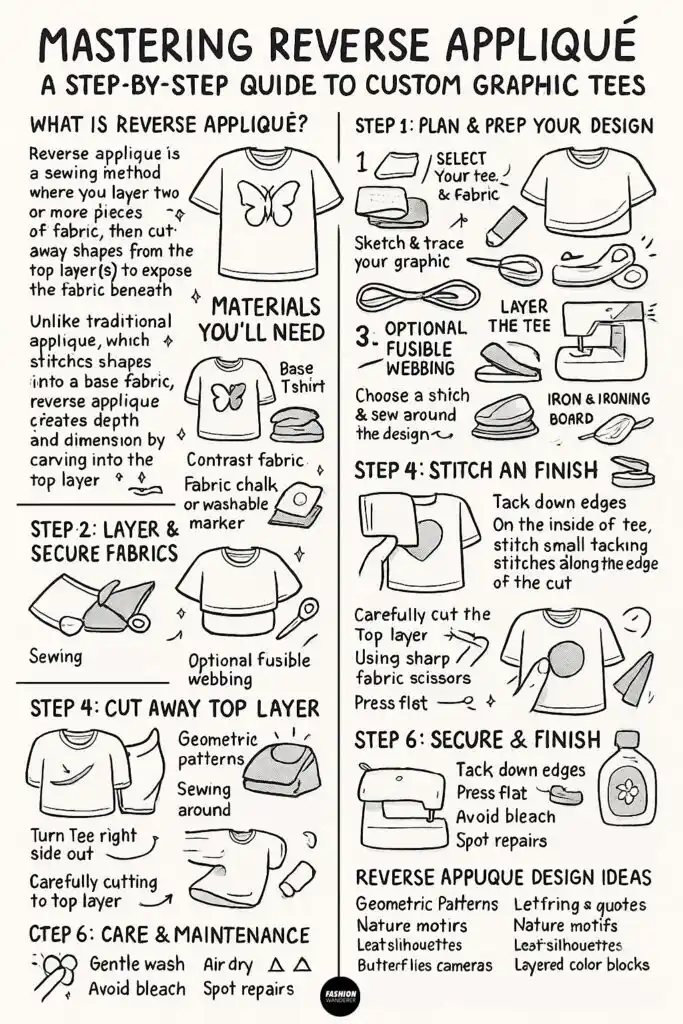
Materials You’ll Need

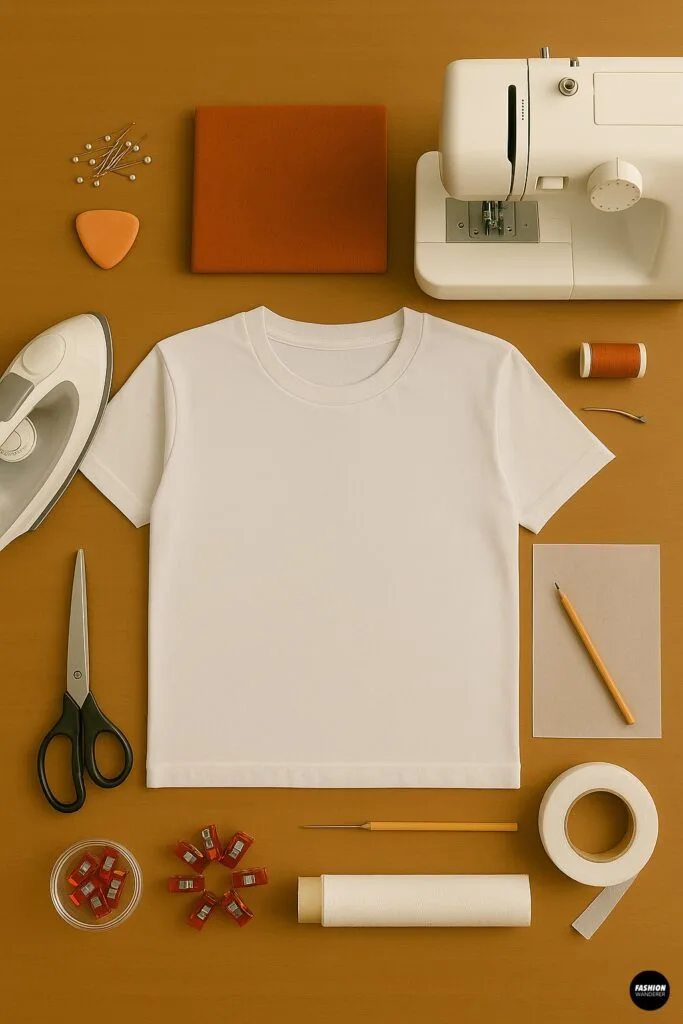
- Base T-shirt (100% cotton or cotton blend)
- Contrast Fabric (lightweight knit or cotton) in at least one contrasting color
- Fabric Chalk or Washable Marker
- Sharp Fabric Scissors
- Sewing Machine (with a small zigzag or stretch stitch) or Hand-Sewing Needle & Thread
- Straight Pins or Fabric Clips
- Iron & Ironing Board
- Tracing Paper & Pencil (for transferring design)
- Fusible Webbing (optional, for no-sew support)
Step 1: Plan & Prep Your Design

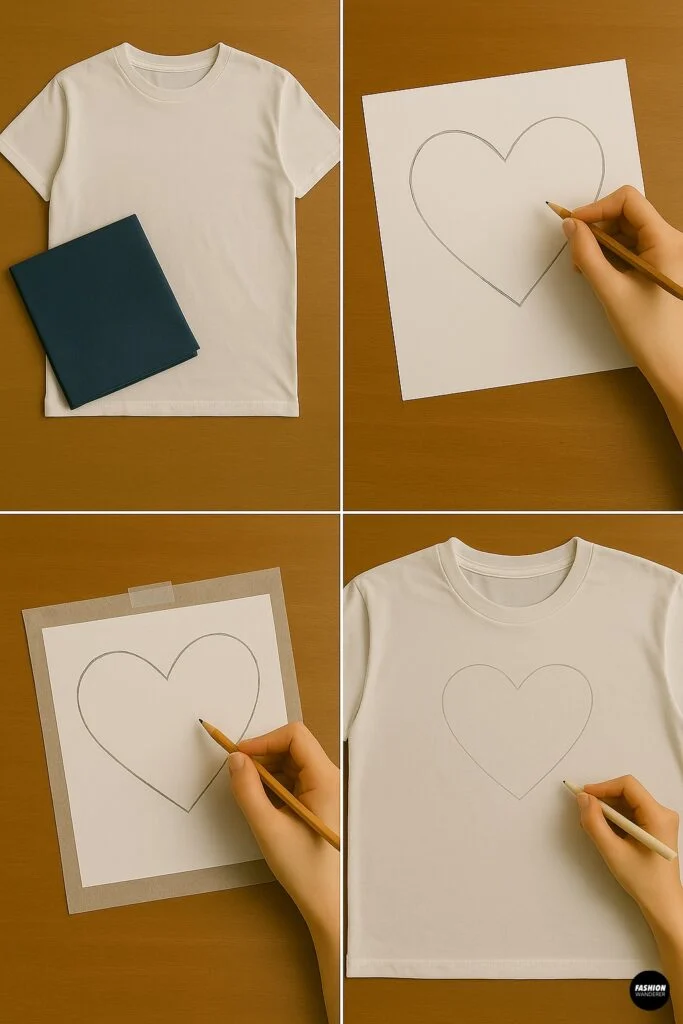
- Select Your Tee & Fabric
- Choose a clean, dry T-shirt you want to customize. Pre-wash to remove sizing and prevent future shrinkage.
- Pick a contrast fabric (jersey knit or cotton) that’s slightly lighter weight than your tee so layers lay flat.
- Sketch & Trace Your Graphic
- Draw or print your design on paper. Simplify shapes for easier cutting (e.g., bold letters, simple silhouettes).
- Tape tracing paper over the sketch and trace the outline with pencil.
- Mark Placement
- Lay the T-shirt flat and smooth out wrinkles.
- Use fabric chalk or a washable marker to lightly mark where the graphic will sit (e.g., centered chest, back panel).
Step 2: Layer & Secure Fabrics

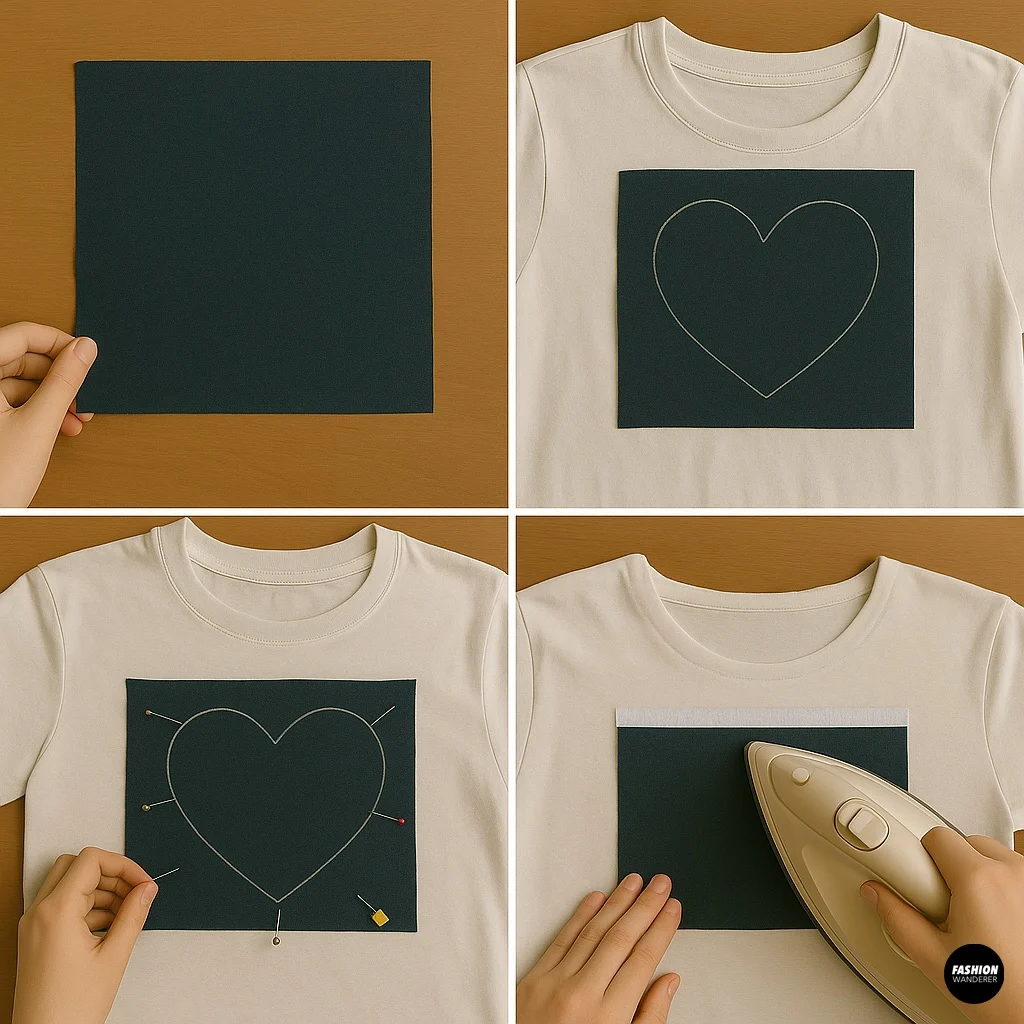
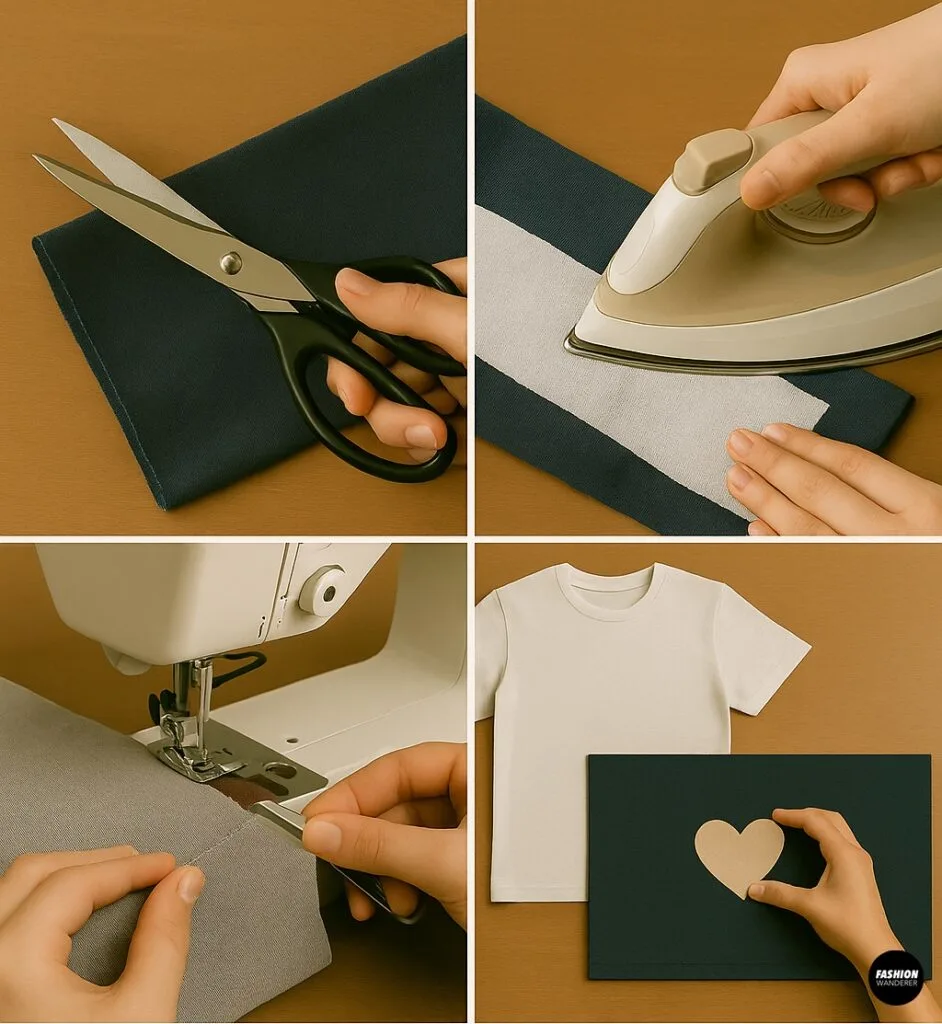
- Cut Contrast Fabric
- Cut a piece of contrast fabric about 1–2 inches larger on all sides than your traced design.
- Layer the Tee
- Turn the T-shirt inside out.
- Pin or clip the contrast fabric to the inside of the tee so it aligns under your chalk-marked design area. Smooth out any wrinkles.
- Optional Fusible Webbing
- For extra hold, adhere fusible webbing to the back of the contrast fabric before pinning. Press with a hot iron per manufacturer instructions.
Step 3: Stitch an Outline

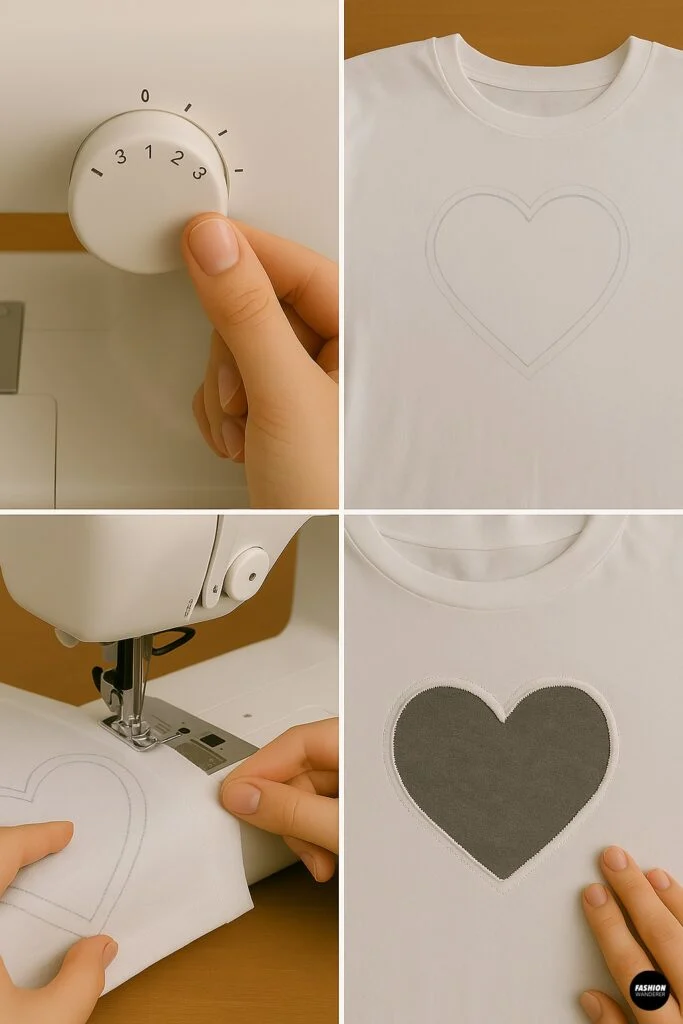
- Choose a Stitch
- Use a narrow zigzag or stretch stitch on your sewing machine. For hand stitching, use a small, tight blanket stitch.
- Sew Around the Design
- Carefully stitch just inside the chalk outline on the tee’s right side, creating a secure border that encases the contrast fabric.
- Backstitch at the start and end of your stitching to lock threads.
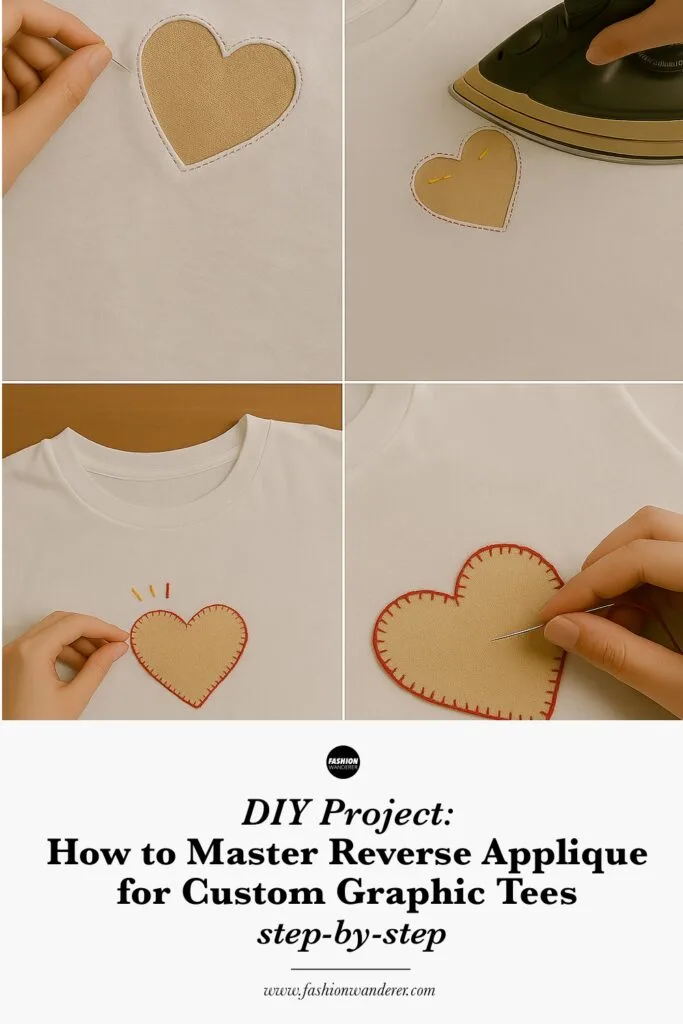
Step 4: Cut Away Top Layer


- Turn Tee Right Side Out
- Flip the T-shirt back to the right side so you see your stitched outline.
- Carefully Cut the Top Layer
- Using sharp fabric scissors, snip a small hole in the center of your stitched shape.
- Gently cut along the inside edge of your stitching, removing only the top T-shirt layer to reveal the contrast fabric beneath.
- Take care not to cut the backing fabric or your stitches.
- Refine Edges
- Trim any loose threads around the cut edge.
- If needed, clip curves gently to help the fabric lie flat.
Step 5: Secure & Finish

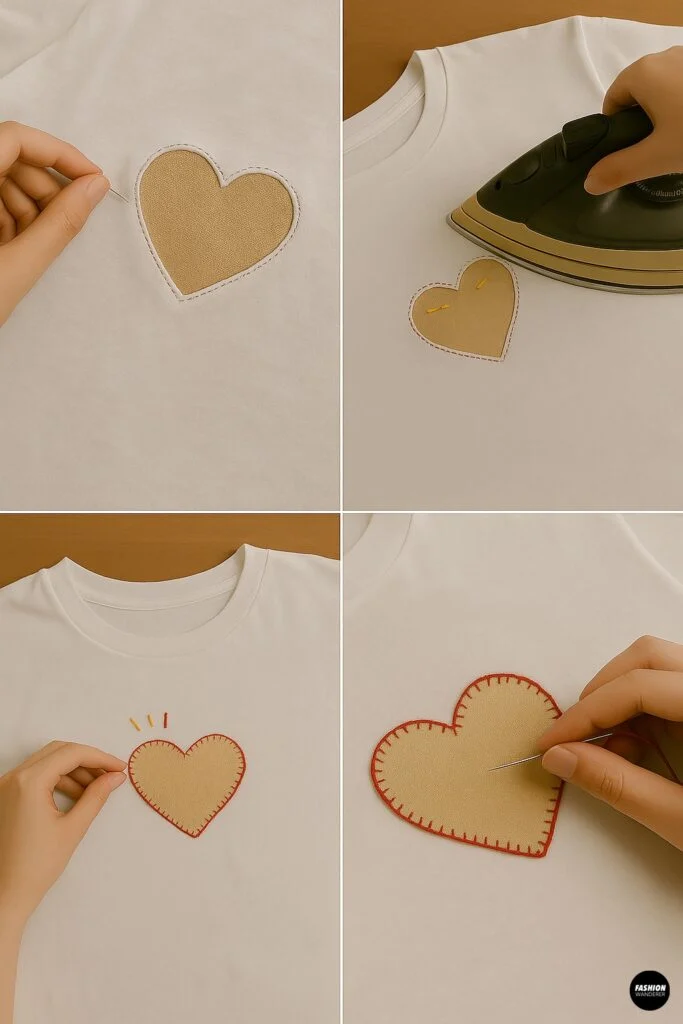
- Tack Down Edges
- On the inside of the tee, stitch small tacking stitches along the edge of the cut opening to secure the contrast fabric and prevent shifting.
- Press Flat
- With the tee right side out, press the appliquéd area lightly with an iron on a low-heat cotton setting. Use a pressing cloth to protect fabrics.
- Optional Embellishments
- Add embroidery, beading, or fabric paint highlights around the graphic for extra flair.
- Sew decorative topstitching in a contrasting thread color to accentuate shapes.
Step 6: Care & Maintenance

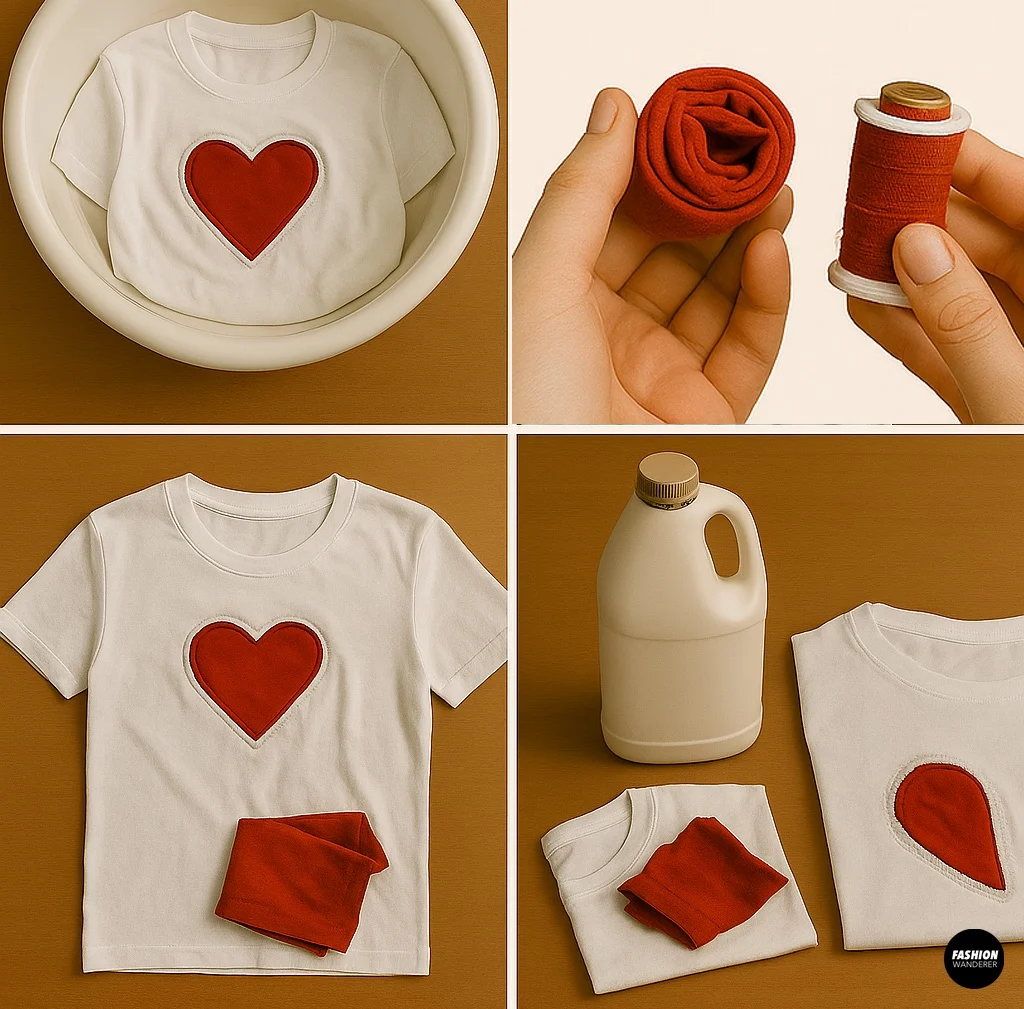
- Gentle Wash: Turn your tee inside out. Machine wash cold on a gentle cycle with like colors.
- Air Dry: Lay flat or hang dry to preserve shape and prevent shrinkage.
- Avoid Bleach: Strong chemicals can weaken stitches and fade fabrics.
- Spot Repairs: Keep leftover fabric scraps and thread on hand for any future touch-ups.
Reverse Appliqué Design Ideas

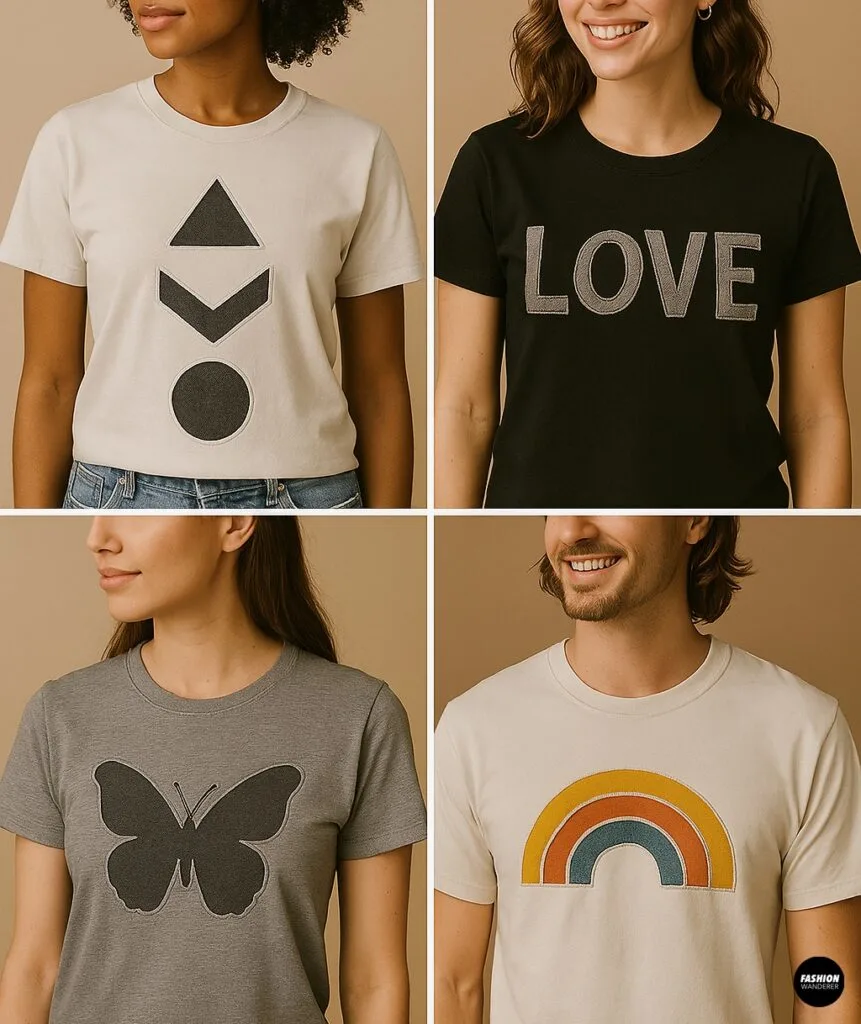
- Geometric Patterns: Triangles, chevrons, and circles make bold statements.
- Lettering & Quotes: Spell out initials, motivational words, or custom monograms.
- Nature Motifs: Leaf silhouettes, butterflies, or mountain ranges add an organic vibe.
- Pop Culture Icons: Retro cassette tapes, vintage cameras, or your favorite band’s logo.
- Layered Color Blocks: Use three or more fabrics for a rainbow effect or ombré fade.
Pro Tips for Flawless Reverse Appliqué

- Use Sharp Scissors: Precise cuts keep edges clean and prevent jagged lines.
- Stabilize Stretch Fabrics: For very stretchy knits, iron on lightweight interfacing before layering.
- Test Stitch & Tension: Practice on scrap fabrics to dial in your machine’s tension and stitch width.
- Mind Grain Lines: Align contrast fabric grain parallel to the tee’s grain for minimal distortion.
- Start Small: If you’re new to reverse appliqué, begin with a simple shape (e.g., heart or star) before tackling complex designs.
Wrap-Up: From Plain to Personalized

Reverse appliqué is a powerful DIY technique that turns ordinary tees into custom graphic masterpieces. With just a T-shirt, scraps of fabric, a sewing machine, and a bit of creativity, you can craft wearable art that reflects your style.
Follow this step-by-step guide to master reverse appliqué—then experiment with new shapes, color combinations, and finishing touches. Whether you’re upcycling thrift finds or refreshing your wardrobe basics, your future custom tees will never be the same.
Ready to reinvent your wardrobe? Gather your favorite tee and adventure into the layered world of reverse appliqué today!
Trendy, Affordable Sewing Patterns for All Sizes


Tie Shoulder Jumpsuit Pattern


Palazzo Pants Sewing Pattern


Pocket Overall Romper Pattern


Wrap Maxi Skirt Sewing Pattern


Tie Back Top Sewing Pattern