
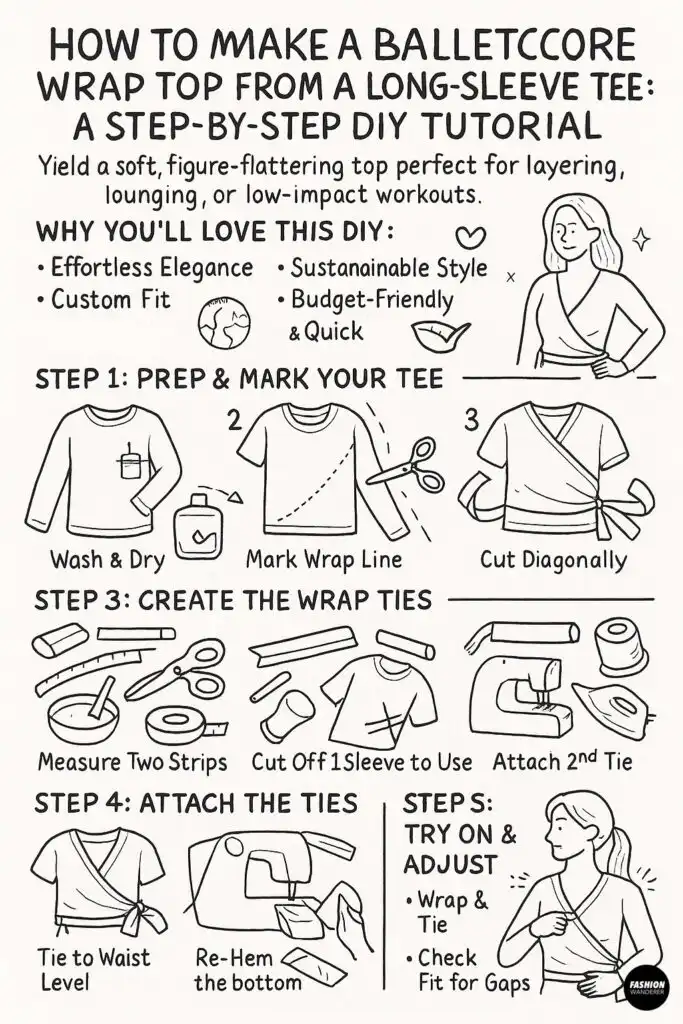
Elevate your wardrobe with a delicate Balletcore wrap top made from an everyday long-sleeve tee! This budget-friendly upcycle yields a soft, figure-flattering silhouette perfect for layering, lounging, or low-impact workouts.
Follow this detailed, beginner-friendly guide to transform an ordinary shirt into a charming wrap top in under an hour.
Why You’ll Love This DIY Balletcore Wrap Top
- Effortless Elegance: Capture that romantic, dancer-inspired vibe with wrap ties and gentle draping.
- Custom Fit: You choose the wrap depth, sleeve length, and tie placement for a truly personalized garment.
- Sustainable Style: Upcycle an old long-sleeve tee instead of buying new—good for your closet and the planet.
- Budget-Friendly: All you need is one tee and simple notions you likely have on hand.
- Quick & Easy: No advanced sewing skills required—perfect for a weekend craft project.
DIY Balletcore Wrap Top from Long-Sleeve T-Shirt

Materials You’ll Need

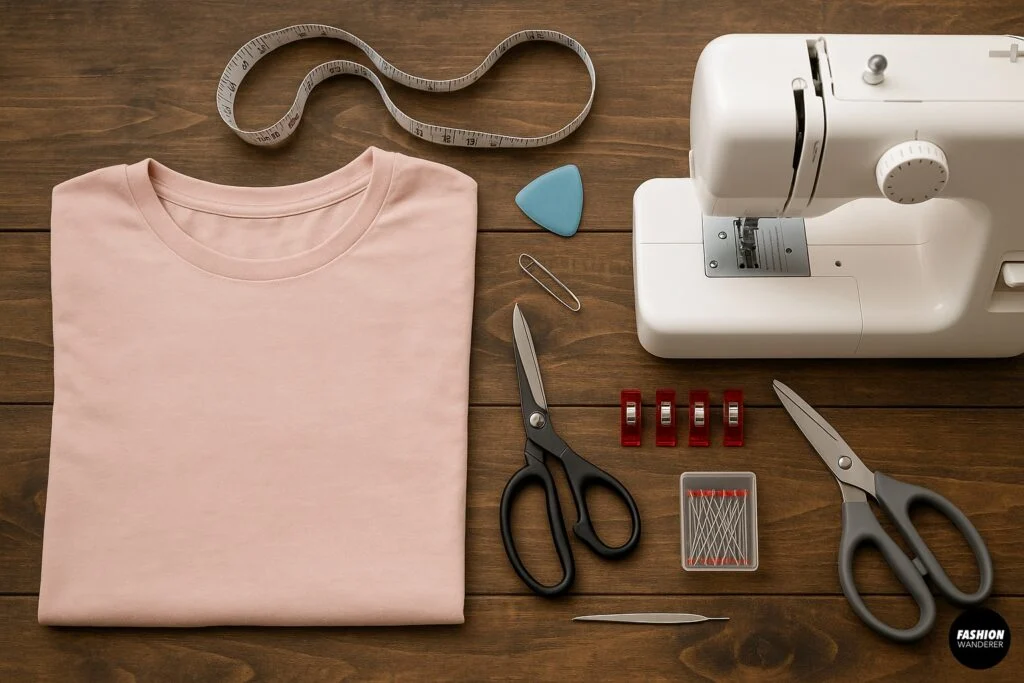
- One long-sleeve T-shirt (soft cotton or cotton blend)
- Measuring tape or ruler
- Tailor’s chalk or washable fabric marker
- Sharp fabric scissors or rotary cutter
- Pins or clips
- Sewing machine (stretch stitch or narrow zigzag) or hand-sewing needle & stretch thread
- Optional: serger for clean, stretch-friendly seams
- Safety pin (for threading ties)
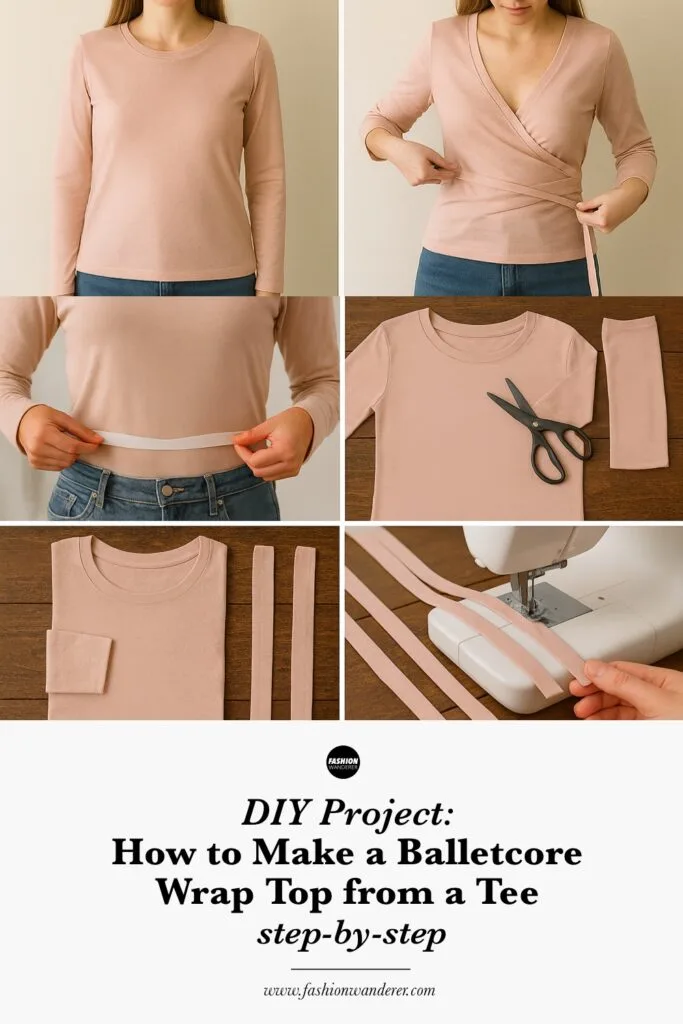
Step 1: Prep & Mark Your Tee

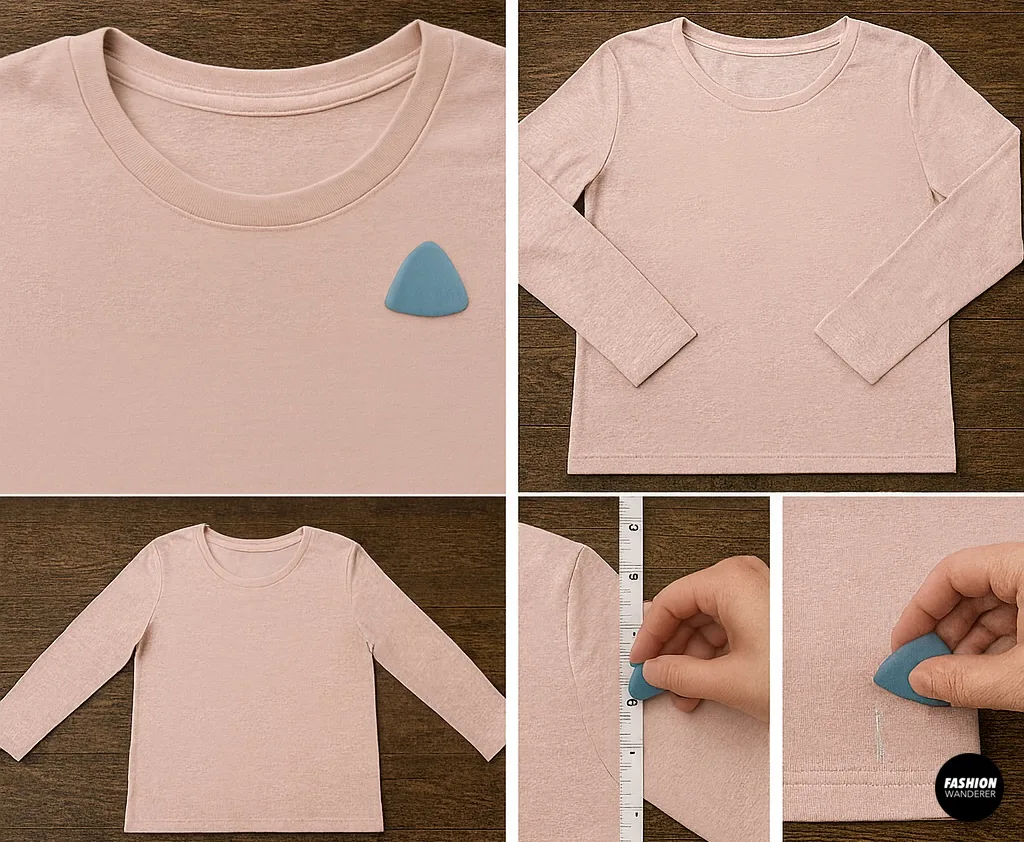
- Choose the Right Tee
- Look for a cotton or cotton-blend long-sleeve tee with at least 5% spandex or elastane. This ensures the fabric stretches and drapes nicely in the wrap.
- Wash & Dry
- Pre-wash to remove any sizing and prevent shrinkage after you’ve tailored your wrap top.
- Lay Flat & Smooth
- On a large table or floor, spread the shirt face-up and smooth out wrinkles for accurate measuring.
- Mark the Wrap Depth
- Decide how deep you want the front wrap neckline to be (e.g., from center shoulder seam down 12″). Use chalk to mark a point on the bottom hem where your wrap tie will cross.
- Mark Tie Placement
- On the opposite side seam, mark where the second tie will sit. This is typically 2–3″ above the hemline for a flattering wrap angle.
Step 2: Cut the Front Opening

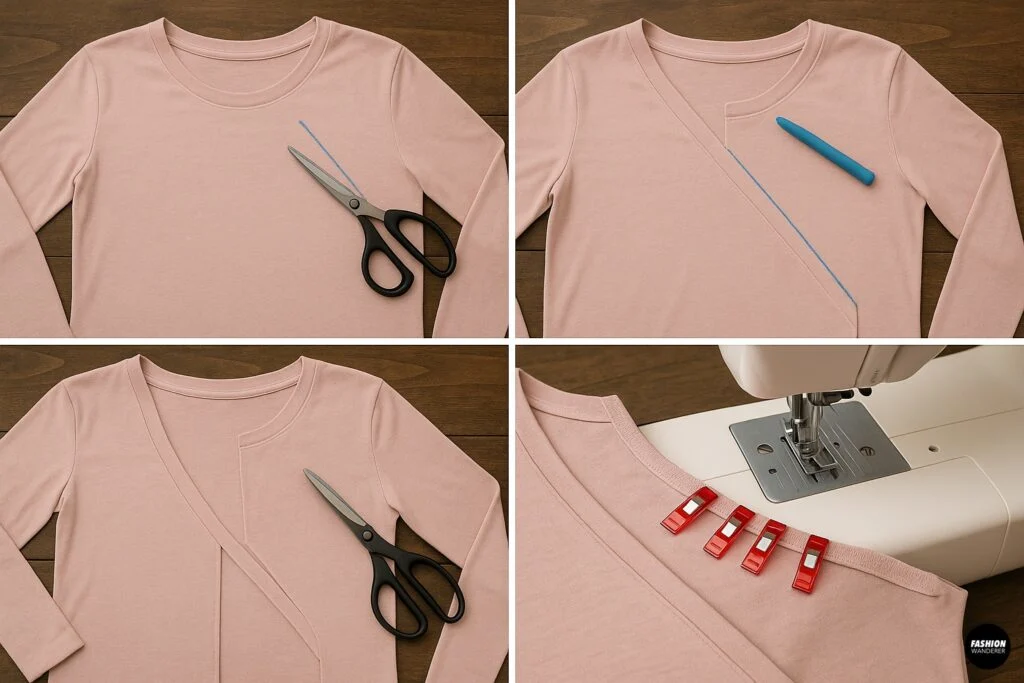
- Draw the Wrap Line
- From the center front neckline, draw a diagonal line down to your first hem-side mark. This will be your cutting line for the wrap front.
- Cut Carefully
- With sharp fabric shears, cut along that diagonal from the neckline to the hem. Leave the back and sleeves intact.
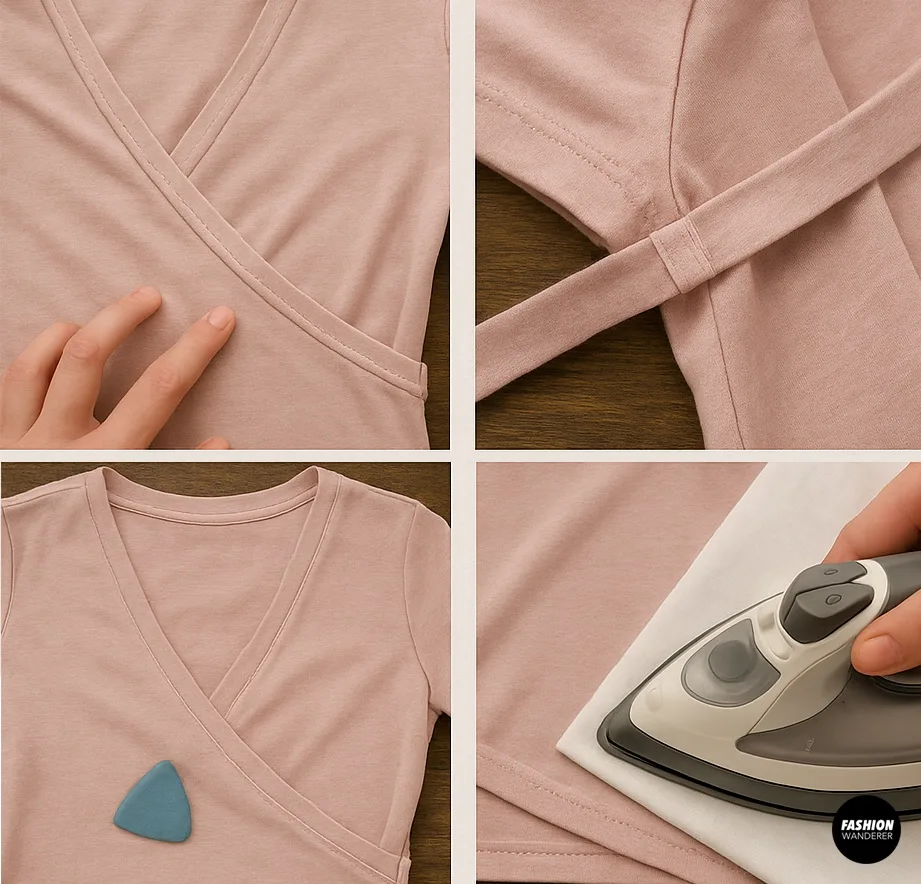
- Reinforce the Neckline
- Fold a ⅜″ strip of hem allowance under along the newly cut edge. Pin or clip, then stitch a stretch-friendly zigzag to prevent stretching out of shape.
Step 3: Create the Wrap Ties

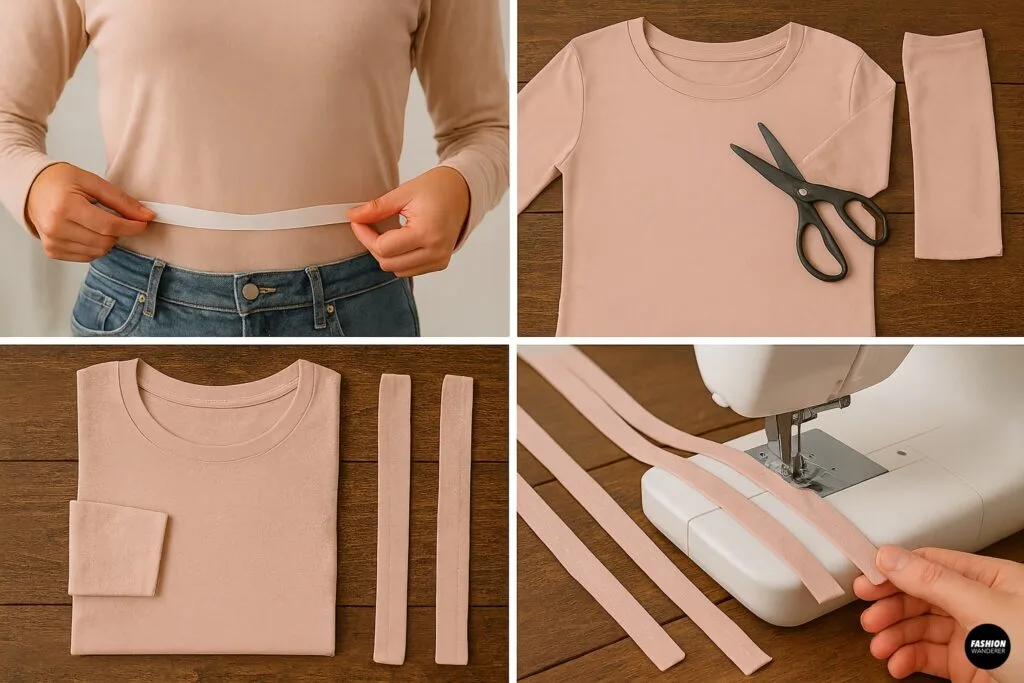
- Measure Tie Length
- Wrap a long ribbon or cord around your torso where you’d like each tie to sit, leaving enough length to knot or bow comfortably—typically about 2× your waist measurement.
- Cut from Sleeves (or Use Separate Fabric)
- If you’re upcycling entirely from the tee, cut off one sleeve at the shoulder seam. Turn that sleeve tube inside-out and flatten it. Measure and cut two strips—each the length measured in Step 3.1, and about 3″ wide.
- Hem Tie Edges
- Fold each strip’s long edges in ¼″ twice, pin, and stitch with a narrow zigzag. Repeat for both strips.
Step 4: Attach the Ties

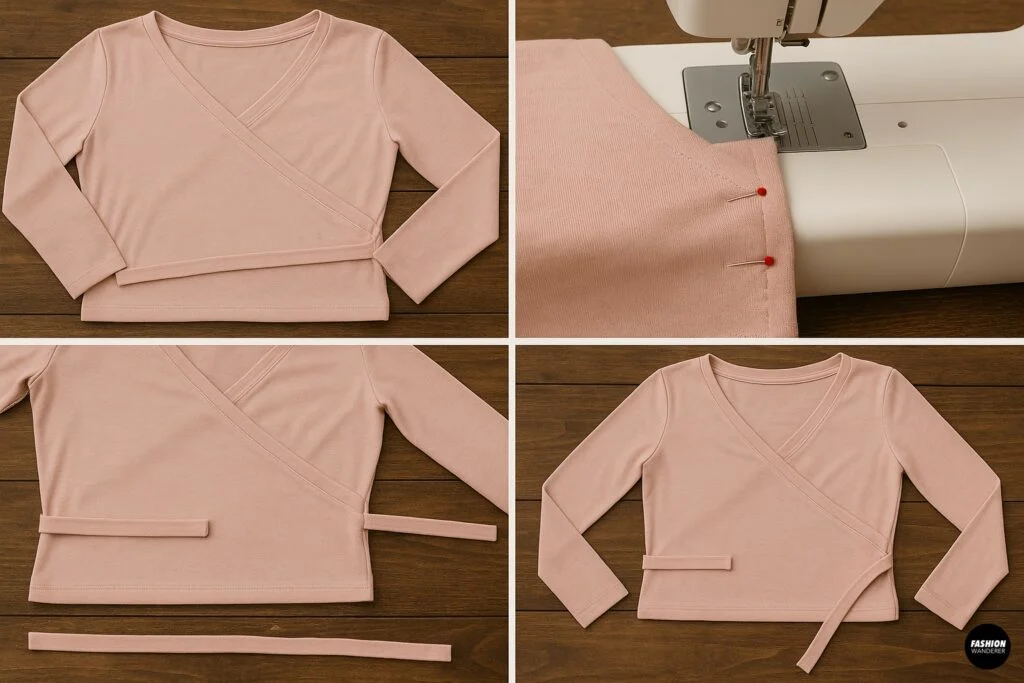
- Position the First Tie
- On the right wrap point (marked in Step 1.4), align the raw end of Tie A to the inside of the tee at the hem, right sides together. Pin securely.
- Stitch in Place
- Use a stretch stitch or zigzag to stitch the tie end to the tee’s hem seam allowance. Backstitch to secure.
- Position the Second Tie
- Repeat on the opposite side seam at your second marked point. Ensure both ties sit at the same vertical level so the wrap hangs evenly.
Step 5: Finish Seams & Hem

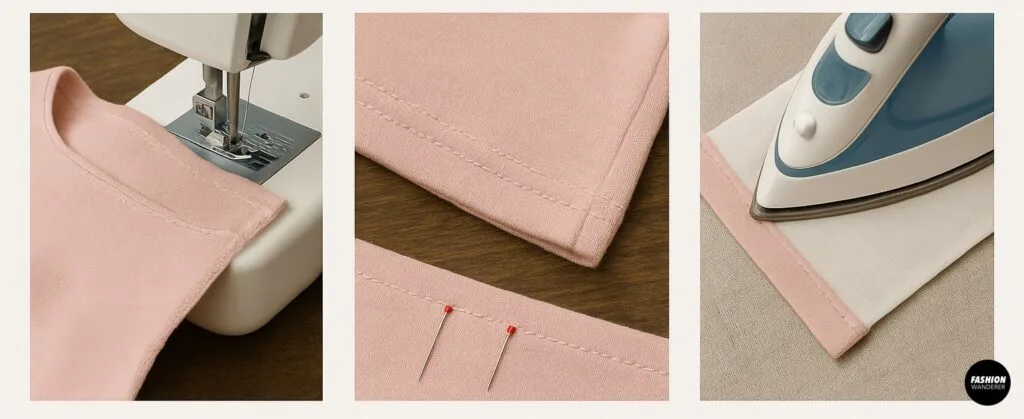
- Neaten Raw Edges
- If desired, run a quick serger or zigzag down any exposed raw edges (the sleeve cut, tie attachment points) for a polished finish and to prevent fraying.
- Re-Hem the Bottom
- Fold the bottom edge up ½″ twice, pin, and sew with a stretch-friendly stitch. This keeps the hem stable under tension from tying.
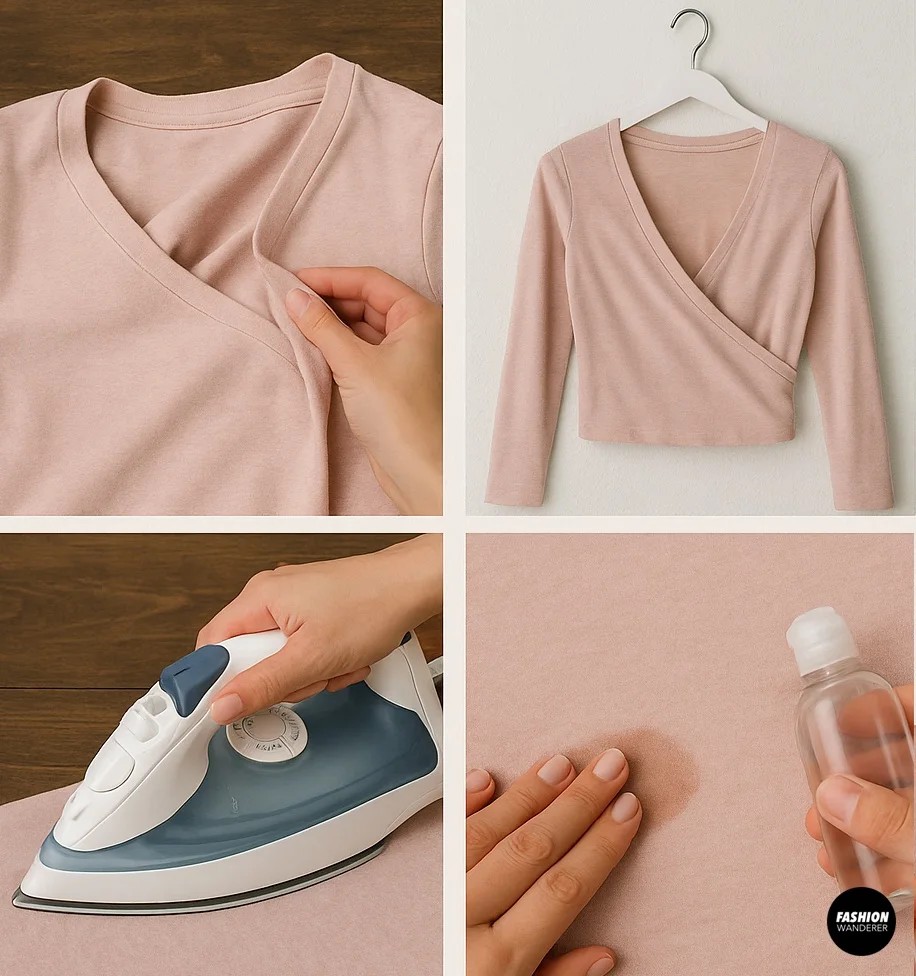
- Press Seams
- Lightly press all new seams with an iron on the appropriate heat setting. Use a pressing cloth to protect knits from shine.
Step 6: Try On & Adjust

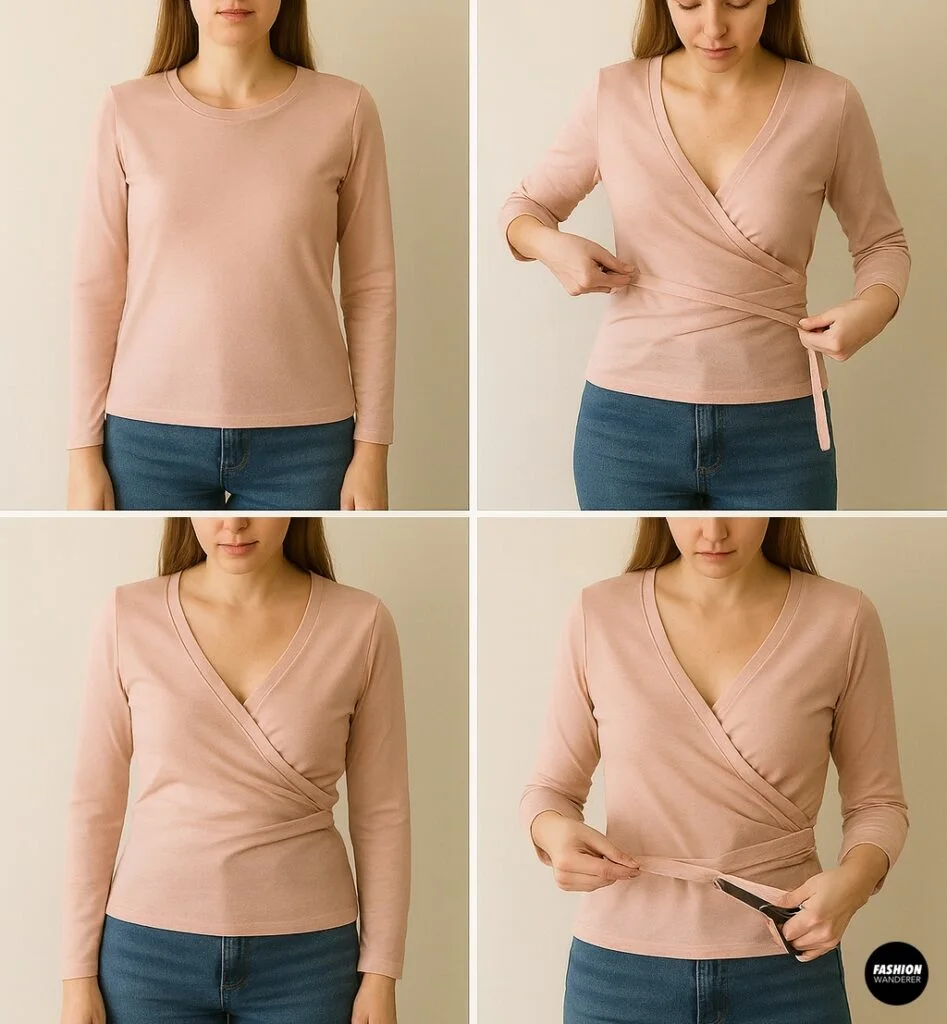
- Wrap & Tie
- Put the tee on, wrap Tie A around the front, cross under your bust, and tie Tie B at the back or side in a neat knot or bow.
- Check Fit
- Make sure the wrap is secure but comfortable; the neckline sits where you want, and there’s no gaping.
- Trim Excess
- If your ties are too long, snip off extra length—remember to re-hem the cut ends to prevent fraying.
Styling & Balletcore Inspiration


- Casual Chic: Layer over a simple tank top or bralette. Pair with high-waisted jeans, ballet flats, and delicate jewelry.
- Athleisure Edge: Wear over sports bra and leggings for a class-to-café look. Finish with sleek sneakers and a low bun.
- Romantic Layering: Drape over a lace camisole and under a lightweight cardigan. Team with a tulle midi skirt for true Balletcore vibes.
- Office Appropriate: Tuck the wrap a bit higher, wear a camisole underneath, and pair with tailored trousers and loafers.
Pro Tips & Troubleshooting

- Gapping at Bust: Choose a deeper wrap (mark cut line further toward armpit) or add an extra half-inch of width to tie strips.
- Tie Slippage: Use a strip of non-slip elastic inside the hem where ties attach to keep tension even.
- Uneven Wrap Line: Fold tee in half vertically and ensure your chalk line is symmetrical before cutting.
- Curling Edges: If cotton blend curls too much at the wrap, press with steam and a pressing cloth to set the fold before sewing.
Care & Maintenance

- Gentle Wash: Turn inside out. Machine wash cold on a delicate cycle with similar colors.
- Air Dry: Lay flat or hang to retain shape and avoid stretching.
- Low Iron: If needed, press on low heat—avoid ironing elastic tie ends directly.
- Spot Clean: For minor spills, dab with mild detergent and water to keep your wrap top looking fresh.
Final Thoughts

With just one thrifted or well-loved long-sleeve tee and a handful of simple steps, you can craft a dreamy Balletcore wrap top that’s entirely your own. This sustainable upcycle not only breathes new life into your wardrobe but also empowers you to play with silhouette, fit, and styling—no expensive pattern or sewing experience required.
Gather your supplies, follow these steps, and you’ll be twirling through your day in an effortlessly elegant DIY creation!
Ready to make your own Balletcore wrap top? Grab that tee, set aside an afternoon, and let your creativity do the rest. Happy sewing!
Trendy, Affordable Sewing Patterns for All Sizes


Tie Shoulder Jumpsuit Pattern


Palazzo Pants Sewing Pattern


Pocket Overall Romper Pattern


Wrap Maxi Skirt Sewing Pattern


Tie Back Top Sewing Pattern