
Who knew one of the trendiest tops for summer could come from something as simple as a T-shirt and a pair of scissors? Backless cut-out tops are all over Instagram and TikTok, and the best part is, you don’t have to spend money to get the look.
With just one upcycled T-shirt—yes, even an old one from the bottom of your drawer—you can DIY a chic cut-out backless top in under 30 minutes. No sewing machine required, just cool t-shirt cutting ideas, a little creativity and a few easy steps.
This tutorial will walk you through the process step by step, with styling tips and variations to make the top fit your vibe. Whether you’re headed to a festival, a night out, or just want to elevate your casual wardrobe, this DIY is budget-friendly, eco-conscious, and super fun.
Why Make a DIY Backless Top?
- Budget-Friendly – Forget dropping $30–$50 on a trendy top when you can upcycle something you already own.
- Eco-Friendly – Upcycling extends the life of your clothes and keeps fabric out of landfills.
- Customizable – Make it as simple or bold as you want: add extra cut-outs, tie straps, or layer over tanks.
- No-Sew Project – Perfect for beginners—no sewing machine or special skills required.
Why I Love This DIY
This project is the perfect example of how fashion and sustainability meet creativity. It’s quick, requires zero sewing, and turns something you might throw away into a stylish wardrobe staple. I love that no two cut-out tops ever look the same—you can make it subtle, daring, or somewhere in between.
Plus, it’s an instant confidence booster. There’s something bold and empowering about rocking an open-back top you made yourself.
Materials You’ll Need

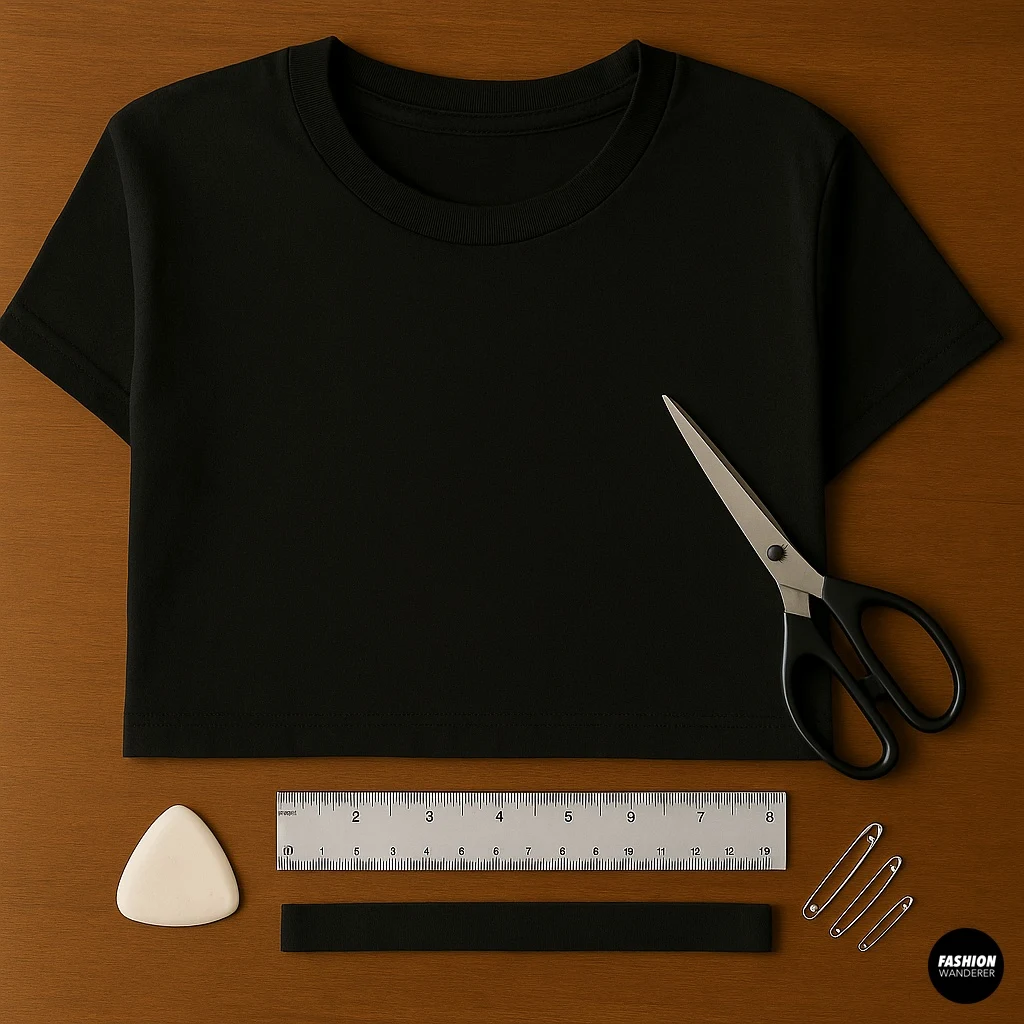
- 1 T-shirt (oversized or fitted, depending on your style)
- Fabric scissors
- Tailor’s chalk or washable marker
- Ruler or measuring tape
- Optional: safety pins or fabric glue for clean edges
DIY Tutorial: T-Shirt into Cut-Out Backless Top
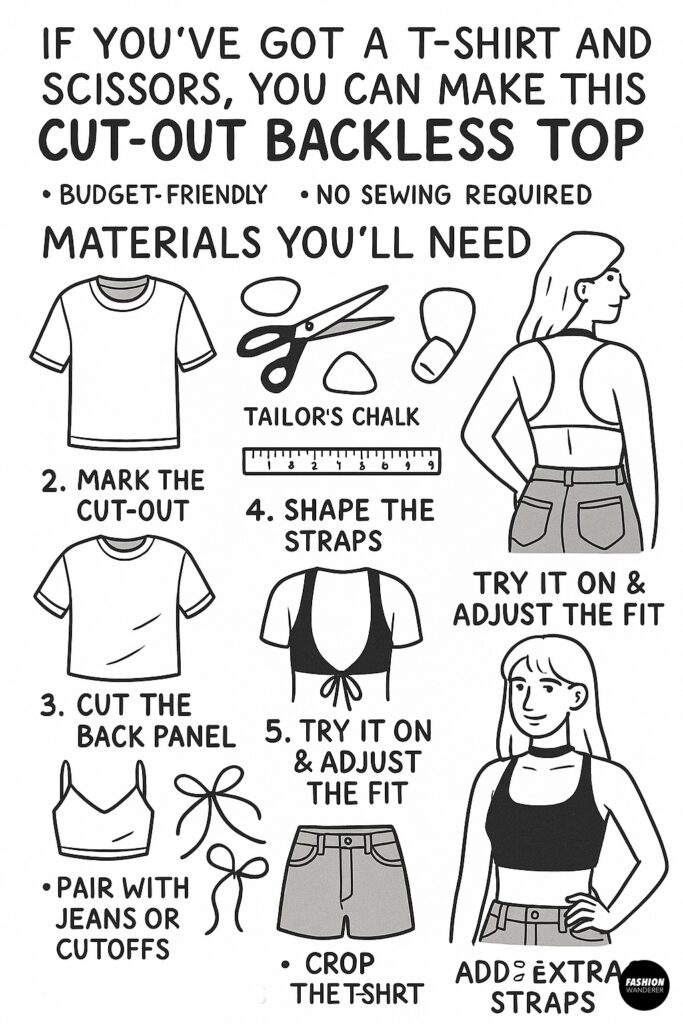

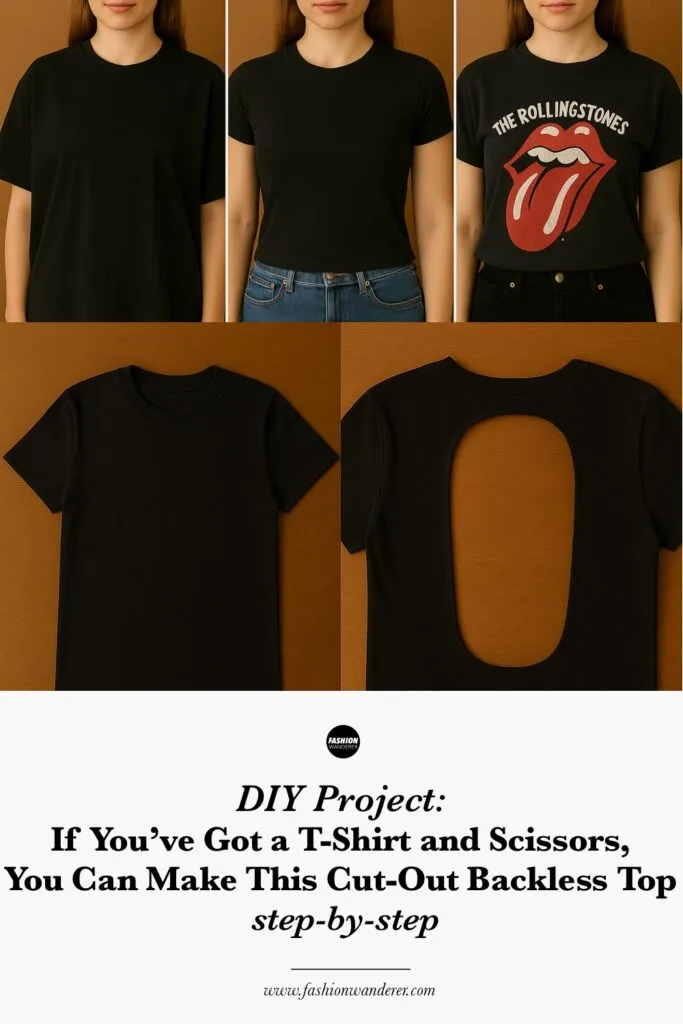
Step 1: Choose the Right T-Shirt

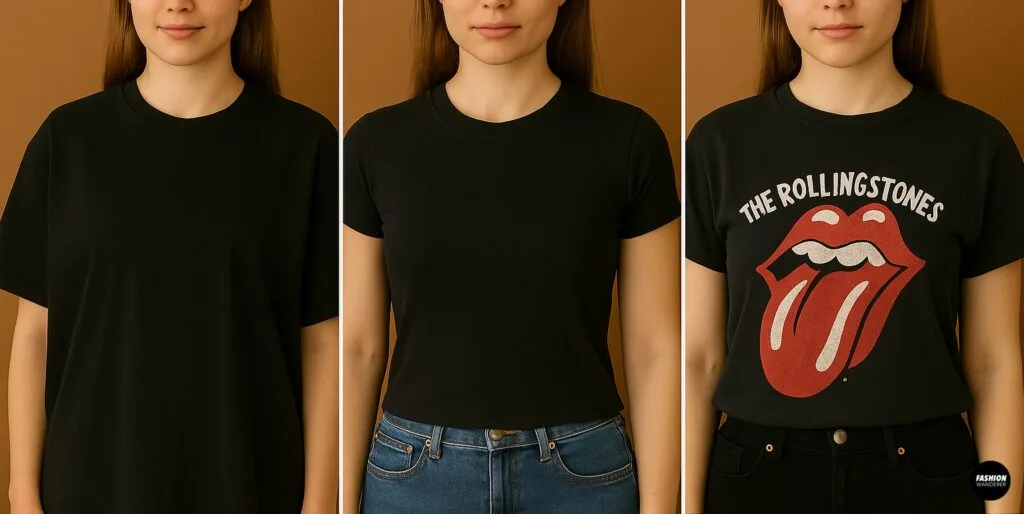
The type of T-shirt you pick sets the tone for your DIY backless top:
- Oversized Tee – Creates a loose, drapey cut-out look, perfect for layering over bralettes or tanks.
- Fitted Tee – Gives a sleek, body-hugging silhouette with a bold cut-out in the back.
- Graphic Tee – Adds extra edge—imagine a band tee turned into a backless going-out top.
Choose a cotton or cotton-blend shirt for best results. Jersey fabric works beautifully because it won’t fray easily.
Step 2: Mark the Cut-Out

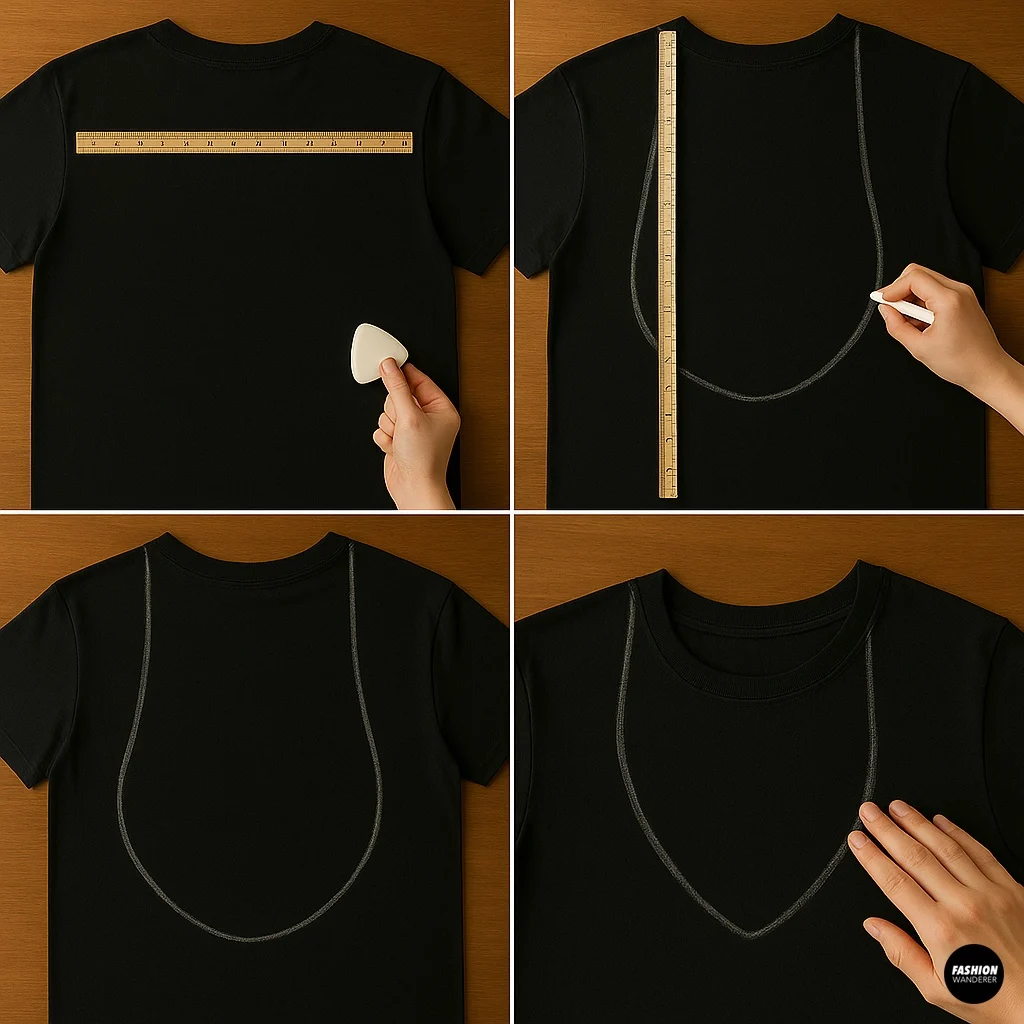
Lay the T-shirt flat on a table, back side facing up. Smooth out any wrinkles. Use tailor’s chalk or a washable marker to sketch your design. The classic cut-out backless look involves:
- A deep U-shape or V-shape cut-out across the back.
- Two straps (from the shoulders to lower back) to hold the top in place.
Measure about 2–3 inches below the neckline and draw your cut line down toward the lower hem. Stop about 3–4 inches above the bottom hem to leave enough fabric for structure.
Variation: If you want a strappier look, draw multiple lines across the back for ladder-style cut-outs.
Step 3: Cut the Back Panel

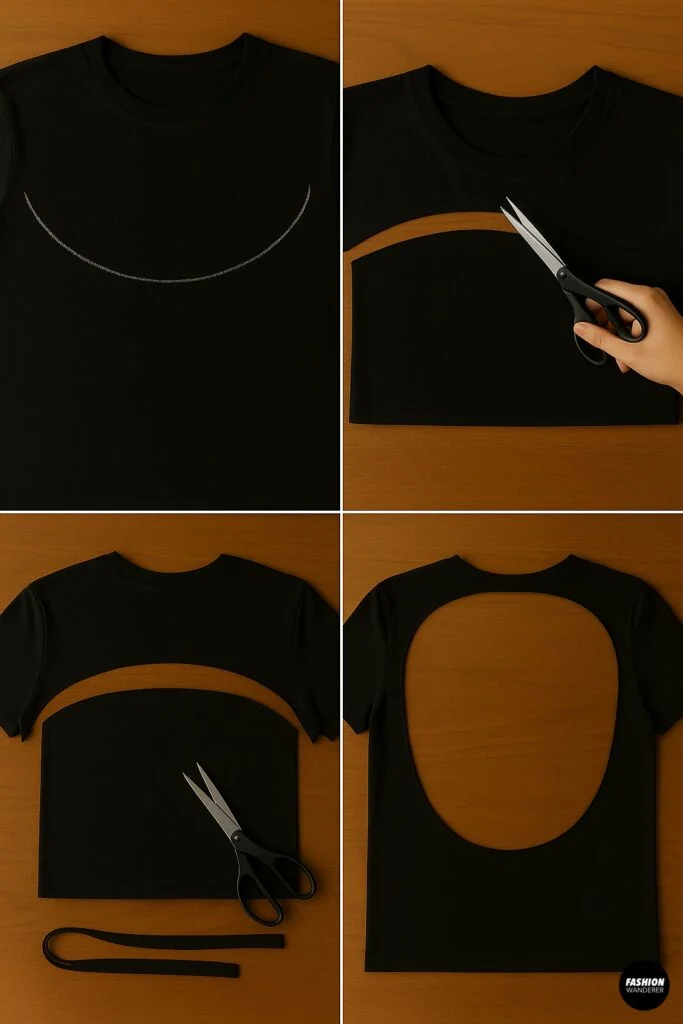
Using sharp fabric scissors, carefully cut along your chalk line. Start small—you can always cut more, but you can’t undo a cut that’s too big. Remove the back panel piece and set it aside.
Make sure the front of the shirt stays intact—this keeps the project simple and wearable.
Step 4: Shape the Straps

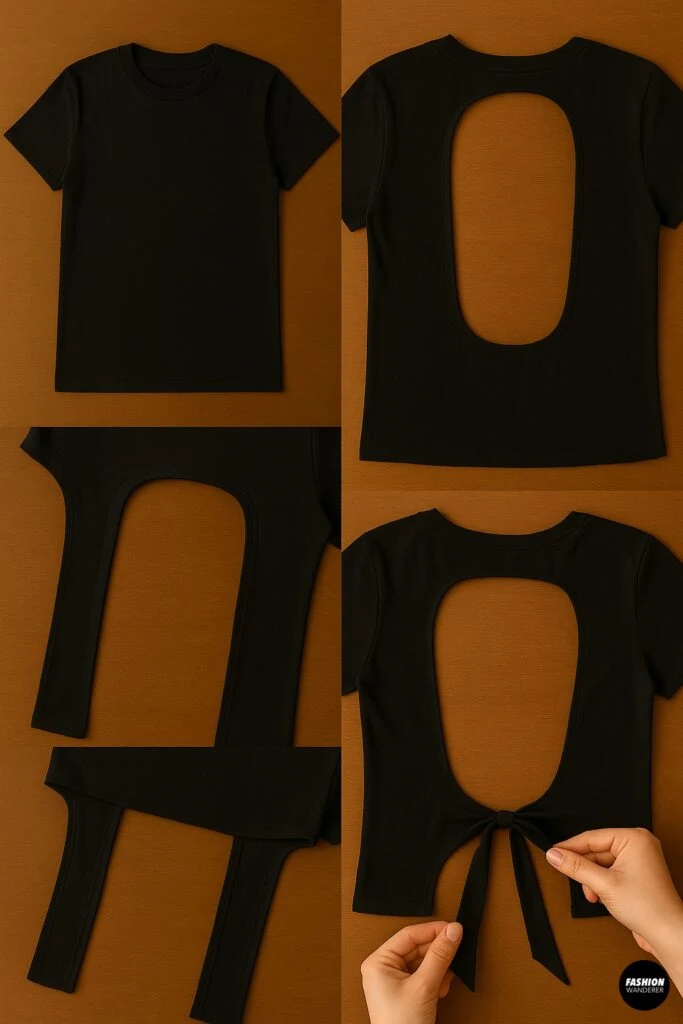
Your backless top needs stability. To achieve this:
- Keep fabric around the shoulders intact to form natural straps.
- Leave narrow strips of fabric running vertically down the sides of the cut-out to act as support.
- Optionally, cut two strips from the discarded fabric and knot them across the open back for a tied detail.
Pro Tip: Pull gently on the fabric strips after cutting. Jersey fabric curls inward, creating a smoother, cleaner look without sewing.
Step 5: Clean the Edges (Optional)

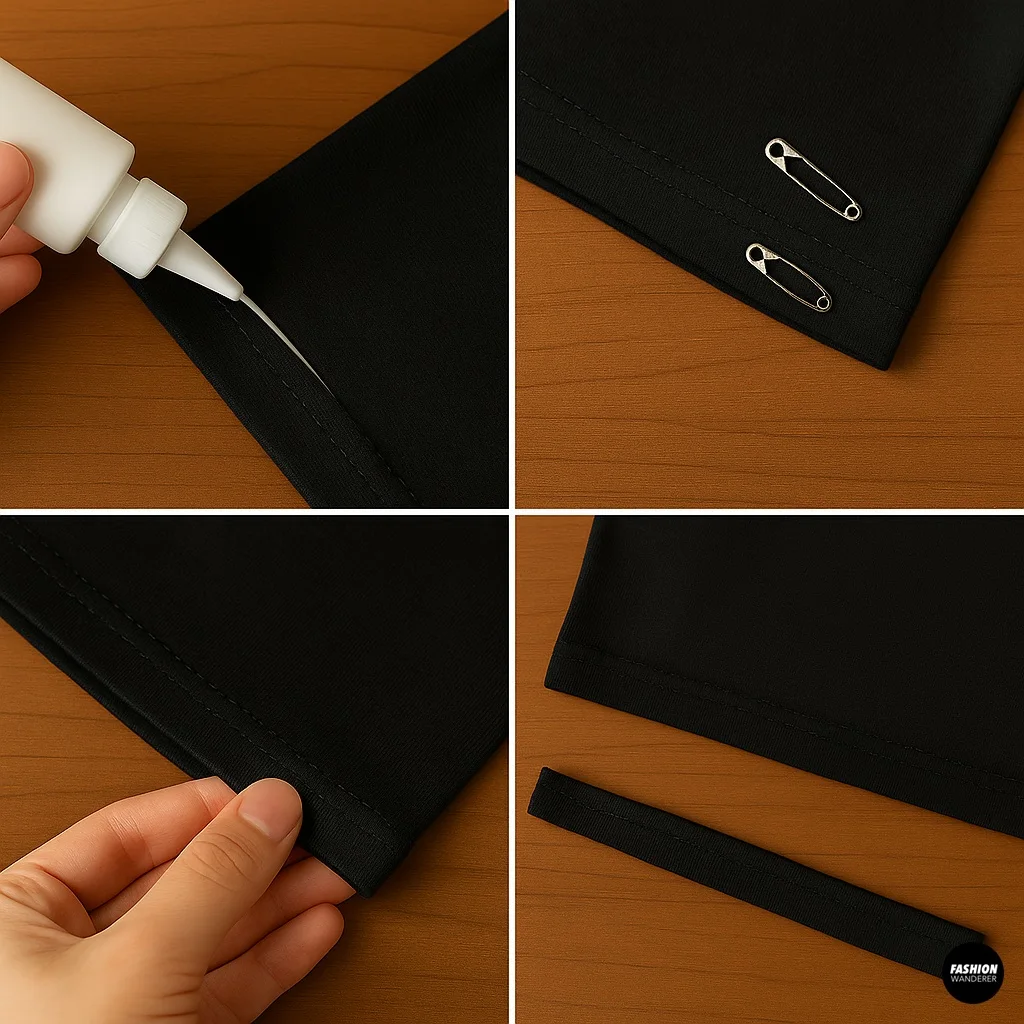
T-shirt material generally doesn’t fray, but if you want a polished finish:
- Use fabric glue along the cut edges.
- Or fold edges under ¼ inch and secure with safety pins for a tucked look.
- For an edgy, raw vibe, leave the edges as-is.
Step 6: Try It On

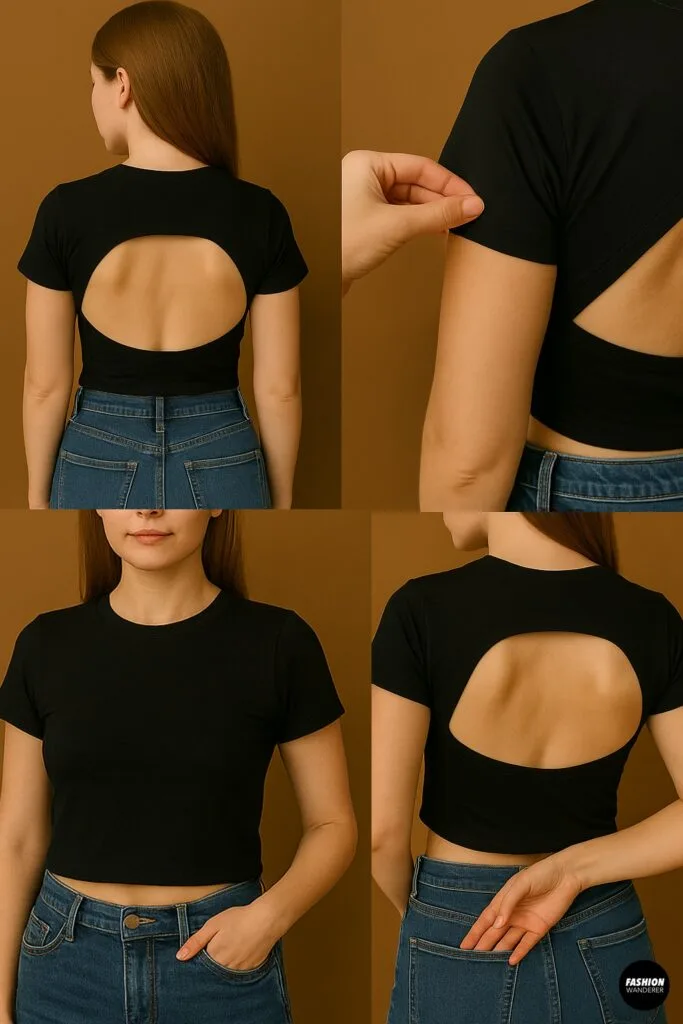
Slip the shirt on and check your cut-out placement. If the opening feels too high or too narrow, adjust with additional trimming. The goal is a flattering, open-back shape that stays secure on your shoulders.
Tie or tuck any added straps for extra support.
Styling Your New Backless Top

This DIY isn’t just about making a top—it’s about styling it to fit your personality. Here are some outfit ideas:
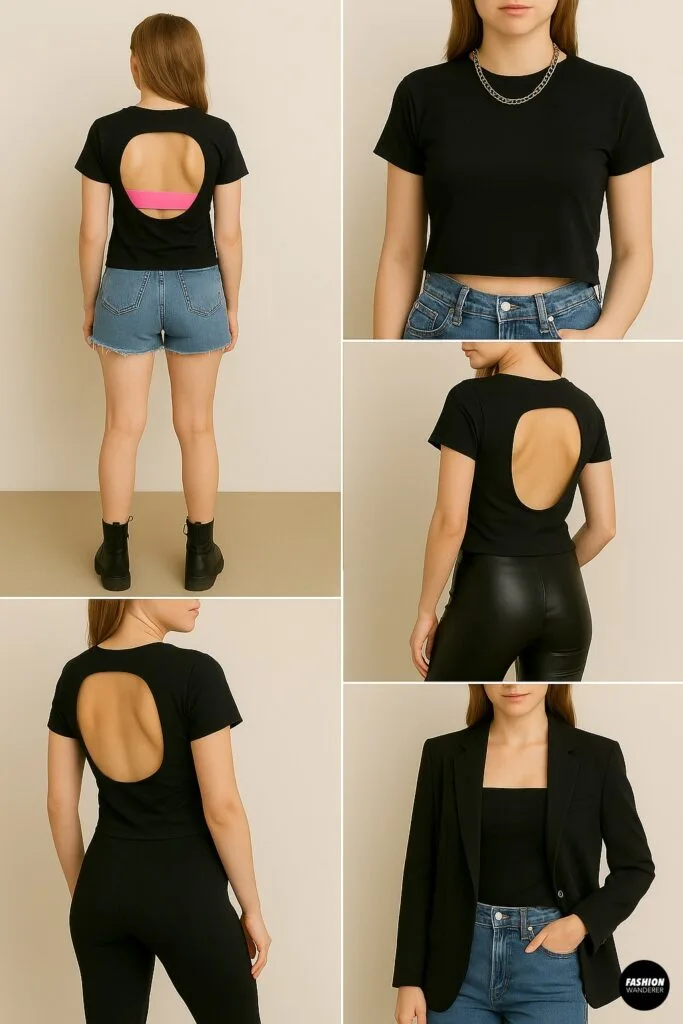
- Festival Ready – Layer your cut-out tee over a neon sports bra or sparkly bralette. Pair with denim shorts and combat boots.
- Street Style Cool – Rock a black cut-out tee with high-waisted jeans, sneakers, and layered chains.
- Night Out – Wear your backless top with faux leather pants and heels for an edgy evening look.
- Athleisure Vibes – Pair a cropped backless tee with leggings and sneakers for a gym-to-brunch outfit.
- Layered Chic – Throw on an oversized blazer over your cut-out top for a balanced, trendy style.
Variations to Try

Once you’ve mastered the basic backless cut, experiment with these variations:
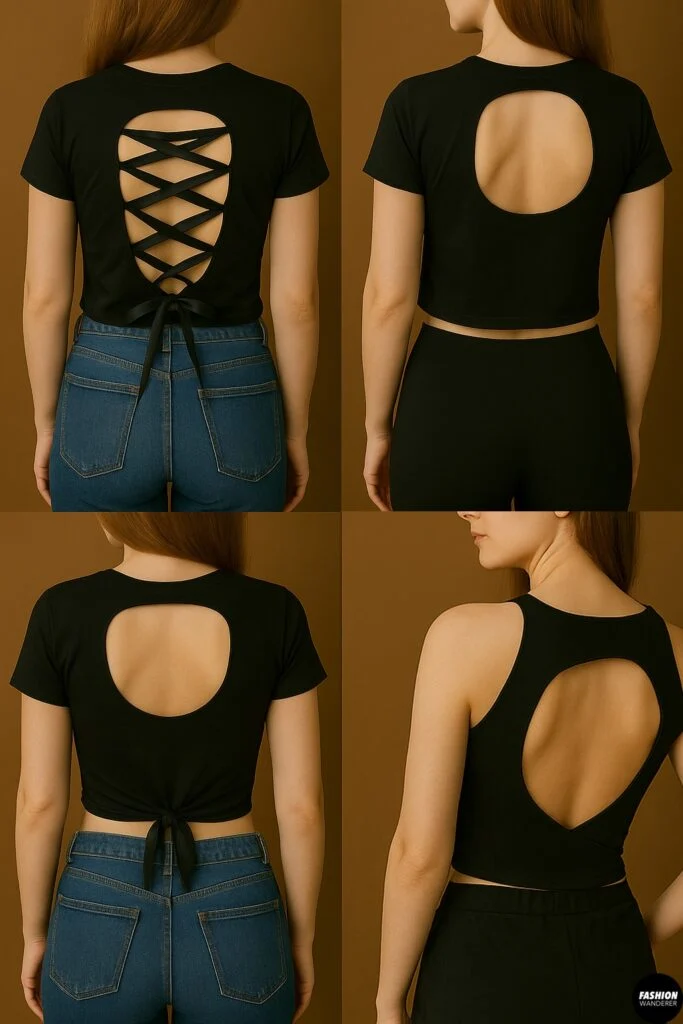
- Lace-Up Back: Cut slits along both sides of the cut-out and weave ribbon or shoelaces through for a corset effect.
- Crop It: Cut off the bottom hem for a cropped backless top—perfect with high-waisted jeans or skirts.
- Knot Detail: Cut long strips and tie them together at the lower back for a tied-knot version.
- Asymmetrical: Try one-shoulder cut-outs for a bold, editorial vibe.
Tips for Success
- Always start with small cuts—you can enlarge as needed.
- Practice on an old shirt before cutting into a favorite tee.
- Use fabric scissors only (paper scissors will leave jagged edges).
- Remember: stretchy fabrics look more polished once the edges curl.
Final Thoughts

If you’ve got a T-shirt and a pair of scissors, you’ve got everything you need to create your own cut-out backless top. It’s simple, stylish, and sustainable—a DIY that saves money and adds personality to your wardrobe.
Next time you’re staring at your closet thinking you have “nothing to wear,” grab an old tee and give it a second life as your new favorite backless top. Trust me: you’ll be surprised how often you reach for it.
Trendy, Affordable Sewing Patterns for All Sizes


Tie Shoulder Jumpsuit Pattern


Palazzo Pants Sewing Pattern


Pocket Overall Romper Pattern


Wrap Maxi Skirt Sewing Pattern


Tie Back Top Sewing Pattern