
The coquette aesthetic has taken over TikTok, Pinterest, and Instagram—and for good reason. Feminine, delicate, romantic, and oh-so-pretty, this style is all about embracing your soft side. And one of the easiest ways to get the look? DIY coquette T-shirts! With a few simple materials like lace, bows, and ribbons, you can turn a plain tee into a dreamy outfit staple.
In this blog post, we’ll walk you through how to make your own coquette-inspired T-shirts, complete with step-by-step tutorials, styling tips, and budget-friendly craft hacks.
🎀 What is the Coquette Aesthetic?
The coquette aesthetic is a hyper-feminine style influenced by vintage lingerie, balletcore, and soft girl vibes. Think pastel colors, satin ribbons, lace trims, delicate bows, pearls, and romantic silhouettes.
DIYing your own coquette T-shirts is not only fun but also a sustainable way to personalize your wardrobe with pieces that reflect your unique style.
✂️ Supplies You’ll Need
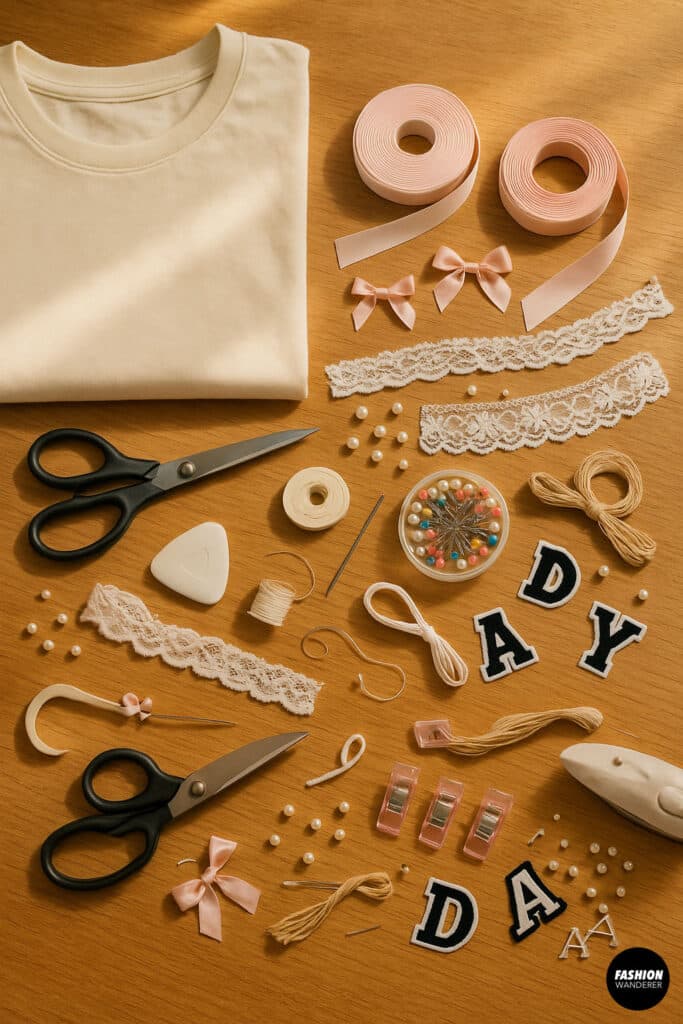

Before we start crafting, here’s a list of basic supplies you’ll want to have on hand:
- Basic fitted or oversized T-shirt (white, blush pink, soft gray, or cream work great)
- Satin ribbon (⅜” to 1″ width)
- Pre-made bows or bow-making ribbon
- Lace trim (flat lace or scalloped edge)
- Hand-sewing needle and thread (or fabric glue for no-sew)
- Scissors
- Fabric chalk or pen
- Pins or clips
- Optional: iron-on letters, pearls, or embroidery thread
🛍️ Where to Get Materials
- Craft stores like Joann, Michaels, or Hobby Lobby
- Online: Etsy for custom lace, Amazon for bulk ribbon
- Thrift stores: Grab secondhand to upcycle tees and save money
🌸 DIY Coquette T-Shirt Tutorials (Step-by-Step)
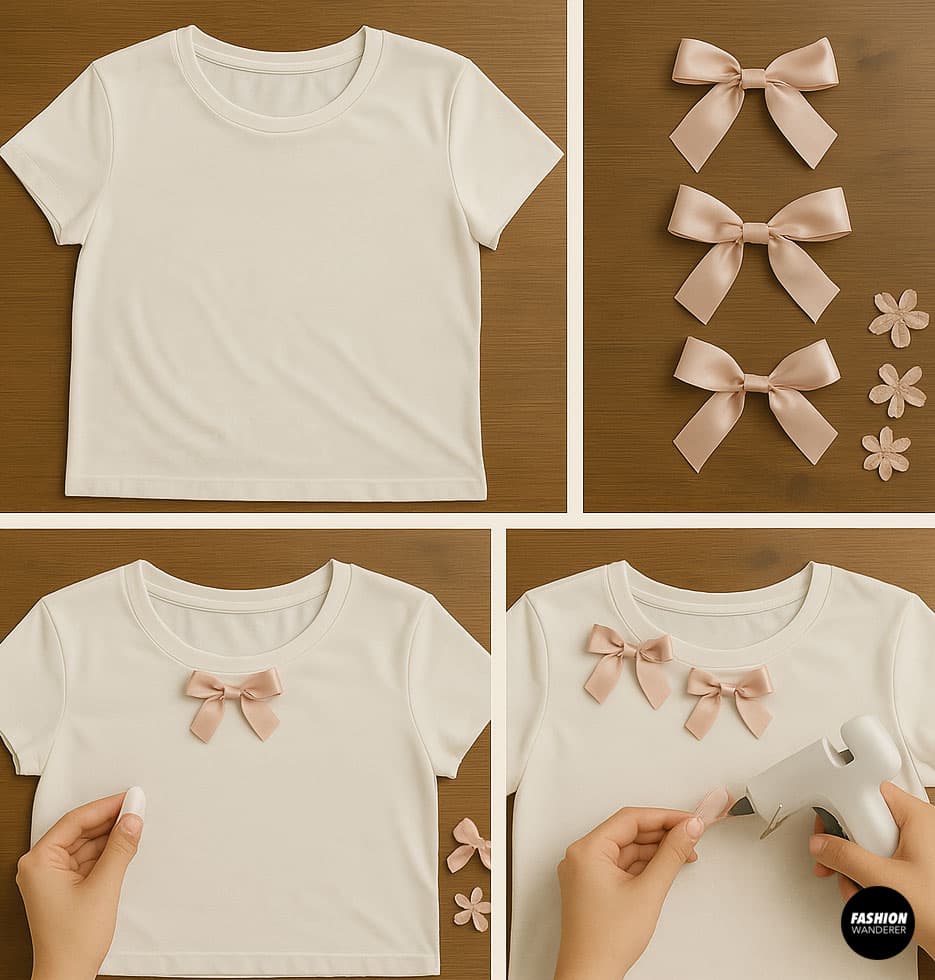
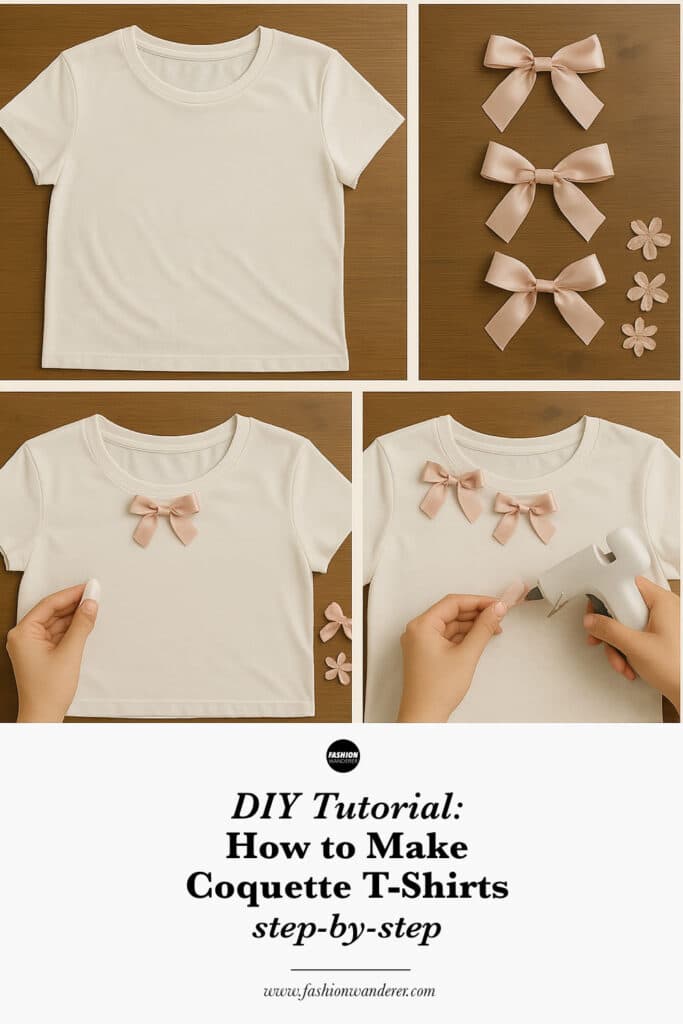
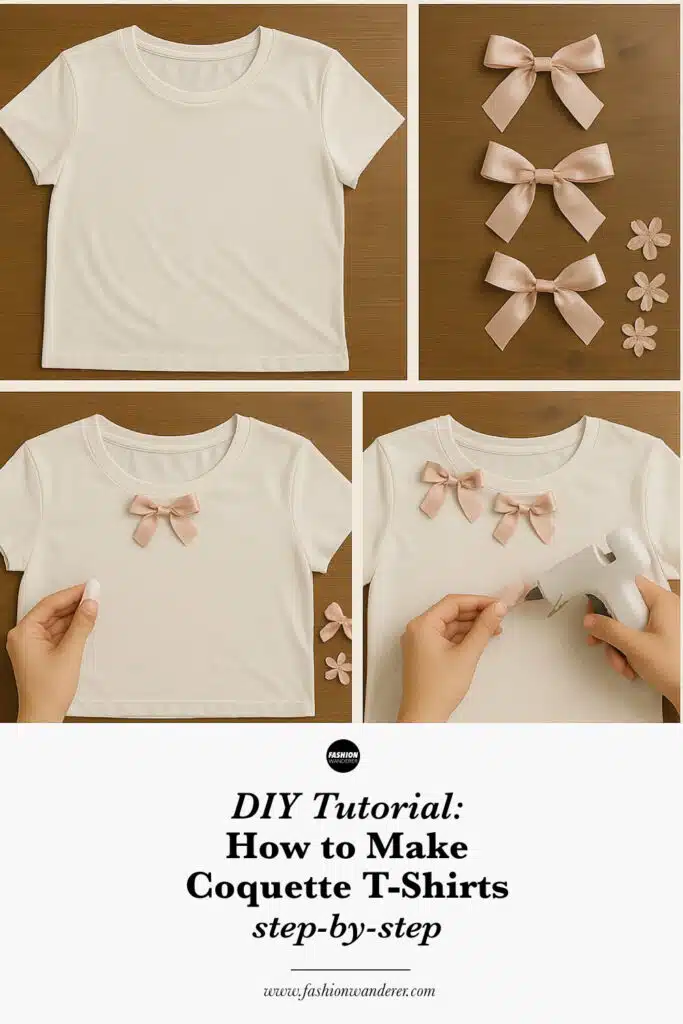
1. The Bow-Bedecked Neckline Tee
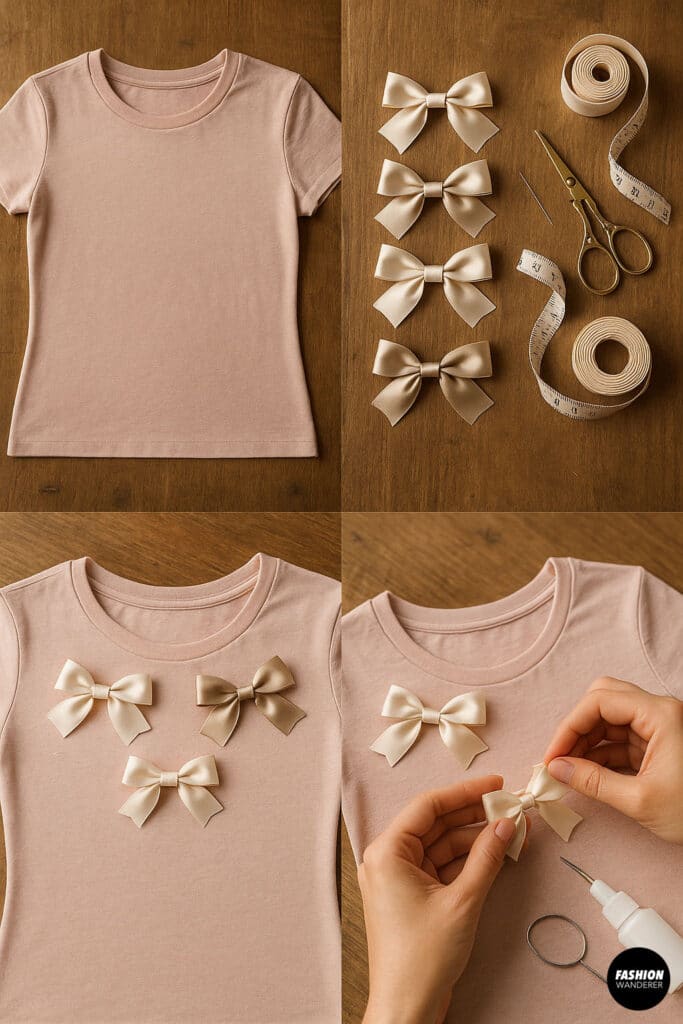

Step 1: Choose Your Shirt
Start with a fitted or baby tee in a soft pastel or neutral color.
Step 2: Cut Ribbon Bows
Use satin ribbon to create 3–5 small bows (about 2 inches wide). You can tie them by hand or use pre-made ones from a craft store.
Step 3: Position the Bows
Lay the shirt flat and place the bows around the neckline—either in the center, at the collarbones, or evenly spaced.
Step 4: Attach the Bows
Sew each bow on with a few hand stitches using matching thread. For a no-sew option, use fabric glue and press firmly for 30 seconds.
Style Tip: Pair with a mini skirt, ballet flats, and pearl hair clips for the ultimate soft girl outfit.
2. Lace Trim Sleeves T-Shirt
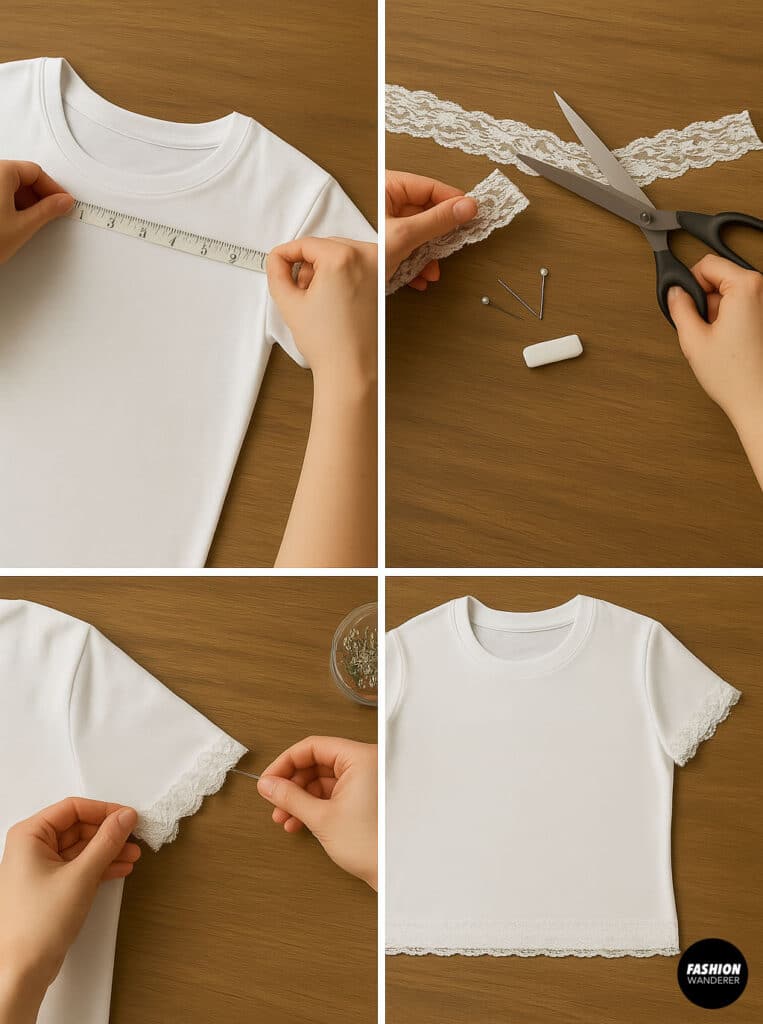

Step 1: Measure the Sleeves
Lay your T-shirt flat and measure the sleeve opening from seam to seam.
Step 2: Cut the Lace Trim
Cut two pieces of flat lace trim to match the width of each sleeve.
Step 3: Pin & Sew
Pin the lace around the edge of each sleeve. Use a basic running stitch or fabric glue to attach the trim.
Optional: Add lace along the bottom hem of the shirt for a cohesive look.
Style Tip: Tuck this tee into high-waisted jeans and add Mary Janes or kitten heels.
For more DIY inspiration, check out this no sew lace peplum top!
3. Coquette Corset-Inspired Ribbon Lacing

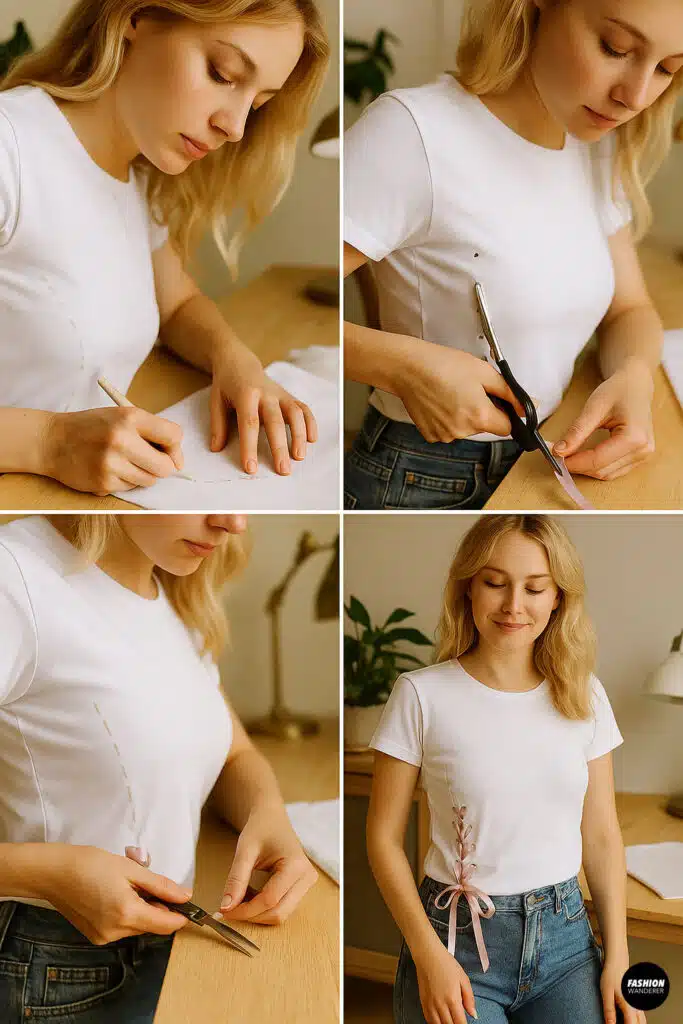
Step 1: Mark Lacing Holes
Use fabric chalk to mark 6–8 spots along each side seam of the shirt, starting a few inches below the underarm. Make sure the marks are evenly spaced and symmetrical.
Step 2: Cut Small Holes
Use scissors or a seam ripper to carefully poke small holes where marked. Finish edges with fray-check if needed.
Step 3: Weave the Ribbon
Thread thin satin ribbon through the holes like a corset. Tie a bow at the bottom to secure.
Step 4: Secure
Knot or stitch the ribbon ends inside to keep them from slipping.
Style Tip: Wear this tee with a tulle skirt and dainty layered necklaces for an ultra-romantic look.
4. Embroidered “Soft Girl” Lettering
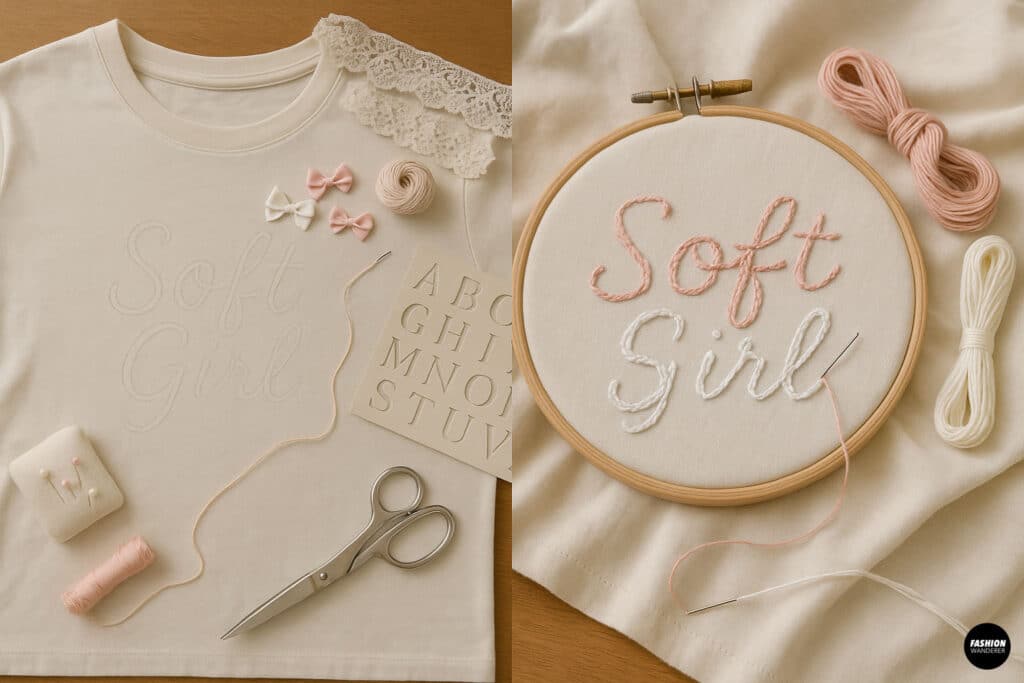
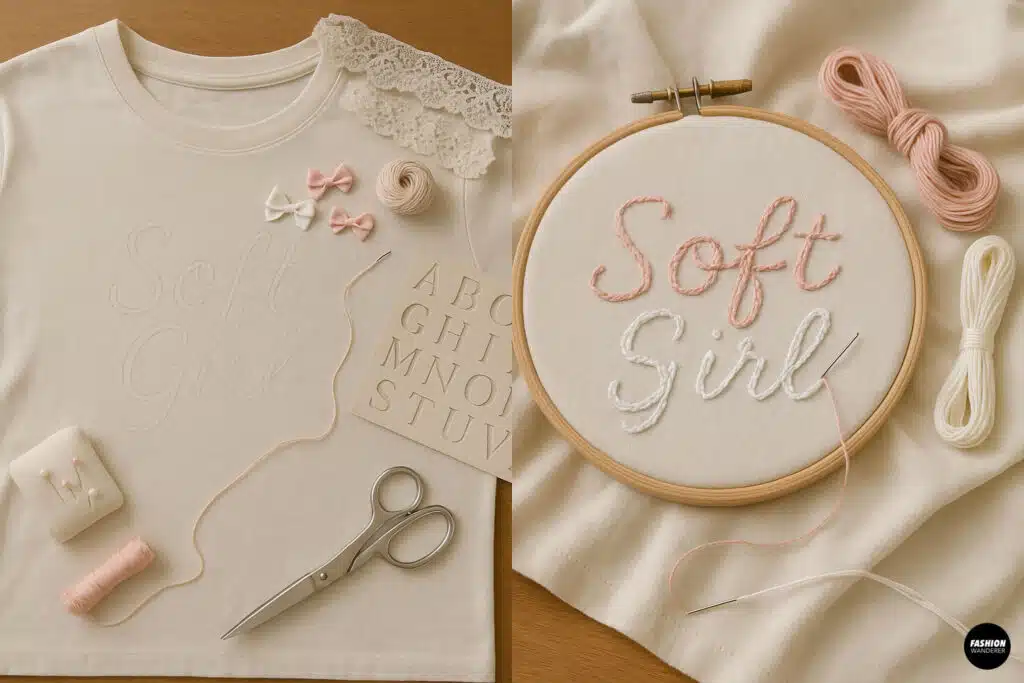
Step 1: Sketch Your Design
Use fabric chalk or a stencil to lightly sketch your text (“Soft Girl,” “Lover,” “Sweetheart,” etc.) onto the shirt.
Step 2: Start Embroidering
Use embroidery thread and a backstitch to outline each letter. Take your time—this adds an elegant, personal touch.
Optional: Add mini stitched hearts, stars, or flowers around the lettering.
Style Tip: Tuck into a lace-trimmed slip skirt and wear with a cropped cardigan.
Add this look to you hand embroidered t-shirt collection!
🪡 No-Sew Hack: Bow Appliqué T-Shirt

If sewing isn’t your thing, grab a glue gun or fabric glue and try this 10-minute no-sew DIY.
1. Lay your shirt flat
Choose a soft tee and lay it on a clean surface.
2. Place a few pre-made bows
Stick to three: one at the neckline, and one on each sleeve.
3. Glue & press
Use fabric glue to attach each bow. Let dry fully before wearing or washing.
This is perfect for beginners or anyone doing a quick last-minute outfit transformation!
💡 Tips for Making Your DIY Coquette T-Shirts Look Boutique-Worthy
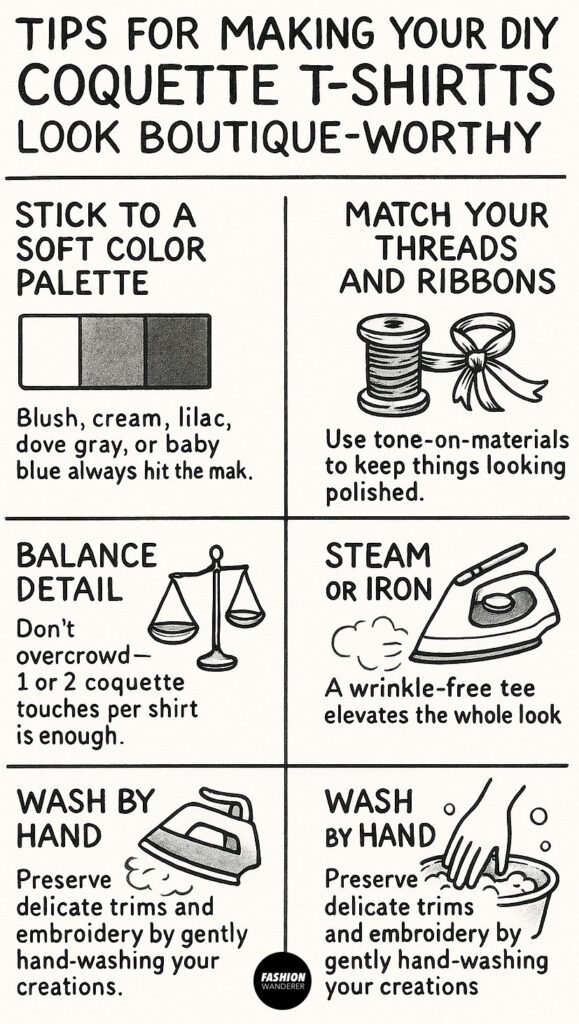
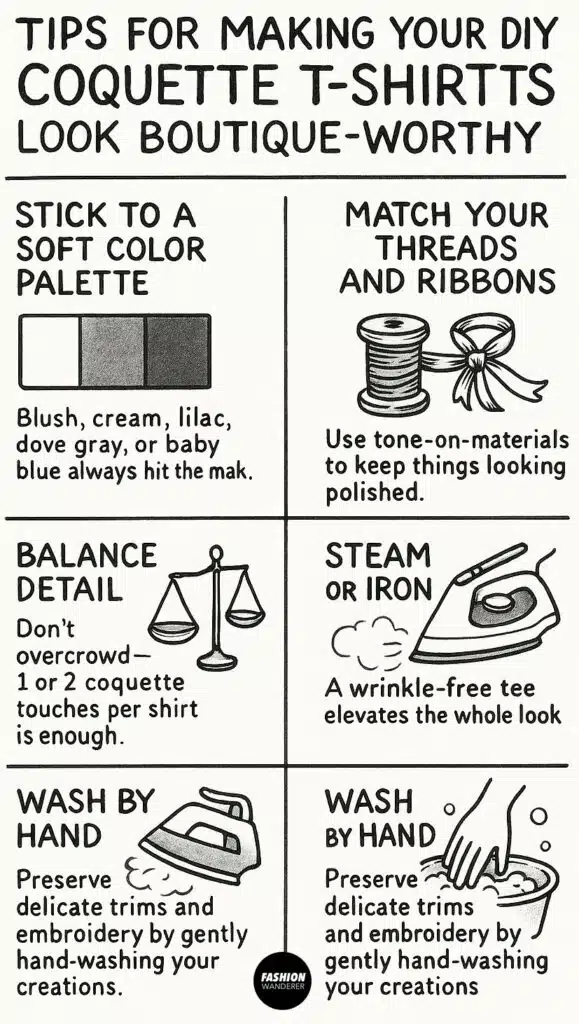
- Stick to a soft color palette: Blush, cream, lilac, dove gray, or baby blue always hit the mark.
- Match your threads and ribbons: Use tone-on-tone materials to keep things looking polished.
- Balance detail: Don’t overcrowd—1 or 2 coquette touches per shirt is enough.
- Steam or iron: A wrinkle-free tee elevates the whole look.
- Wash by hand: Preserve delicate trims and embroidery by gently hand-washing your creations.
📸 Bonus: How to Style and Photograph Your DIY Coquette Tees
- Use natural light, a white or blush-toned backdrop, and soft props like vintage books, pearls, or lace scarves.
- Show full outfits with cute skirts, flared jeans, or ballet flats.
- Close-up shots of bows, stitching, and lace trim perform very well on Pinterest.
💕 Final Thoughts
Creating your own DIY coquette T-shirts is the perfect blend of creativity, sustainability, and personal expression. Whether you’re adding a sweet satin bow or lacing up corset details to your upcycle clothing, each piece becomes a one-of-a-kind treasure that reflects your soft, romantic side.
Tag your creations with #FashionWandererOfficial and #DIYCoquetteTee on Instagram or Pinterest to join the community and inspire others!
Trendy, Affordable Sewing Patterns for All Sizes


Tie Shoulder Jumpsuit Pattern


Palazzo Pants Sewing Pattern


Pocket Overall Romper Pattern


Wrap Maxi Skirt Sewing Pattern


Tie Back Top Sewing Pattern