
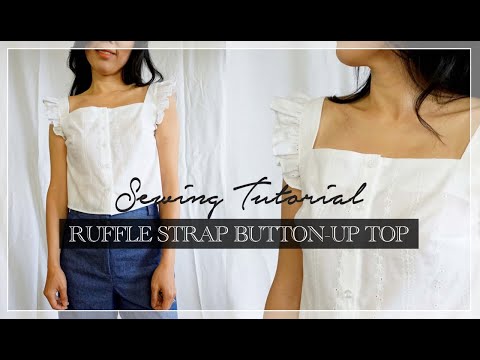
Searching for a cute easy-to-wear summer top sewing pattern to add to your DIY wardrobe? This Millie tank top features loose and airy silhouette, square neckline, adorable ruffled flutter straps, and button up closure at front.
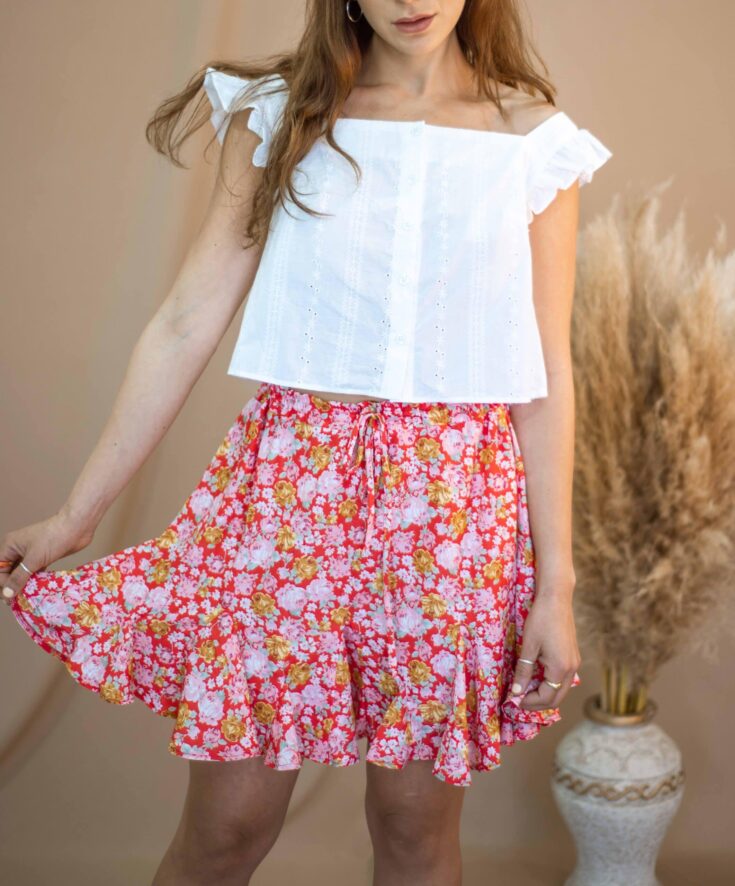
It gives a happy and retro vibe top to match perfectly with high waist jeans or mini skirt, and also can be paired with a cardigan for cooler evening temps. It will become your favorite lightweight spring and summer top.
How do you make ruffle strap button-up top? Machine wash in warm water and tumble dry the embroidered eyelet cotton fabric before cutting and beginning the sewing project.
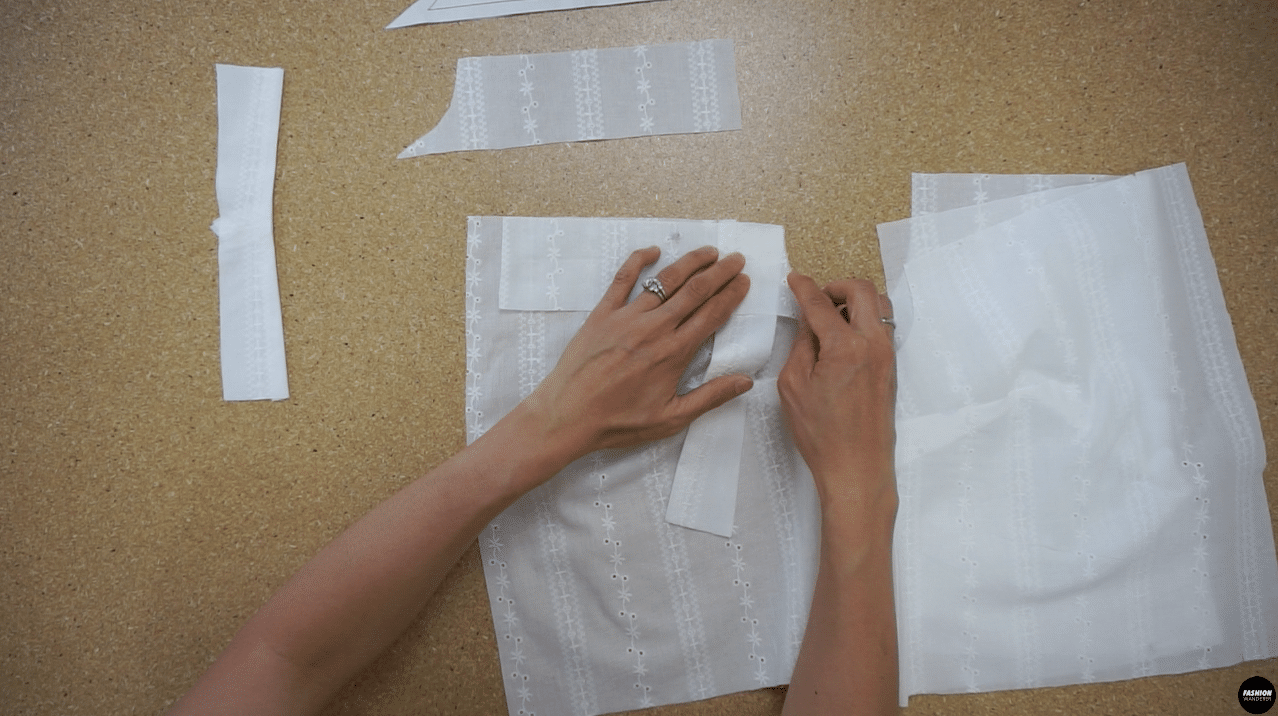
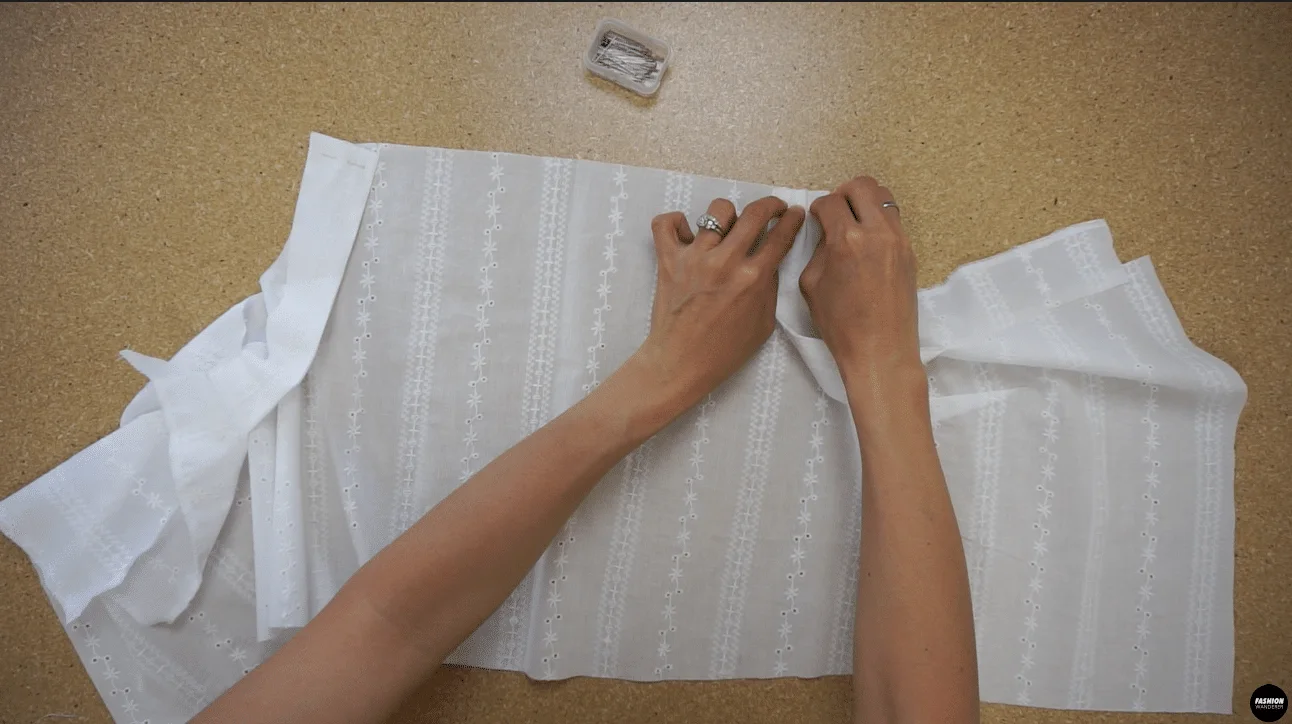
Lay the pattern pieces along the selvage of the fabric and cut out along the size dotted line. Follow the sewing tutorial to make this cute ruffle strap button-up top from gathering to create ruffles, add facing along the neckline, and insert button and buttonhole to complete the garment.
If you have never made buttonholes with your sewing machine before, this beginner friendly tutorial will help you to professionally nail the buttonholes and button closure on the placket. By using buttonhole sewing foot and adjusting the stitch type, you can easily accomplish clean buttonholes that are store-bought quality.
Each and every Fashion Wanderer sewing pattern consists of step by step pictures and video instructions, followed by sewing tips and hacks to apply fabrics you chose for each project.
Also, the how-to tutorials are easy to read and detailed enough for any beginner level to complete. But if you need additional help in certain steps or have questions regarding the Millie top, feel free to contact me on any platform, I’m here to help you in every step!


DIY Ruffle Strap Button-Up Top Sewing Pattern


You will love this DIY ruffle strap button-up top because…
- The Millie top sewing pattern comes in size from US 2 to 12 and UK 6 to 16 to select from.
- Each sewing pattern piece incorporates ⅜” wide seam allowance that are is enough to make any fitting adjustments.
- Learn to sew buttonhole with sewing machine and add buttons by hand sewing in place.
- Use special techniques to sew facing on front and back square neckline to give clean finish.
- Master the ability to sew ruffles with straight stitches to manually create ruffle amount along the armhole.
- Beginner friendly sewing project to learn basic sewing skills from sewing darts for the right fit to finish the garment with hemming the proper way.
This is a fun top that you can breathe in easily. The design features an elegant square neckline front and back with playful ruffled short sleeves.
In addition, the extended button placket and neckline facing is there to accomplish a high quality garment.
Use this DIY ruffle strap button-up top sewing pattern and tutorial to turn into full length top or mini dress version of your desire.


How to make ruffle strap button-up top from scratch
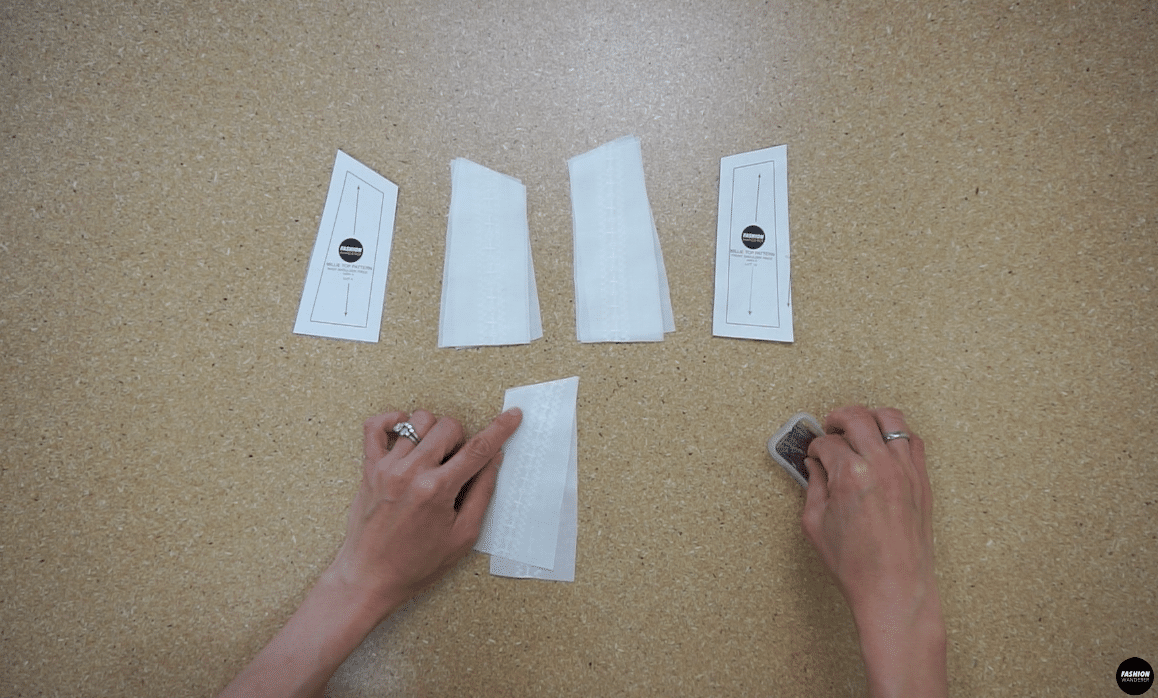
Print out the Millie top pattern and use the diamond shape on each page to assemble the pdf sewing pattern to prepare yourself to sew.
Double check your body measurement and match with the size guide chart to select the correct dotted line to cut out. In this tutorial, you only need chest and waist to find the true top size.
It is important steps to not cut corners before transferring to the fabric. As a result, you won’t have to deal with complete wrong fit and issues later on.
Whether you choose embroidered eyelet cotton fabric or seersucker gingham fabric, find out the fabric content and special instruction to care the fabric beforehand.
For all woven cotton base fabric, pick cotton or polyester thread and size 70/10 universal sewing needle. Always start with knowing how to thread a sewing machine properly and change sewing needle if you see dull needle point or bent needles.
As a result, you may avoid from skipped stitches or jammed thread that leads to destroying your sewing machine. Whether you are making buttonholes or sewing darts on the bodice, thread a bobbin to have clean and even under stitches along the way.
DIY Ruffle Strap Button-Up Top Tutorial Material:
- Millie Top Sewing Pattern
- Embroidered Cotton Eyelet 1 yards for 60” width or 1½” yards for 45” width
- 5 Pieces of 4-Hole Plastic Button Size 18L (11mm)
- Buttonhole Sewing Foot
- (Optional) Interfacing
- Measuring Tape
- Water Erasable Fabric Pen
- Pins
Transfer the bust dart on sewing pattern to the right and left Front Top pattern pieces to the fabric on the wrong side. Mark the dart point and leg with ruler and water erasable pen. Pin along the dart leg, then straight stitch and tie a knot on both ends to secure the stitches instead of using a backstitch.
Join the Front Top and Back Top bodice facing each other on the right side and sew along the seam allowance. Then, finish the seam with overlock stitch to secure and press the seam toward the back.


Assemble the shoulder strap pieces by sewing along the shoulder seam for both Outer and Inner pieces and press the seam open. Place right side facing together on both pieces and sew ⅜” width seam allowance only on the right hand side of the pieces. Flip the strap inside out and press with iron along the sewn seam.
Lay the shoulder straps on the bodice by matching the notches and cover with Front Facing. Then, sew ⅜” away from the neckline and finish the Facing ends with overlock stitch. Do the same on the left Front Top Bodice and Back Top Bodice with Back Facing and Back strap.
Turn the Front and Back facing toward inside of the garment and press along the neckline to shape.
Fold ⅜” width to follow the top and bottom notches to create button placket on both front bodice. Fold again 1” width and press to create folded line. Insert the Front Facing ends between the folded placket and edge topstitch from top to bottom
Use wide double stitch length to create manual gathering on the sleeve. Match the notches on the body and sleeve to evenly distribute the ruffles and pin to position. Ensure the ends of the sleeve or underarm overlap ½”. Sew along the armhole and finish with overlock stitch.
Locate the buttonhole and button by 2½” distance apart and use buttonhole sewing foot to add buttonhole along the placket. Use seam ripper to open the buttonhole. Hand sew the buttons on the other side of placket. Double fold ¼” wide along the hemline to straight stitch and finish the Millie top.


DIY Ruffle Strap Button-Up Top Sewing Tips


Sewing with embroidered cotton eyelet fabric is a classic summer fabric that is breezy, romantic, and delicate.
This fabric that we are working on for this sewing project has small patterned cut-outs that are finished with embroidered stitches throughout the body of the fabric. The base of the fabric is usually made from cotton, linen, or voile.
When sewing embroidered eyelet cotton fabric to make this ruffled strap button-up top, use these sewing tips and techniques to handle the delicate fabric properly. This top may look complex for beginner due to the design elements from ruffle sleeve to faced neckline and button placket at front. However, this step by step tutorial will guide you to create this adorable summer top.
In this sewing tutorial, we are going to use basic straight stitch to create gathering, attach facing on neckline, and hemming on the garment you are about to sew. If you already downloaded the Millie sewing pattern, review these sewing tips to help you understand the process much easier and smoother.
- Sewing Needle: When sewing cotton material, the weight and thickness of fabric determine the approach. For any lightweight, use size 70/10 sewing needle, for medium and heavy weight select size 75/11 or size 90/14 for best results. These needles are universal needles that are great for general woven fabrics because the tip has a slightly rounded point.
- Thread: To select the correct thread for this tutorial, it is all about the fiber content and weave rather than the design. If you are sewing a garment that is based on cotton or linen embroidered eyelet fabric, utilize cotton or polyester thread.
- Stitches: Set the machine to standard tension setting between 3 and 4. Based on the weight of the fabric, loosen or tighten the tension to avoid puckering on any stitches. For cotton or linen, shorten the stitch length between 1.8 to 2.5 mm. However, when making ruffled sleeve to get gathering, change to 3.5 stitch length to easily maneuver the gathering across the top of the sleeve.
- Button: When sewing buttonholes, slightly reduce the upper tension to produce a neat buttonhole. Use buttonhole sewing foot to help you achieve the right size buttonhole for your button. If you are working with lightweight fabric, add interfacing or stabilizer that is same as your fabric behind the button placket to avoid ripping the fabric. When cutting to open buttonholes, use a sharp seam ripper or fabric scissors and place two pins at then the end of the buttonholes to avoid cutting too far.
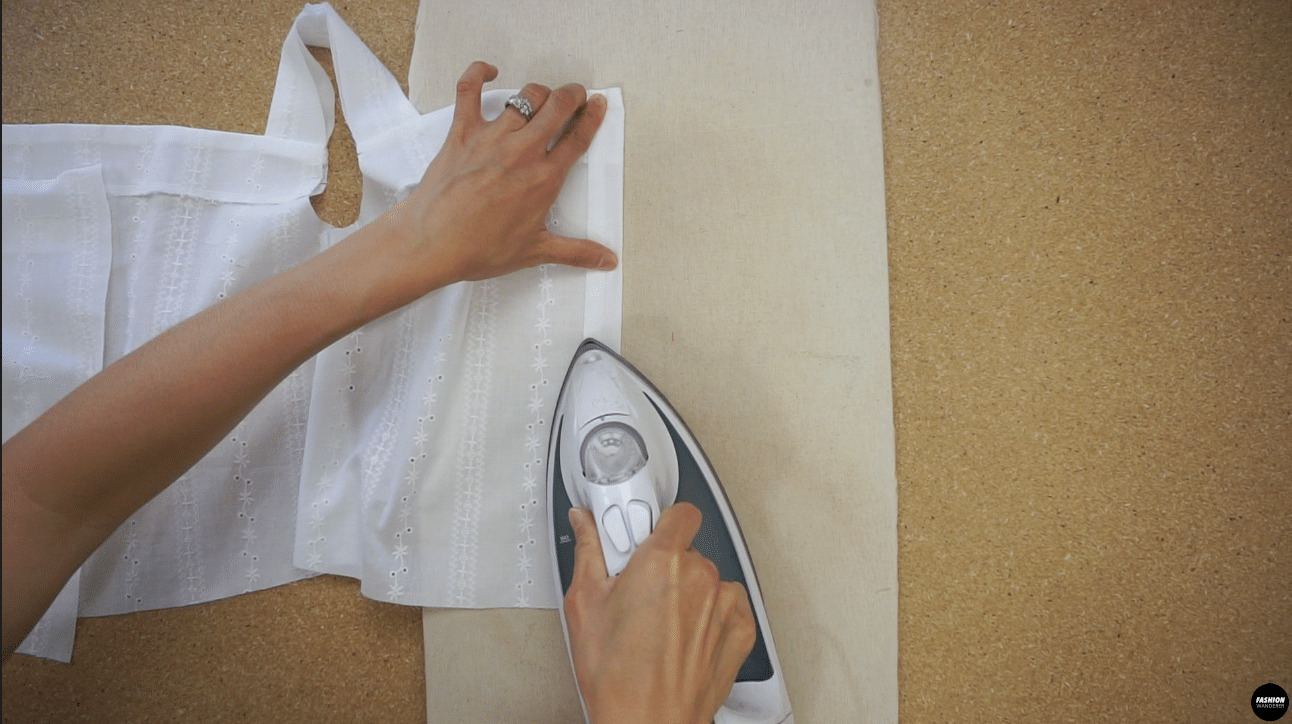
- Ironing: Make a habit of pressing or ironing on the wrong side of the eyelet whenever possible to avoid from flattening any embroidery design on the surface. Most of time the thread that are used to embroider the eyelet is synthetic, which can be harmed by overheating. Test the fabric before ironing by using a press cloth.
- Facing: In this tutorial, we are going to use facing to clean finish the front and back neckline to give nice crisp straight edges. Depending on the delicate holes on the surface of fabric, if you have wide open designs with light weight content, do not use fusible interfacing directly on the fabric. Instead use fusible on your underlinings or use less visible silk organza.
To make ruffle strap button-up top, you do need to understand some sewing tips on embroidered eyelet cotton fabric. Due to complex surface design, the tidy seam finishes are recommended including French seams, Hong-Kong finish, or edge seams with Serger will look best.
Also, when hemming, use a simple turned or double fold hem for lightweight eyelet. For heavily embroidered eyelet, overlock stitch the edges and single fold to finish the hemline.
Always test on a scrap of cotton or linen base fabric, to make sure to find the best stitch tension and length that looks good on the fabric you selected. Use these sewing tips and techniques to complete Millie summer top free from stress and mistakes!

DIY Millie Ruffle Strap Button-Up Top
What are you sewing this summer? If you are looking for an easy to wear and adorable summer piece, this top will be a perfect go-to item that you can proudly add to your DIY wardrobe. Simply follow these step by step instructions to learn basic stitches to sew darts, ruffles, facing, buttons, and many more!
This Millie tank top features loose and airy silhouette, square neckline, adorable ruffled flutter straps, and button up closure at front. Also, the silhouette is slightly cropped length that you can easily add couple more inches to convert into regular length.
From frill sleeves to button-up front closure, this garment includes effortless and practical design elements. Sew along with tutorial with guide from the sewing pattern to help you to fulfill this retro vibe top to pair with any high waisted pants or skirt of your choice.
Materials
- Millie Top Sewing Pattern
- Embroidered Cotton Eyelet 1 yards for 60” width or 1½” yards for 45” width
- 5 Pieces of 4-Hole Plastic Button Size 18L (11mm)
Tools
- Sewing Machine
- Serger
- Buttonhole Sewing Foot
- Thread
- Fabric Scissors
- Measuring Tape
- Water Erasable Fabric Pen
- Straight Pins
- (Optional) Interfacing
Instructions
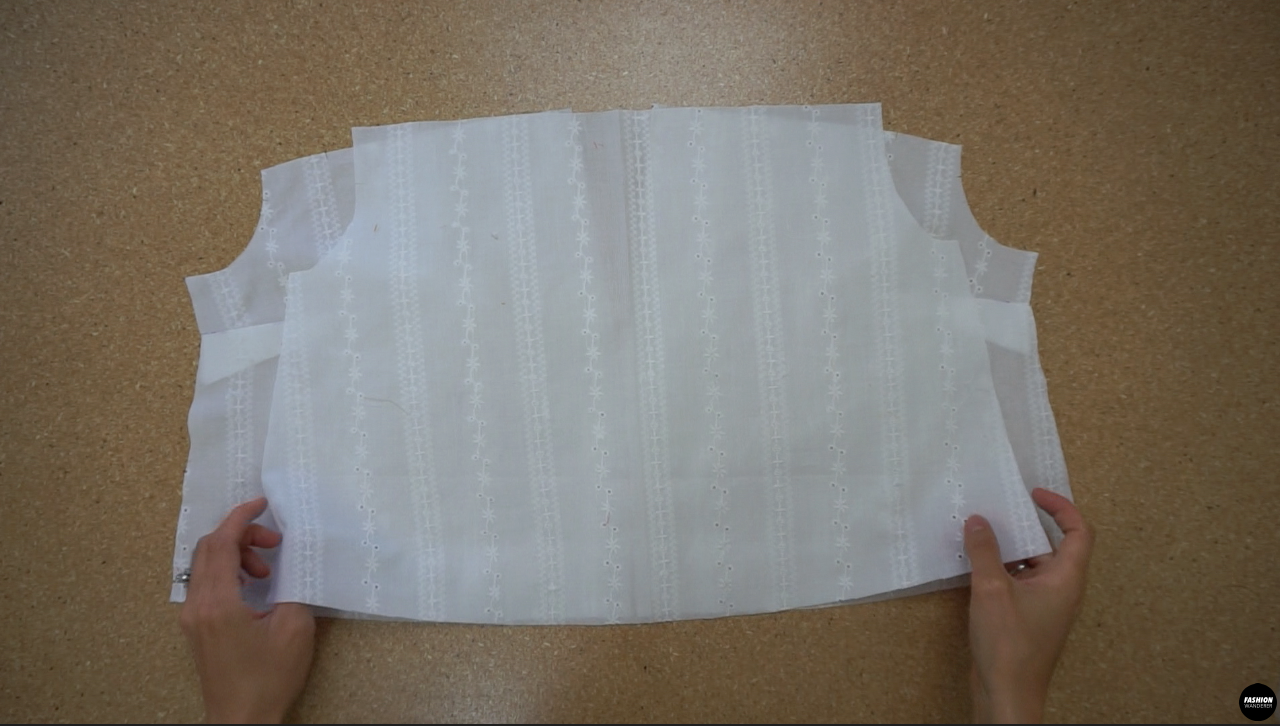
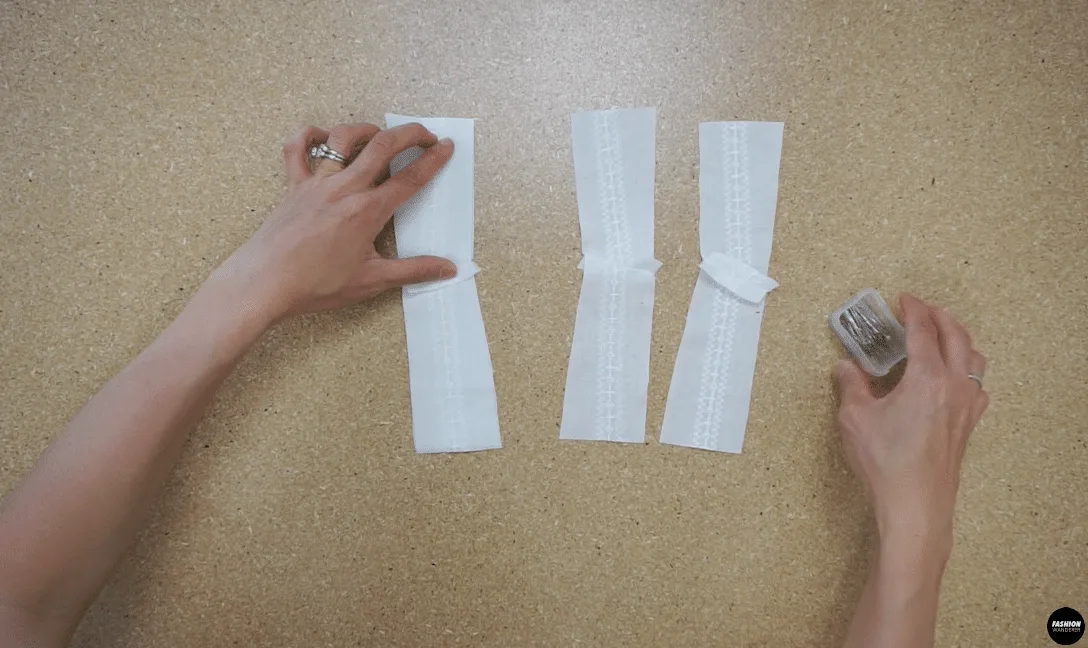
For this Millie ruffle strap button-up top tutorial, start by assembling the pattern pieces:
2 pieces of Front Top
1 piece of Back Top
4 pieces of Front Shoulder
4 pieces of Back Shoulder
2 pieces of Front Facing
1 piece of Back Facing
2 pieces of Sleeve
How to Sew Bust Dart
- Flip the Front Top pattern wrong side up and match the dart leg on the side seam. Pin through the dart point to transfer the location on the wrong side of the right and left Front Top pieces.

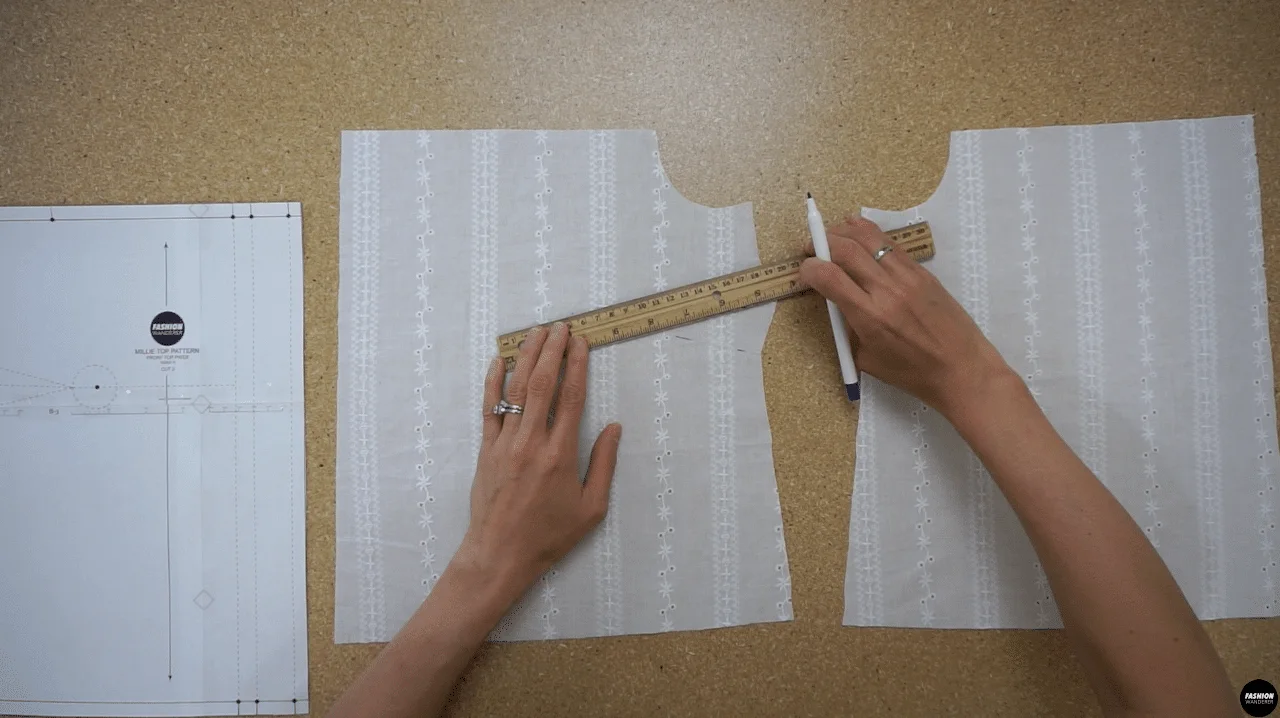
- Use a ruler and water erasable pen to draw the dart point and leg to make it easy to sew.
- Fold the right side of dart and pin along the dart leg without back stitching. Tie a knot on the start and end of dart to secure the stitches on both bodice.
- Press the dart so it faces toward the hem.
How to Make Bodice
- Place the right side of the Front Top and Back Top facing each other, sew ⅜” width wide seam allowance on both side seam and overlock to finish the edges.

- Press the seam toward the Back bodice and set aside.
How to Sew Shoulder Strap Pieces
- Lay right side of the Front Shoulder and Back Shoulder facing together and sew ⅜” width straight stitch and press open the shoulder seam.

- Next, place right side of the Outer Shoulder strap piece and Inner Shoulder strap piece facing each other and only sew ⅜” width seam allowance on the right hand side with the seam toward the neckline on both sides.

- Flip the strap wrong side facing each other and press along the sewn seam.
How to Assemble The Bodice and Strap
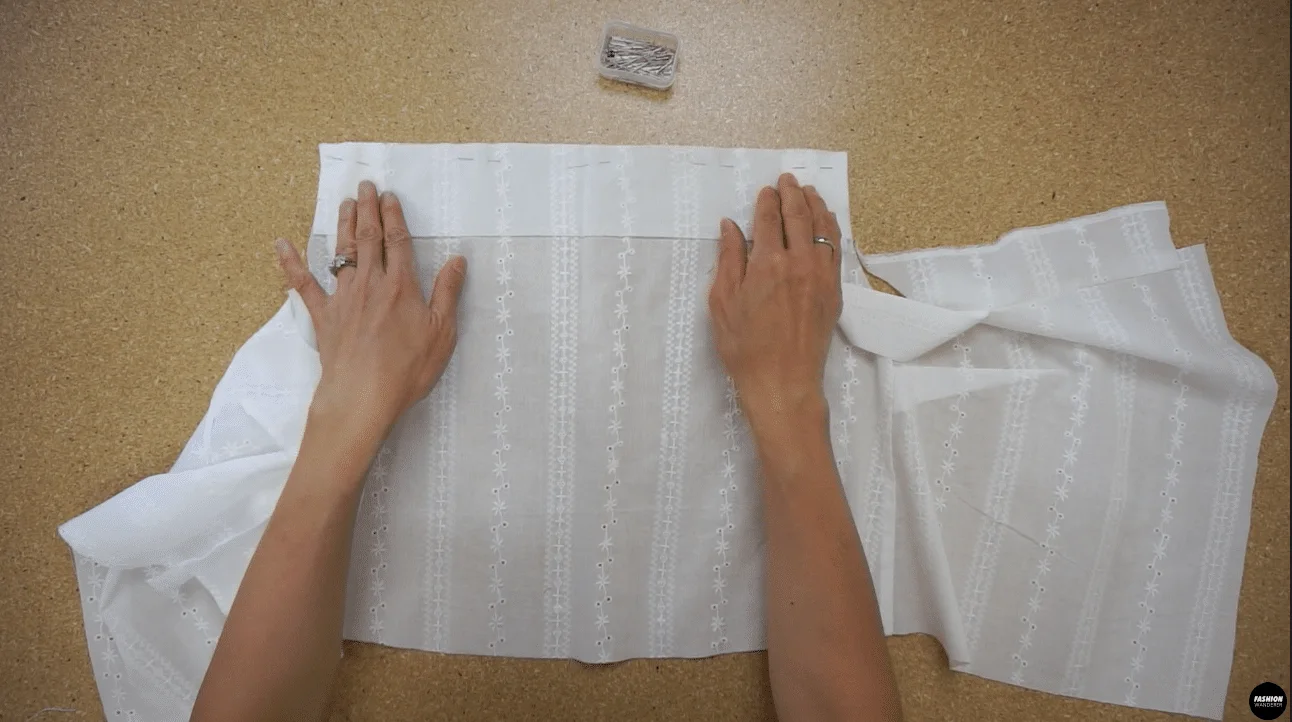
- Place the Front strap on the right side of Front Top bodice notch, cover with Front Facing and pin. Start sewing along the front neckline ⅜” away from the armhole edge to ⅜” away from the cut edge. Finish the Facing ends with overlock stitch.

- Do the same on the left side of the Front Top Bodice.

- Put the Back strap on the Back Top bodice notch.
- Cover the straps with Back Facing and pin.
- Sew along the back neckline ⅜” away from the top edge and finish the ends with overlock stitch. Flip the Front and Back facing, fold inside and press with iron to shape the neckline.

How to Make Button Placket
- Fold the right side of the Front Top bodice ⅜” width and press with iron to create folded crease line. Next, fold again 1” width and press with iron. On the second fold, sandwich the Front Facing ends in-between. Edge topstitch ⅛” along the folded button placket top to bottom.

How to Sew Ruffle Sleeve to Bodice
- Finish the sleeve hem with double fold ⅛” width or use narrow hemming sewing foot to straight stitch around.
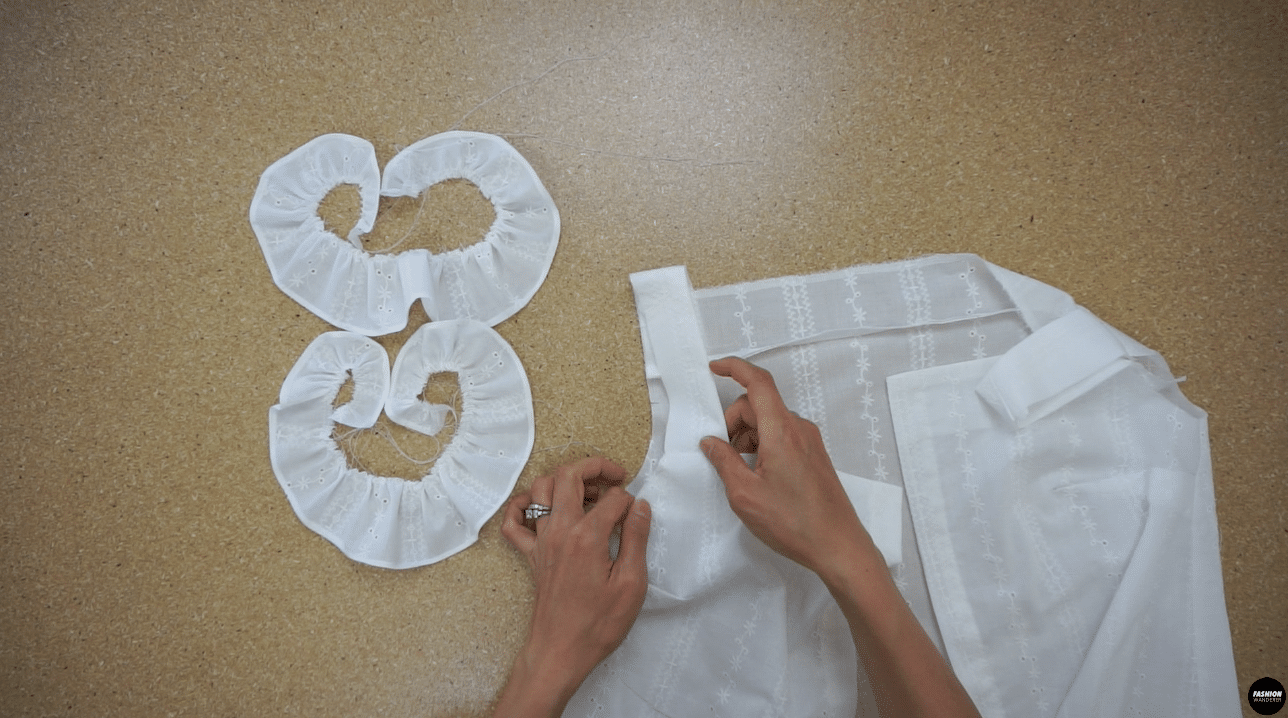

- Adjust the sewing machine to 3.5 stitch length and double straight stitch ⅛” apart along the top edge of the both sleeve pattern pieces. Gently pull the back thread to evenly distribute the gathering.
- Match the top notch of the Sleeve with shoulder seam, front and back sleeve notch with single and double notch on the bodice, and side seam with under sleeve by overlapping the sleeve ends with ½” and pin along the armhole.
- Sew ⅜” width seam allowance around the armhole and finish the cut edges with overlock stitch. And secure the ruffle sleeve by edge topstitching ⅛” around the armhole. As a result, your ruffle sleeve will stay positioned instead will flip.
How to Finish Ruffle Strap Button-Up Top
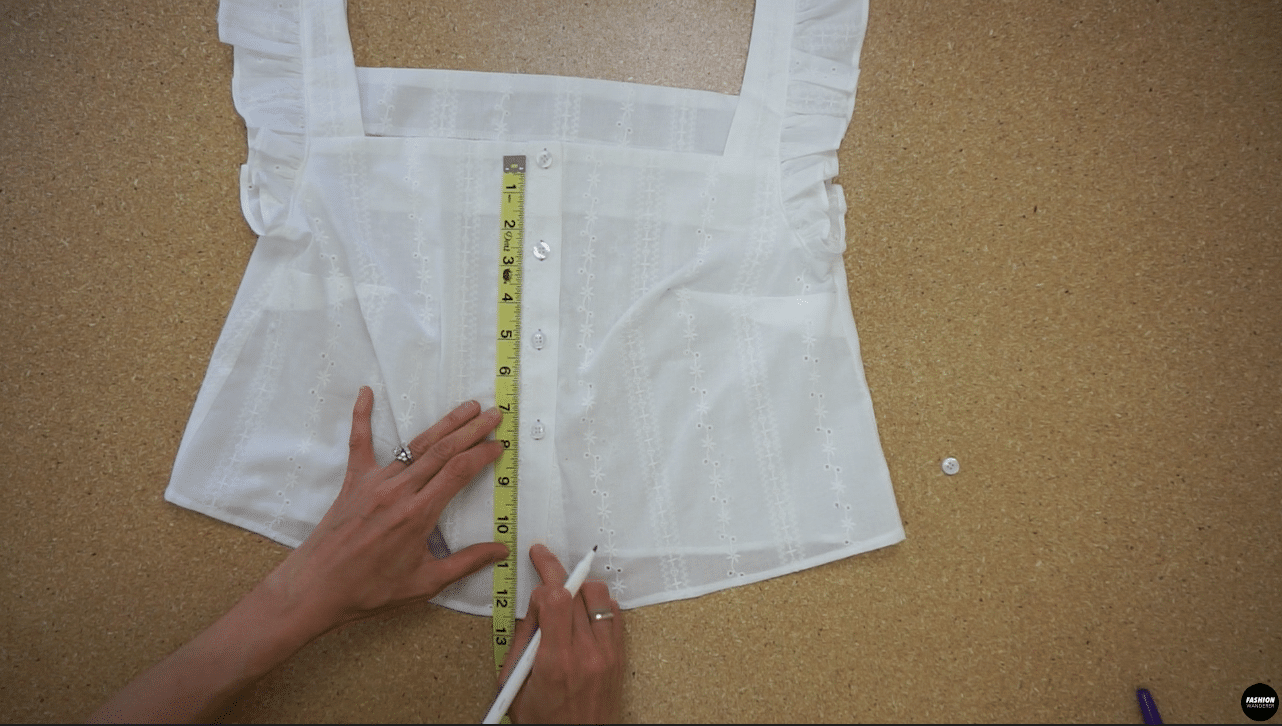
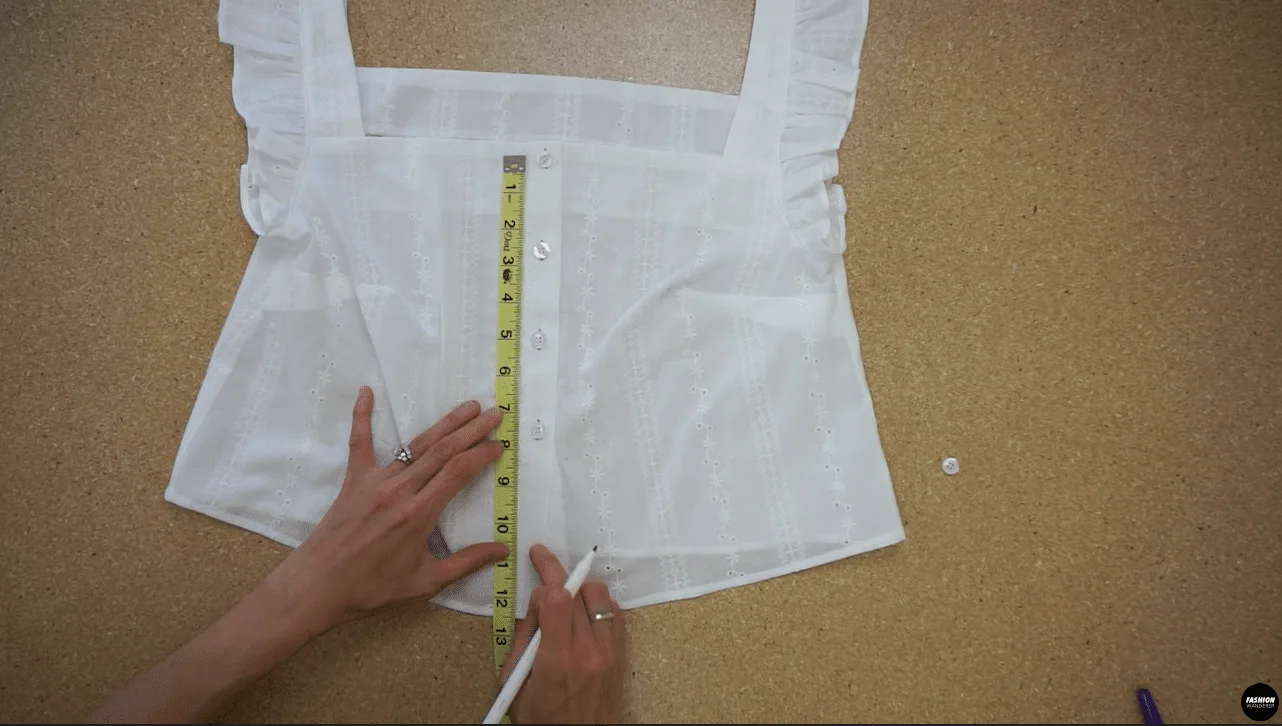
- Use 5 pieces of size 18L, which is equal to 11mm or 7/16” wide, 4-hole plastic button to position along the button placket. Place the first button ¼” away from top edge. Measure 2½” away from the center of the button and mark with water erasable pen. Do the same for 3 remaining buttons to position the location.
- Insert the button to the back part of the buttonhole sewing foot. Replace the sewing foot with buttonhole foot on your sewing machine. Select a buttonhole stitch number 30 on your sewing machine.
- Position the fabric with the front end of the buttonhole mark, and align with the red mark on the side of the buttonhole foot, then lower the presser foot lever facing back of the bracket. Start sewing the buttonhole and raise the needle and presser foot lever to trim the thread.
- Use seam ripper to open the buttonhole.
- Next, transfer the center of the buttonhole to the left side of the button placket, mark the button position and hand sew the buttons.
- Double fold the hem ¼” and straight stitch around to complete this Millie ruffle strap button-up tank top. Pair with high waisted jeans or skirt of your choice. Enjoy your new go-to summer piece!


Recommended Products
As an Amazon Associate and member of other affiliate programs, I earn from qualifying purchases.


Trendy, Affordable Sewing Patterns for All Sizes


Tie Shoulder Jumpsuit Pattern


Palazzo Pants Sewing Pattern


Pocket Overall Romper Pattern


Wrap Maxi Skirt Sewing Pattern


Tie Back Top Sewing Pattern