
Looking for a cute and easy summer dress idea that you can sew at home? Here is a trendy ruffle shoulder gingham mini dress that is an easy men’s dress shirt upcycle idea for a quick transformation!
From ruffles to smocking and tiered maxi silhouettes, there are many dress from men’s shirt projects for you to search through. For each design, I demonstrate how to make a dress without a pattern so that you can easily follow along.
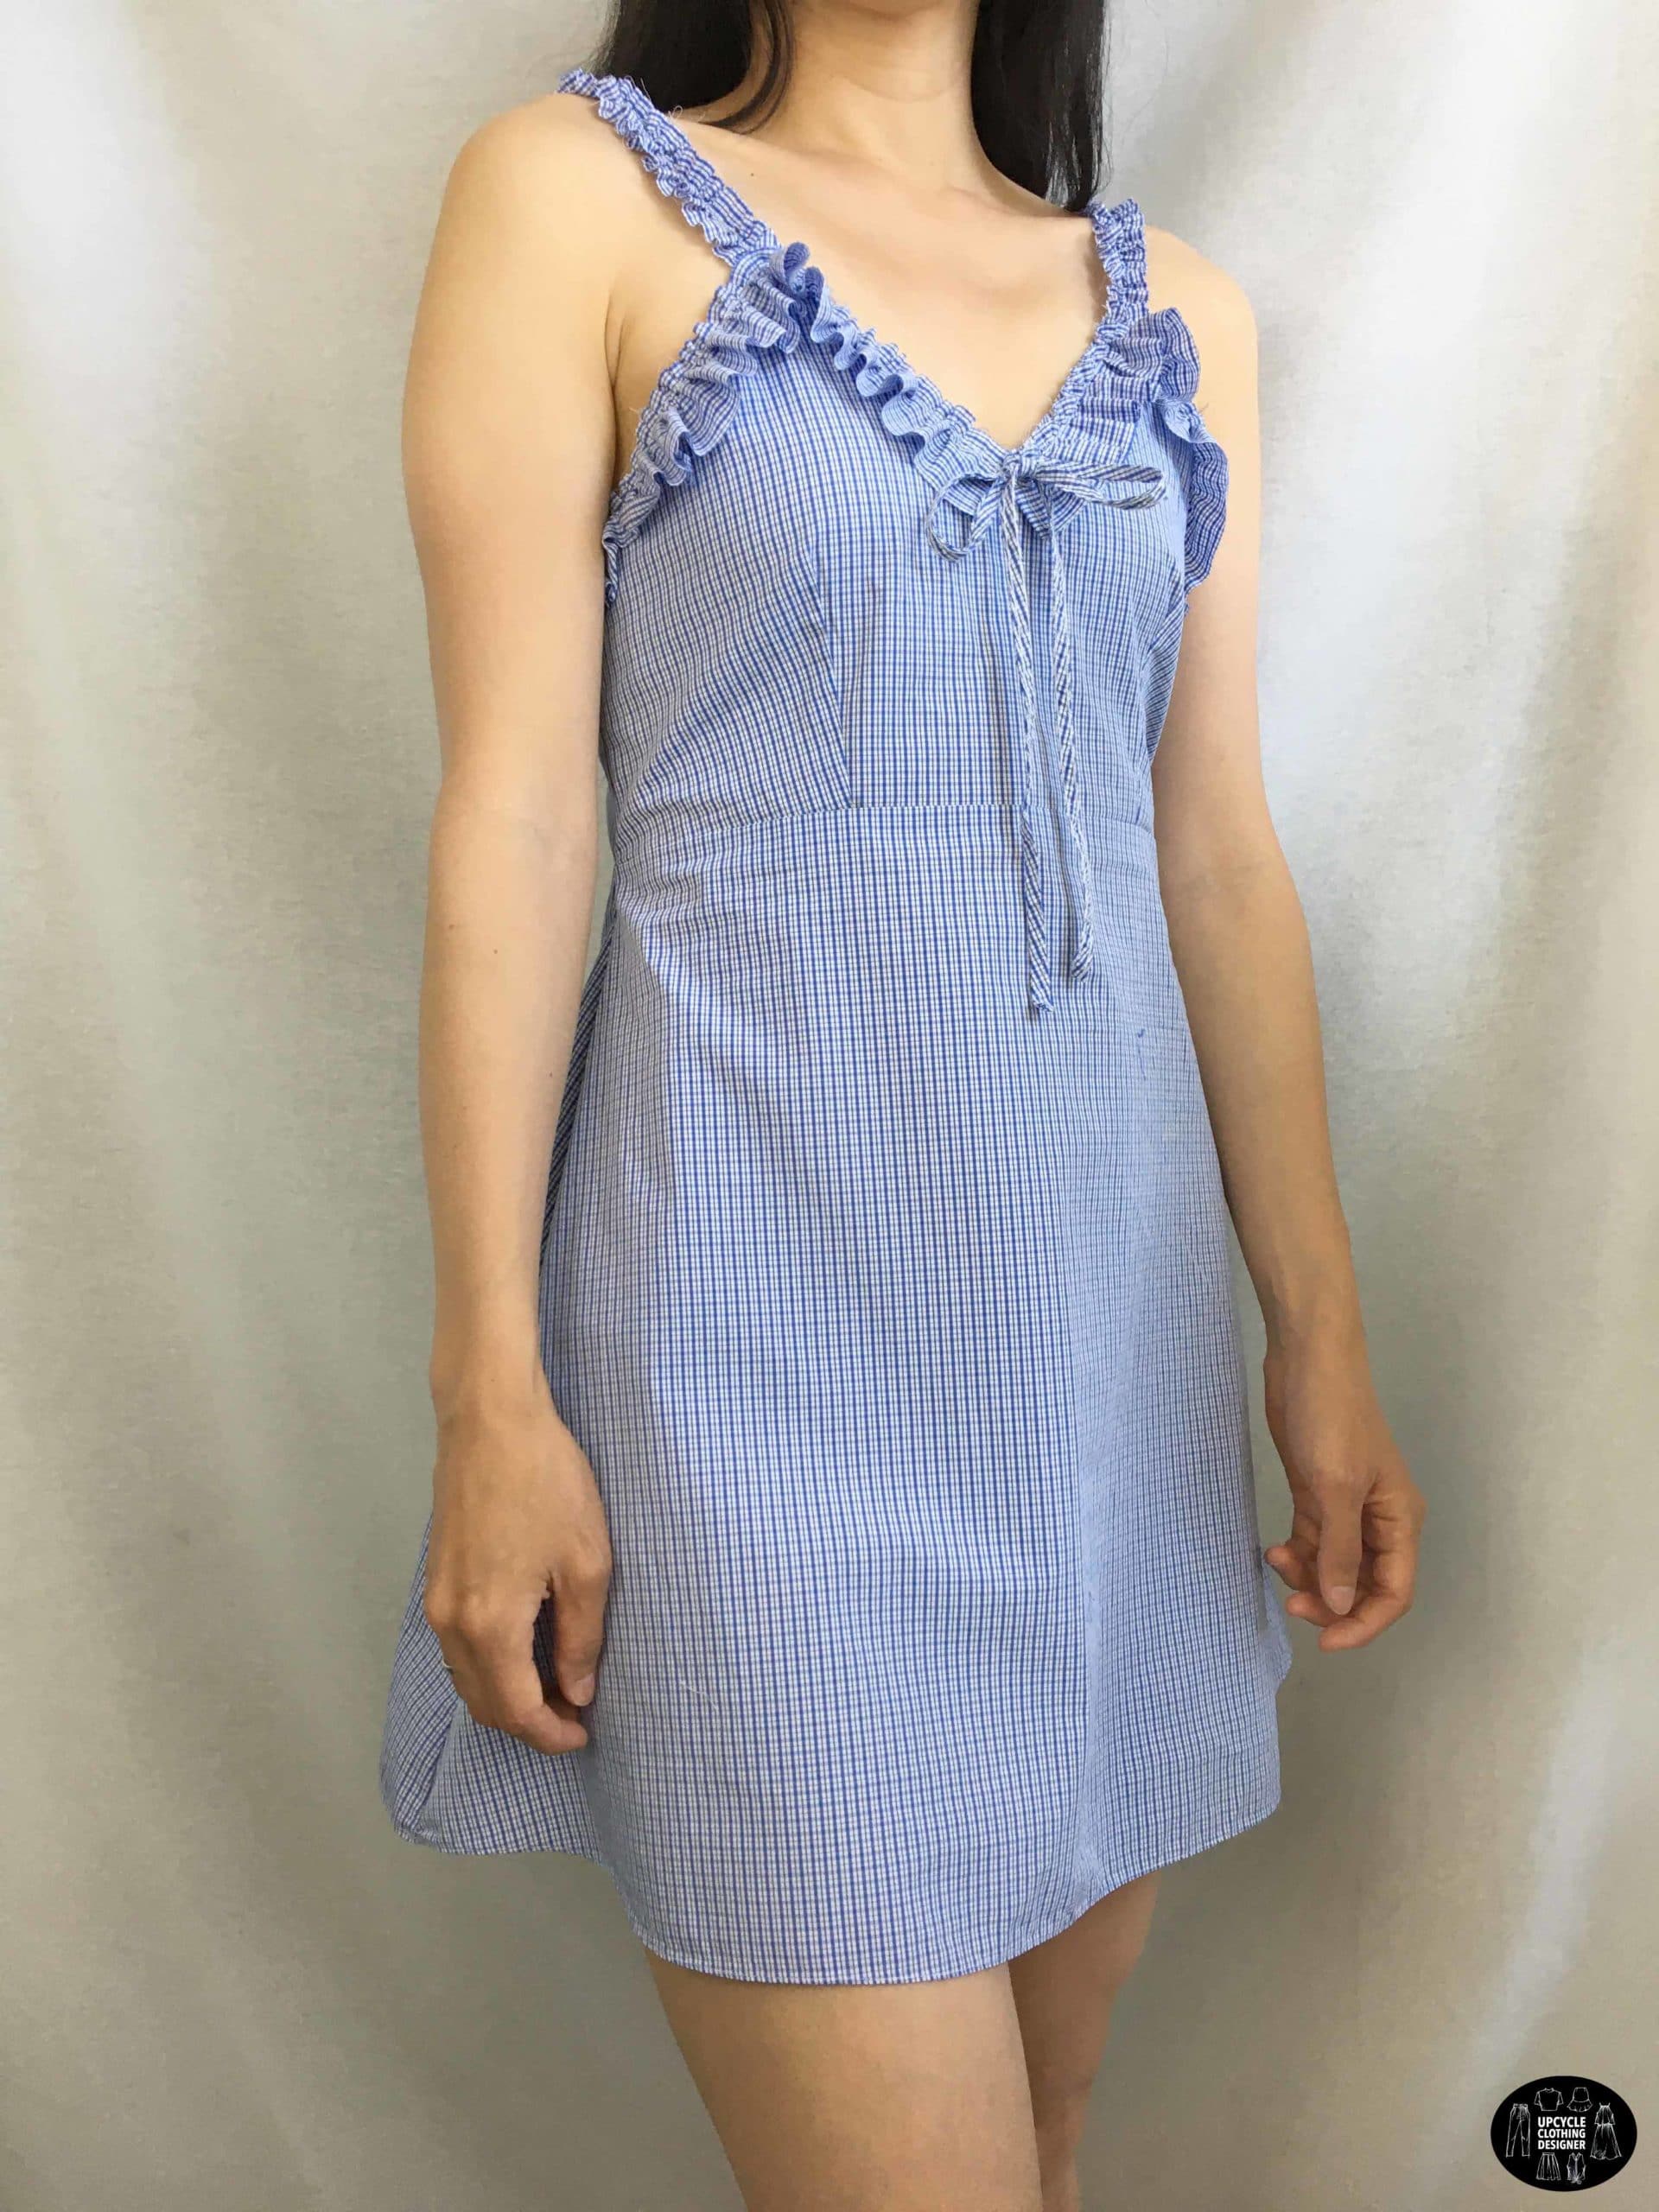
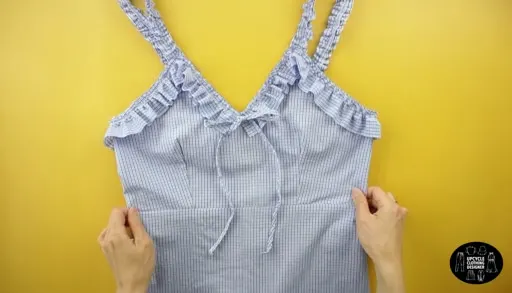
The mini ruffles detail around the shoulder strap and neckline give a flattering look to the upcycled clothing design. In addition, the raw edges make it easy to sew and add to the overall texture of the design.
Furthermore, the mini gingham pattern is so fun to work with. Whether you have blue or red gingham, the colors will work well to refashion a shirt into this fashion forward mini dress to add to your DIY wardrobe.
You will love this ruffle shoulder mini dress from men’s shirt because…
- Learn how to make bust darts on both sides that look identical.
- Easy sewing project to transition from a beginner level to an intermediate.
- Learn how to sew an invisible zipper along the center back using a zipper foot.
- Create shoulder straps with fixed shirring to hold the gathering.
- No sewing pattern is needed for this project.


I recommend going with tiny gingham print with a size less than ¼” per square. This does help to smoothly match each seam along the top and skirt pattern.
Simply follow the step-by-step video tutorial that I put together for you to make this mini dress from men’s dress shirt. Also, you can easily lengthen the midi dress bottom to give more coverage.


How to make ruffle shoulder strap dress from shirt?
The men’s dress shirt that I used for this upcycle project is 100% cotton and polyester blend. It has a slippery surface that makes crunchy noise when rubbed against the fabric. It is medium to light weight, which helps to keep the dress crisp and cool when wearing during the summer.
Pre-wash and iron the dress shirt before beginning to make this ruffle shoulder strap dress from men’s shirt. I highly recommend you take body measurements for clothing and review the measurements provided below, then you are able to estimate the size shirt you will need to upcycle.
Grab you sewing kit and follow the sewing instruction and techniques provided in this tutorial. If you have any questions about the project, feel free to ask in the comments below and I will try my hardest to help you along! Let’s get started!
DIY Ruffle Shoulder Dress From Men’s Shirt Material:


- Men’s Dress Shirt
- Sewing Machine
- Fabric Chalk
- Loop Turner
- Measuring Tape
- Ruler
- Scissor
- Seam Ripper
- Straight Pins
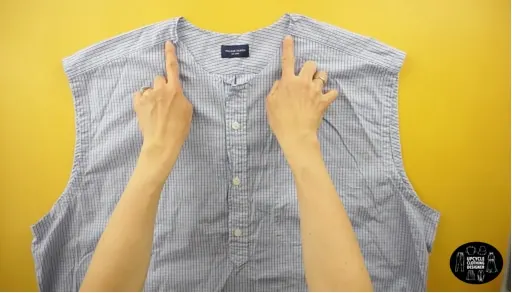
For this men’s shirt into ruffle mini dress upcycle tutorial, start by deconstructing the original dress shirt.
Use scissors to detach the collar and neckband, cut off both sleeves. Remove the pocket with a seam ripper. Cut both shoulder seams the back yoke and also both side seams.
Turn the back piece of the men’s shirt into the front bottom of the A-line dress, and the front piece of the men’s shirt to make the back bottom of the A-line dress
The top back piece of the original men’s shirt to make the front of the top bodice with a sweetheart neckline and bust darts. Use the top front piece of the original men’s shirt to make the back of the top bodice with back darts.
Attach the front part of the dress together, and also join the back part of the dress together. Then, attach the front of the dress to the back of the dress with the right sides facing together.
Use the sleeves from the original dress shirt to make shoulder straps and ruffles. Topstitch with wide stitch width and pull on the back thread to bunch up the fabric on the ruffles.
Sew the ruffles to both shoulder straps and the sweetheart neckline. Also, make a cute bow tie with the straps and fasten it to the center front neckline.
Add a zipper and back center seam on the dress to finish this ruffled mini dress from men’s shirt.


DIY Ruffle Shoulder Dress Sewing Tips
I’ve put together these sewing tips to help you make a DIY ruffle shoulder dress with professional finishes that will last a long time. Always evaluate and test the sewing machine tension, and double check the threading, the goal is to have a smooth ride.
- Sewing tips: Enjoy the process and take time to properly stitch and use an iron while you are sewing to press seams. Mark and clip the ends of the dart along the edge so that is is easier to sew along the marked line. Adjust the bust dart width to make it more fitted to you measurements.
- Stitch: In this tutorial, we use straight stitch with regular and wide stitch lengths, as well as overlock to finish all seams inside the garment.
- Thread: Because the shirt content is cotton/polyester blend, I used a thread that was the same blend as the fabric. Always go with a similar content when you choose the type of thread to work with.
- Zipper foot: If you are sewing an invisible zipper, I recommend using a regular zipper foot. First, hand baste around the zipper to sew the zipper straight on the garment. Then, finish with the zipper foot.
- Loop Turner: When making a shoulder strap, I like to use a loop turner. However, a plastic straw or bobby pin are the old trick to avoid using the tool. Make sure the strap is flat or ironed after pulling out, therefore it’s easy to topstitch and secure onto the ruffles.
More dresses to make from men’s dress shirt sewing project for your next DIY fashion:

How To Make Ruffle Shoulder Strap Mini Dress From Men’s Dress Shirt
Re-cutting and re-sewing a dress shirt into new clothes is a wonderful and satisfying feeling. Learn new sewing techniques to execute this ruffle shoulder strap mini dress from men’s dress shirt.
Materials
- Men’s Dress Shirt
Tools
- Sewing Machine
- Fabric Chalk
- Loop Turner
- Measuring Tape
- Ruler
- Scissors
- Seam Ripper
- Straight Pins
Instructions
- For this ruffle mini dress from men’s shirt tutorial, start by deconstructing the original dress shirt.
- Use scissors to detach the collar and neckband;
also cut along the arm seam to detach both sleeves.
- Then, use a seam ripper to remove the pocket.
- Cut both shoulder seams and across the back yoke;
also cut both side seams to detach the front piece from the back piece of the dress shirt. - To make the front bottom of the A-line dress, fold the back piece of the men’s shirt in half lengthwise.
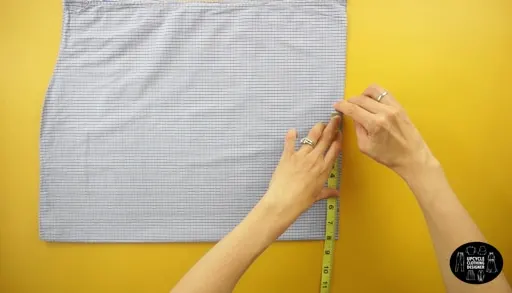
Measure 17” up from the hemline.
Draw a straight line across and cut.
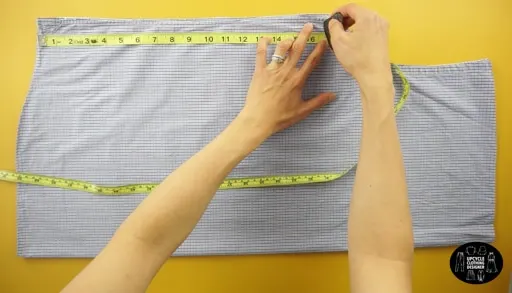
Measure 8” from the folded line on the top of the dress bottom.
Draw a diagonal line from the 8” mark to the far bottom corner.
Cut to make the front bottom piece of the dress silhouette.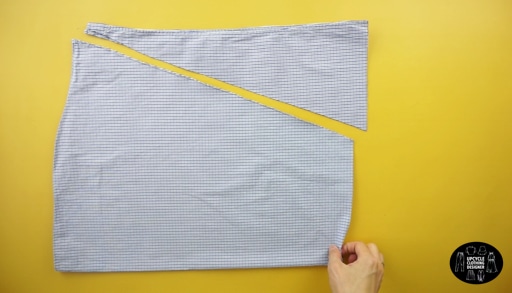
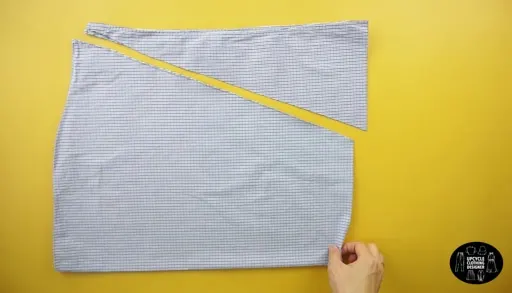
- To make the back bottom of the A-line dress, fold the front piece of the men’s shirt in half lengthwise.
Copy the front bottom piece of the dress silhouette onto the front piece of the men’s shirt.
Cut to make the back bottom piece of the dress silhouette.
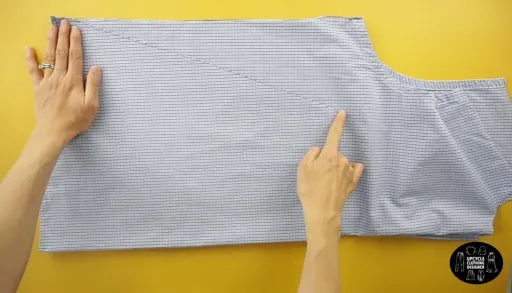
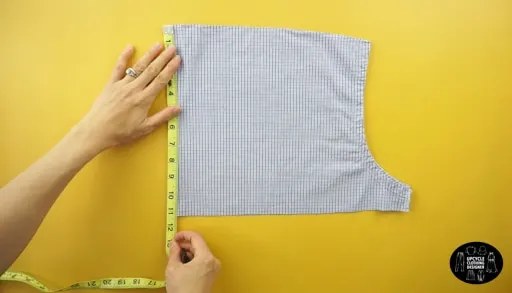
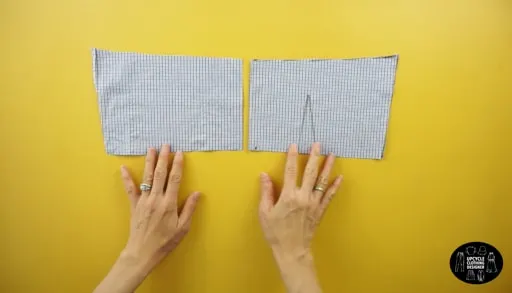
- To make the front of the top bodice, fold the top back piece of the original men’s shirt in half lengthwise.
Measure a 9” x 9” square to help guide the shape for the front top bodice.
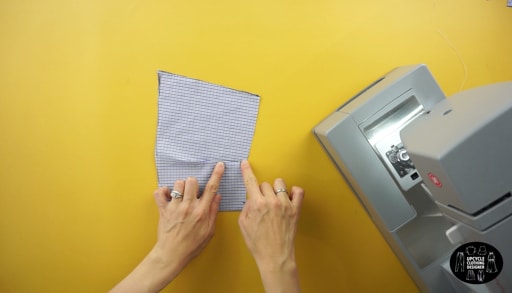
- To make the sweetheart neckline, measure 3 inches away from the top of the folded line.
Also, measure 3” down from the neckline along the folded line.
Draw a diagonal line to connect both points and make the shape of the sweetheart neckline.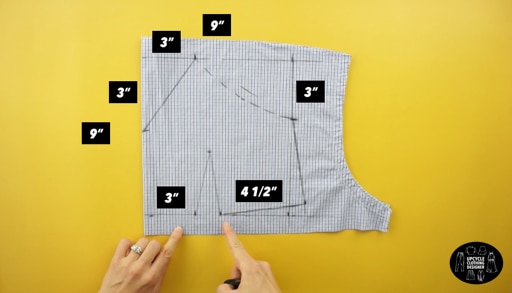

- To make the armhole, mark 3” down from the top opening.
Then, draw a curved line connecting the sweetheart neckline to the bottom of the armhole.
- To make the bust dart, measure 3” and also 4½” away from the bottom of the folded line.
Measure 4” up from the center of the bust dart.
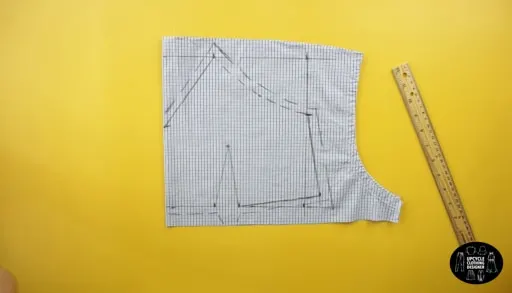
Connect the three points to mark the placement of the bust dart. - Add ½” seam allowance on all sides.
Pin to secure,
and cut to make the top bodice with a sweetheart neckline.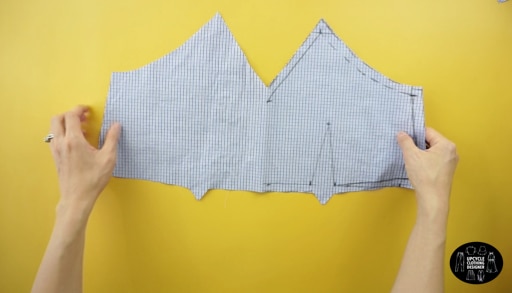

Use the measuring guide in my website to help you. - To make the back of the top bodice, use the top front piece of the original men’s shirt.
Measure a 6” x 9” square to help guide the shape for the back top bodice.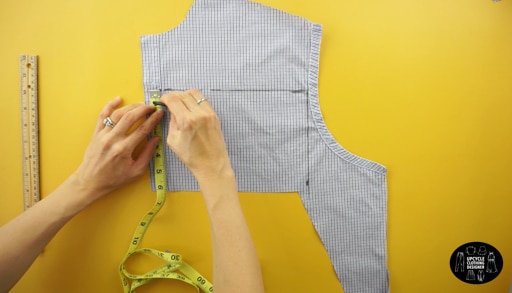
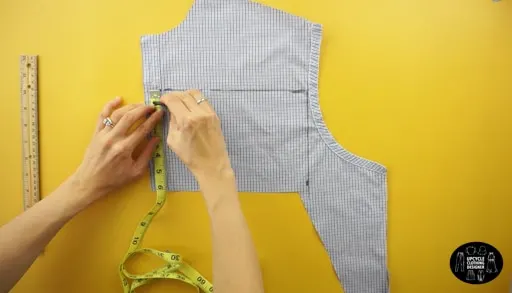
- To give shape to the backside waistline, measure 1” down along the edge;
draw a curved line to connect this point with the opposite corner.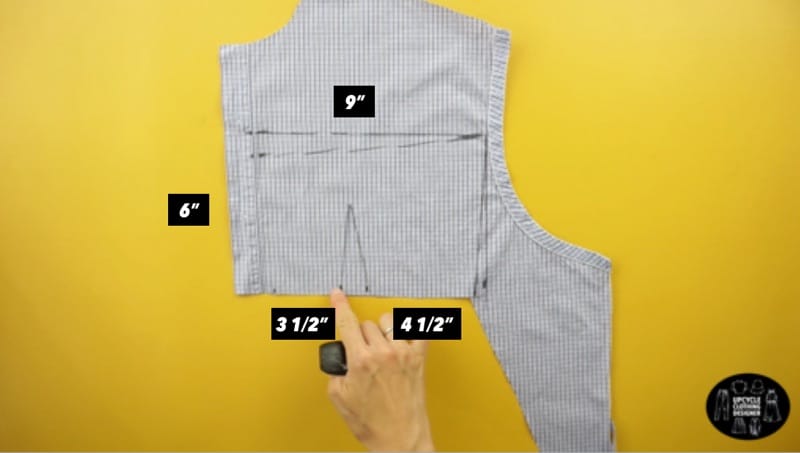

- To make the back dart, measure 2½” and also 3½” away from the edge.
Measure 3½” up from the center of the back dart.
Connect the three points to mark the placement of the back dart.
The seam allowance has already been added into this back piece, so cut along the line.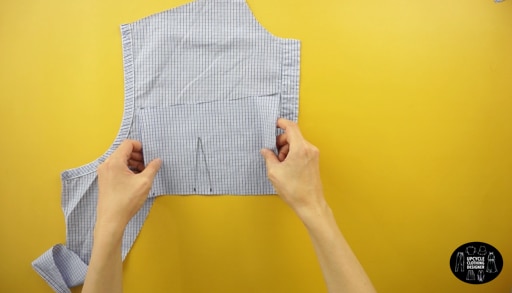

Copy this back piece onto the other top front piece of the original men’s shirt.
- Pin to secure, and close the 1” darts on both back pieces.


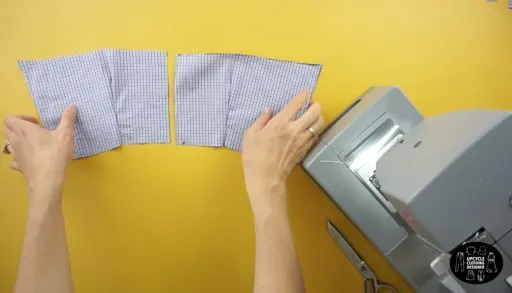
- Then, pin to secure, and close both 1½” bust darts on the front of the top bodice.
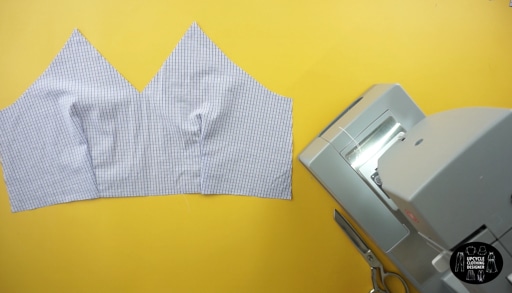

- To complete the front part of the dress, attach the front bodice to the front bottom with the right sides facing together.
Fold both pieces in half lengthwise to mark the center placement.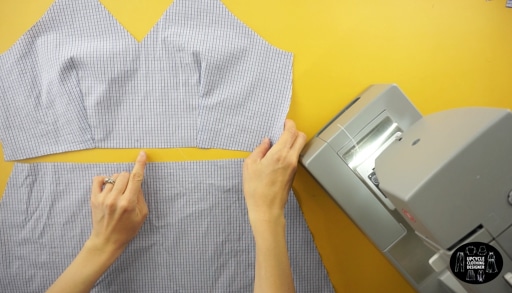

Line up the center marks, pin to secure and topstitch to finish.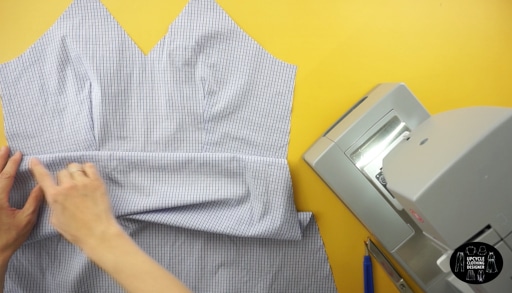

- To complete the back part of the dress, attach the back bodice to the back bottom with the right sides facing together.
Use a seam ripper to detach the remaining piece of the button and buttonhole placket.
Measure the width of the back bodice pieces.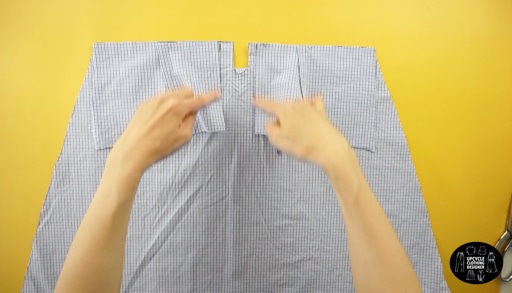
Subtract the difference from the back bottom piece,
and cut out the remainder.

- Attach the back bodice piece to the back bottom piece with the right sides facing together.
Do the same for the opposite side of the back bodice.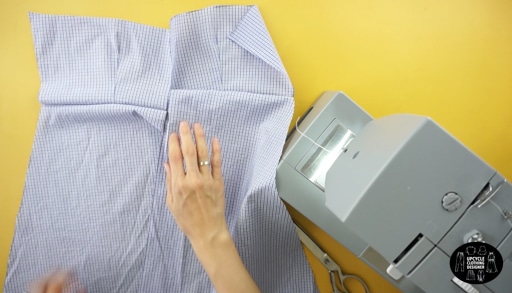

- To attach the front part of the dress to the back part of the dress, topstitch along both side seams with the right sides facing together.
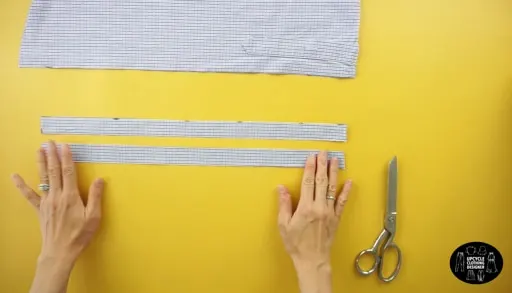
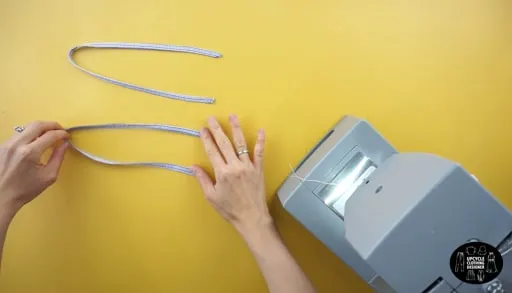
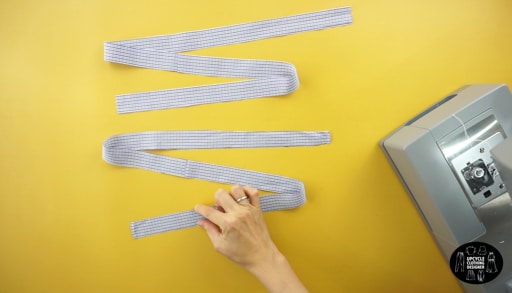
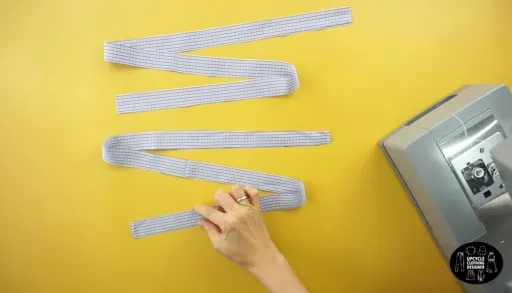
- To make shoulder straps, use the sleeves from the original dress shirt.
Cut off the cuff, and open the underarm seam.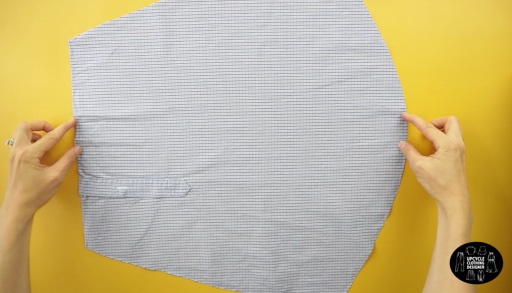

Fold the sleeve in half lengthwise, and cut along the folded line.
Draw a straight line that is 1” away from the edge.
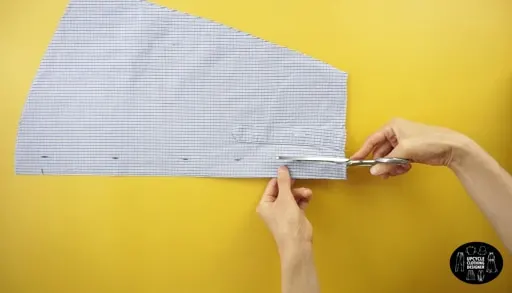
Cut along the line resulting in two separate 1” wide straps.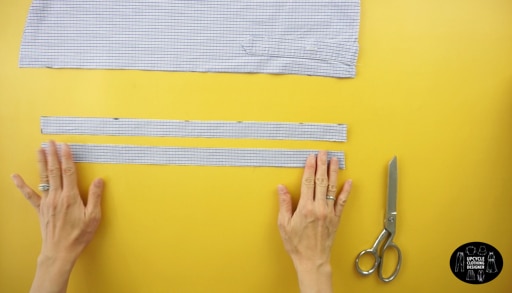
- Fold the straps in half lengthwise and edge topstitch.
Use a loop turner to flip both shoulder straps inside out.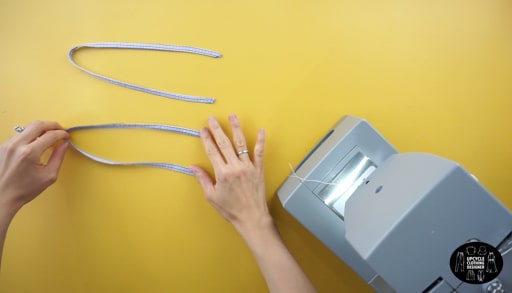
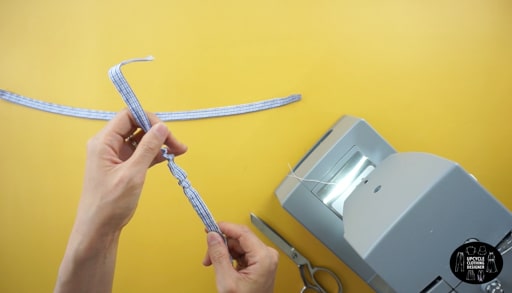
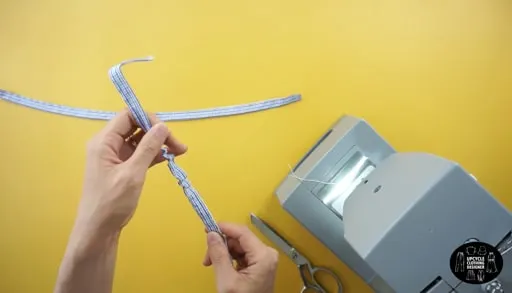
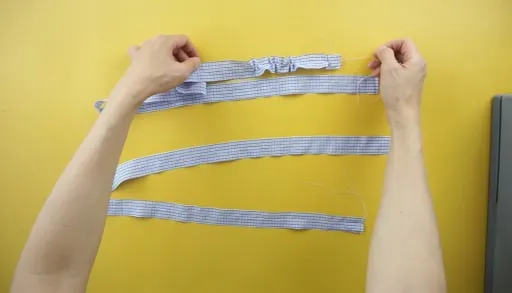
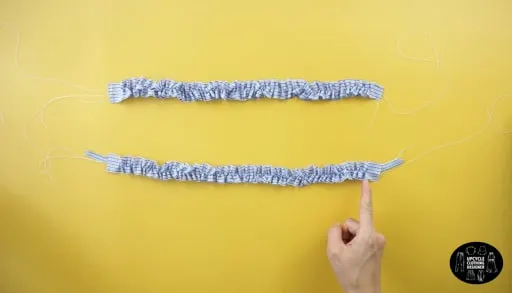
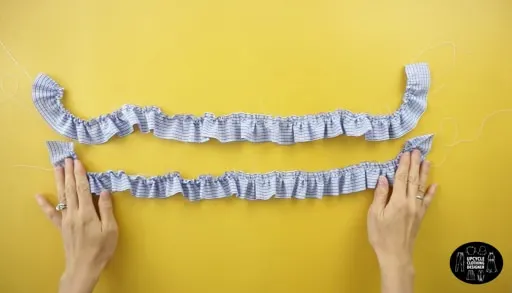
- To make the ruffles for the shoulder straps, use the original sleeves to cut four more 1” wide straps.
Make two double length straps by attaching the ends of two straps together.
Use wide stitch width and topstitch along the center of both double length straps.
Pull on the back thread to gather the fabric with bunching.
Match the length of the ruffles to the shoulder straps.
- To complete the ruffled shoulder straps, attach the ruffle pieces to the shoulder straps pieces.
Pin to secure and topstitch.
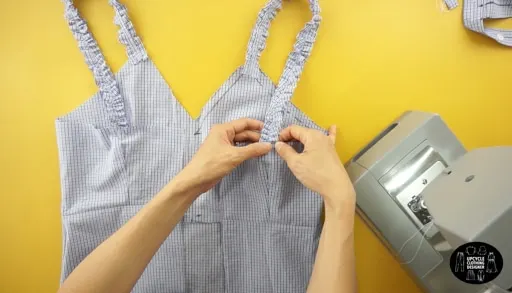
Then, attach the ruffled shoulder straps to the highpoint of the sweetheart neckline.
Pin to secure and topstitch.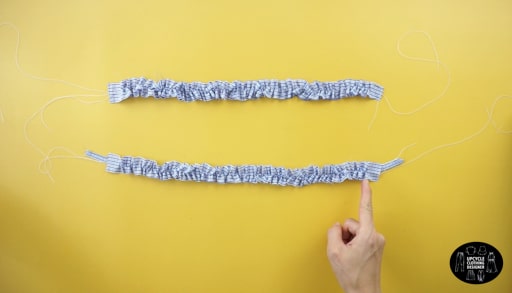
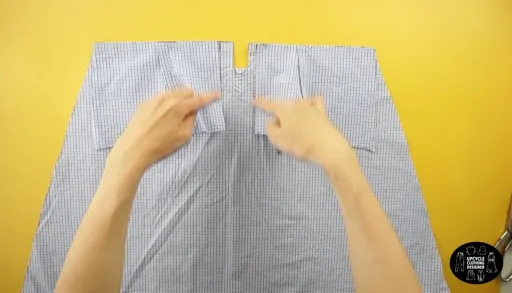
- Next, attach the ruffled shoulder straps to the back bodice just above the back dart.
Pin to secure and topstitch.
- To make the ruffles for the top opening, use the excess fabric from the bottom of the dress to cut two separate 2” wide straps.
Use a wide stitch width and topstitch along the top edge of the straps.
Pull on the back thread to gather the fabric with bunching.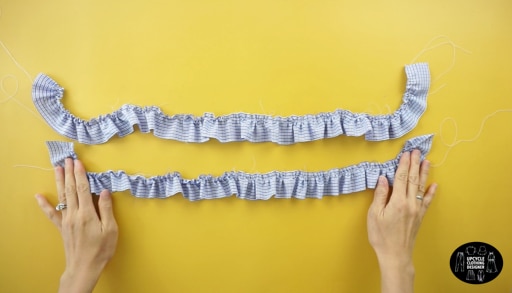
Match the length of the ruffles to the top opening.
Pin to secure and topstitch around the top opening.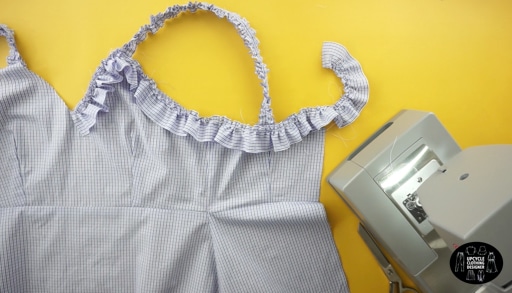

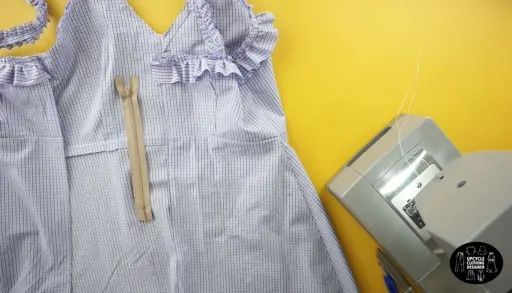
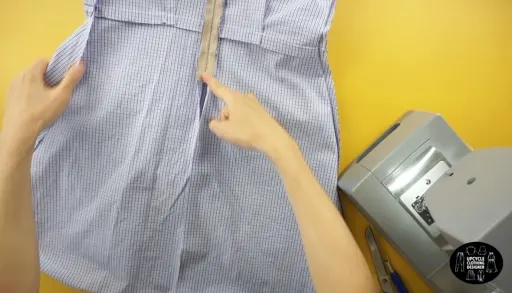
- To finish the back of the dress, add a zipper to the back of the top bodice.

Then, close the back bottom of the dress with topstitch.
- To make bow tie straps, use excess fabric scraps to cut two separate 1” wide straps.
Fold the straps in half lengthwise and edge topstitch.

Use a loop turner to flip both shoulder straps inside out.
Attach the straps to the center of the front top opening.
Tie a decorative bow with both straps to finish the ruffle mini dress from men's dress shirt.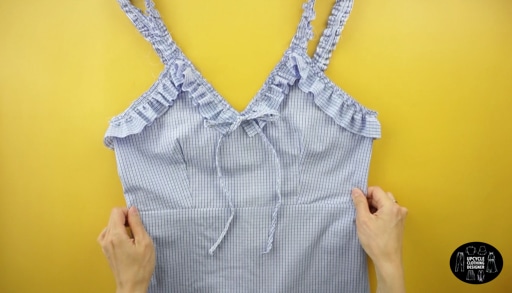
Recommended Products
As an Amazon Associate and member of other affiliate programs, I earn from qualifying purchases.


Trendy, Affordable Sewing Patterns for All Sizes


Tie Shoulder Jumpsuit Pattern


Palazzo Pants Sewing Pattern


Pocket Overall Romper Pattern


Wrap Maxi Skirt Sewing Pattern


Tie Back Top Sewing Pattern