
Let’s convert a men’s dress shirt into a cute bow-detail mini dress for an adorable look. Mini tie bows around the sleeve and tiered drop waist ruffle is all you need to execute this Fendi inspired dress silhouette.
The cotton material is a perfect because it doesn’t require a lining when making a dress. Men’s dress shirt upcycle ideas are easy to sew and the crisp medium-weight poplin is a durable material that makes a nice shift or A-line silhouette.
The instructions for this dress without a pattern sewing tutorial is for an intermediate level. However, if you want to step up your sewing game, then an ambitious beginner can give this a try as well.
Whether you use solid or printed shirt, you will need to choose two identical shirt to accomplish this dress from men’s shirt. Make a DIY bow-detail mini shift dress from men’s shirt by following this easy step-by-step refashion tutorial.
You will love this bow-detail mini shift dress from men’s dress shirt because…
- With two men’s dress shirt, make a $2,200 Fendi copycat mini dress by following this tutorial.
- No sewing pattern is required.
- Perfect sewing project for an experienced beginner or intermediate level.
- Learn how to use a top to copy and modify into this dress design.
- Make spaghetti straps and manual gathering.


I have been falling in love with upcycled clothing, especially the ability to transform a men’s shirt into a dress! I enjoy finding high-quality, crisp, cotton-poplin fabric with a subtle print pattern on it.
Take the time to pick a suitable fabric when you chose to refashion old clothes. Once you become familiar with how to upcycle clothes, this is an important step to success.
When I upcycle dress shirts, I always chose a design I wish to replicate, then I select the material to work with. If you pick the right material for the project, the finished garment looks like store bought quality clothing.
No matter what sewing skills you have, transforming old clothes is fun and much easier to do than you think!
If you’re new to sewing and looking for a sewing project for beginners, start with this this DIY bow-detail mini shift dress from men’s shirt. This beginner refashion tutorial helps you to understand a few basic sewing principles before attempting more advanced undertakings.
How To Make A Mini Shift Dress Out Of A Men’s Button Down Shirt?
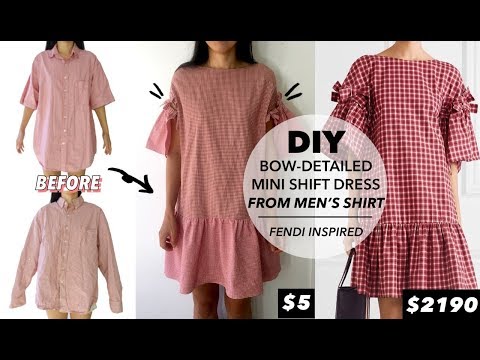
For this $5 fashion challenge, I chose to make a Fendi inspired shift dress from men’s shirt. Upcycle old button down shirt to make your own DIY bow-detail mini shift dress from men’s shirt.
When making any DIY clothing, working with accurate measurements is extremely important so that the garments fit properly. Here is a detailed guide to help you take body measurements for clothing so that your pieces fit you perfect.
If you are passionate about sewing, then a basic sewing kit is a must. In general, you only need a few essential tools and a sewing machine to start with.
DIY Bow-Detail Mini Shift Dress Materials:
- 2 Men’s Button Down Shirts
- ¾” Elastic Band
- Sewing Machine
- Fabric Chalk
- Measuring Tape
- Seam Ripper
- Pins
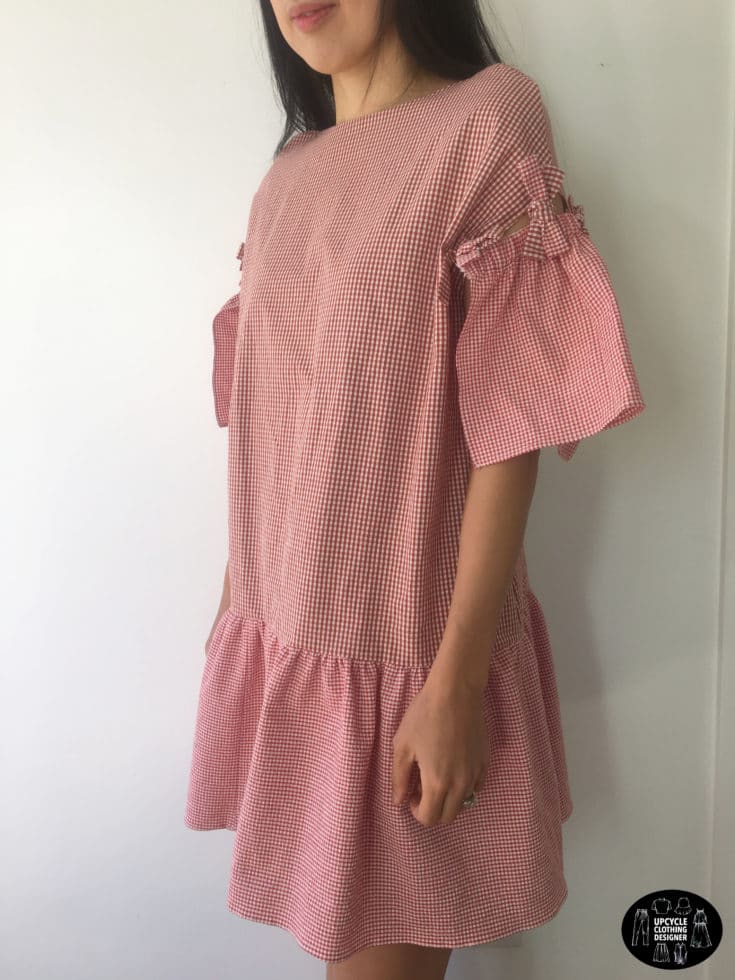
I used a red gingham print that is season less and even holiday friendly. Follow the step by step tutorial with video instructions below to guide you through every stitch you take!
You can easily upgrade your capsule wardrobe without breaking the bank. Take the $5 fashion challenge and follow this DIY bow-detail mini shift dress from men’s shirt tutorial.
Enjoy the process and transformation when you refashion old clothes into wearable fashion trends.


DIY Men’s Shirt Into Bow-Detail Shift Dress Sewing Tips
Explore how to refashion a dress from men’s shirt so that you can enhance your basic sewing techniques. The DIY bow-detail mini shift dress from men’s shirt tutorial is easy to follow if you start by using these helpful sewing tips.
- Sewing Tips: Always test on a shirt fabric scrap before attempting any different stitches such as straight stitch or zigzag/overlock stitch. This will help you achieve the same results when putting the pieces together.
- Cutting Tips: The two shirts that I was working with have slight texture on the surface due to the gingham weave. So, pre-wash them and iron them nicely to give a clean cutting lines to work with. Also, don’t forget to use sharp scissors!
- Needle & Thread: For this upcycle tutorial, I used 80/12 universal needle size and chose a cotton thread. Double check the fabric content of the shirts and follow the base material to determine whether you use cotton or cotton/polyester blend.
- Hemming: Poplin is versatile material that is easy to work with, especially when it comes to finishing the hemming. Double fold the hem and topstitch to complete the finishing details.
- Sewing Foot: Good news is that you don’t need a special sewing foot for this tutorial. Keep your regular foot to sew straight stitches. If you happen to have a gathering foot, then use it when you sew the ruffles.
Feel free to ask me any questions about how to turn a men’s shirt into a dress. If you’re stuck on one of the steps in the DIY bow-detail mini shift dress from men’s shirt tutorial, refer back to these beginners’ sewing tips.
Leave a comment below, on my YouTube video or even contact me via email. I will try my best to help you out!
More dresses from men’s dress shirt refashion sewing projects:

Bow-Detail Mini Shift Dress From Men’s Button Down Shirt Tutorial
For this DIY bow-detail mini shift dress from men’s shirt tutorial, we are going to learn how to make a dress from men’s shirt. I was inspired to make the $5 fashion challenge based on the recent runway trends.
I have included all the reconstruction steps required to make this Fendi inspired dress pattern. In addition, there is a step-by-step tutorial video that walks you through the DIY bow-detail mini shift dress from men’s shirt .
This DIY bow-detail mini shift dress from men’s shirt has a cute feminine look that easily pairs with either chunky heels or ankle boots.
Materials
- 2 Each Men's Button Down Shirts
- ¾" Elastic Band
Tools
- Sewing Machine
- Fabric Chalk
- Measuring Tape
- Scissors
- Seam Ripper
- Straight Pins
Instructions
- Start by removing the front pocket and the buttons.
- Next, use a pair of scissors to remove the collar and collar band.
- Then, cut off both sleeves, cut the shoulder seam and side seam, and also remove the yoke from the back piece.
- Do the same deconstruction process for the other men’s button down shirt as well.
Pro tip: I always make sure to collect the extra plastic shirt buttons for a later use. You can easily dye, cover or embellish buttons to match different clothing styles. So, be sure to keep them for another refashion old clothes project!
How To Make A DIY Shift Dress Without Pattern
- To make a dress pattern for this Fendi-inspired dress design, I used my favorite knit dress to copy the boat neckline and drop shoulder style.
- For the front piece of the top bodice, fold your favorite shirt in half and then pin it along the neckline and shoulder for you to easily copy. Place your shirt on the folded back piece of fabric.
- Measure 24” down from the highest point of the shoulder and mark with fabric chalk. Next, add an additional ½” seam allowance as you copy along the neckline and armhole.
Sewing tip: Because we are changing from knit to woven be sure you make a smooth curved line along the shoulder and NOT a straight shoulder line. - To curve the shoulder line for woven fabric, find the center point of the shoulder. Then, mark ½"-¾” down from the original armhole and also add ½"-¾” to the sleeve opening. With fabric chalk, redraw a smooth curve to connect the new sleeve opening.
Helpful hint: I also added 1” longer to the sleeve length and also increased the armhole opening 1” wider. Pin along the chalk mark and cut out the front piece of the top bodice. - For the back piece of the top bodice, copy the shoulder and the armhole of the front piece.
Then, measure 9” down from the highest point to make the v-neckline. Make 2” wide facings for the front and back pieces by copying the neckline. - For the ruffle skirt dress pattern, you need a piece of fabric that is 11” x 50”. I made 2 pieces of 11” x 14” and 2 pieces of 11” x 11” from the short sleeve dress shirt.
- For the bow-detail sleeves, I took both short sleeves from the dress shirt and cut open the seam.
Sewing tip: Because the sleeves already had a 1” width hem, I was able to put elastic band through the inside. - For both sleeves, keep the hem and draw a rectangular that is 6 1/2” x 13”. Cut along the fabric chalk mark.
- For the bowtie straps, use the leftover scraps to make 8 pieces of 2” x 8” straps from each shirt.
To Sew The DIY Shift Dress From Men’s Shirt
- Now that we understand how to make a dress pattern, let’s assemble the dress to complete this DIY bow-detail mini shift dress from men’s shirt tutorial.
- To sew the top bodice, join both back pieces of the top bodice together with ½” seam allowance. Topstitch and finish with zig zag stitch.
- To join the front and back of the top bodice, topstitch with ½” seam allowance along shoulder seam and side seam and finish with zigzag stitch.
Sewing tip: Place the right side of the dress and right side of the facing together and sew ¼” around the edges. Open the seam and finish the facing with edge topstitch. - To sew the neckline facing, join the back facing pieces at the center back with ½” seam allowance. Topstitch and finish with zigzag stitch.
- To hem the arm opening, double fold ⅛” of the arm opening and finish with edge topstitch3
- To sew the bow-detail sleeves, double fold ⅛” around the border of the rectangular shaped sleeve pattern and finish with edge topstitch.
- Prepare two separate 9” long pieces of ¾” width elastic band. Using a safety pin, slide the elastic band through the tunnel of the sleeve. When both sides meet the end of the sleeve, edge topstitch the elastic to secure.
- To sew the ruffle skirt, make a 50” long skirt panel by connecting all of the dress pattern pieces together with ¼” seam allowance and finish with zig zag stitch. Next, double fold the hemline ⅛” and finish with edge topstitch.
- To sew the ruffle waistline, use a wider thread length and less tension on the sewing machine. Topstitch along the inside of the skirt panel about ½” away.
Pro tip: Slowly and carefully pull the threads to make the shirring by hand. - To attach the top bodice and ruffle skirt, place the right sides together and pin all around.
Sewing tip: Before attaching, make sure the shirring is evenly distributed all around the bottom of the bodice piece. Then, sew ½” seam allowance and finish with zigzag stitch. - To sew the bowtie straps, start by folding each strap in half, length wise, and iron them flat.
Topstitch ¼” to close each strap and then use a loop turner to flip the straps inside out.
Then, use hand-sewing techniques to close both ends of each strap. - To sew the bowtie straps to the sleeves, evenly distribute 4 bowtie straps to each sleeve and then edge topstitch to secure. Use the bow-detail sleeves as guidelines to attach the opposite bowtie straps to the armhole opening with topstitch.
- Finish by connecting the dress and sleeves together by making a cute bow.
Notes
For this refashion old clothes tutorial, you need 2 separate men’s shirts that have similar texture and color tones. My husband had a long sleeve red gingham dress shirt and I found another short sleeve red gingham dress shirt at a local thrift store.
I personally picked two red gingham men's dress shirts. This refashion DIY bow-detail mini shift dress tutorial does require two men’s shirt to complete the design.
However, you can simply substitute a solid colored button down shirt or any other subtle print pattern. Grab your cotton-poplin men's shirt, and let’s get started!
Recommended Products
As an Amazon Associate and member of other affiliate programs, I earn from qualifying purchases.


Refashion a dress from men’s button down shirt.
Share your cute DIY bow-detail mini shift dress with me!
#FashionWanderer
Trendy, Affordable Sewing Patterns for All Sizes


Tie Shoulder Jumpsuit Pattern


Palazzo Pants Sewing Pattern


Pocket Overall Romper Pattern


Wrap Maxi Skirt Sewing Pattern


Tie Back Top Sewing Pattern