
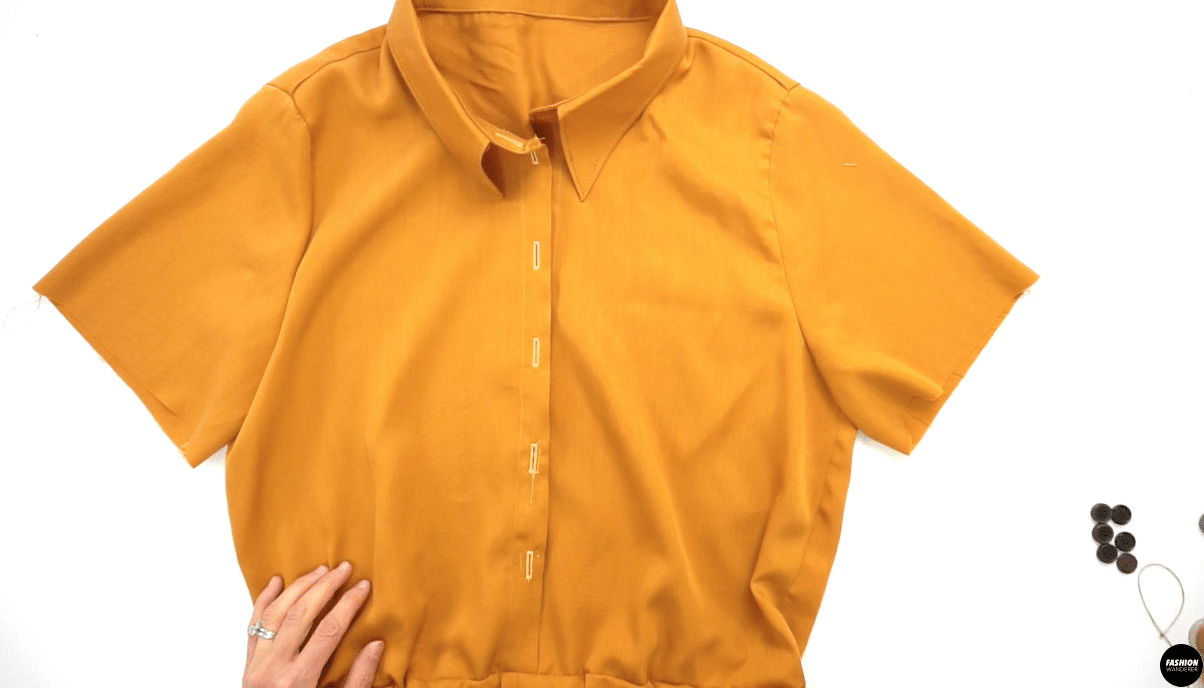
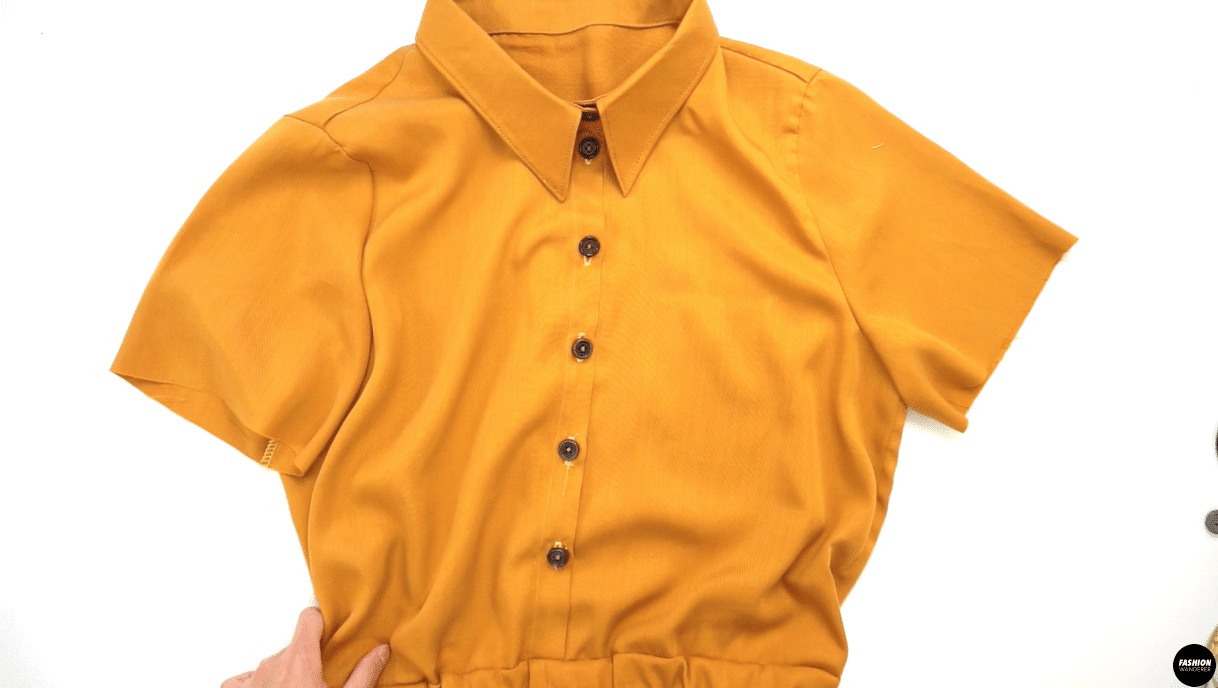
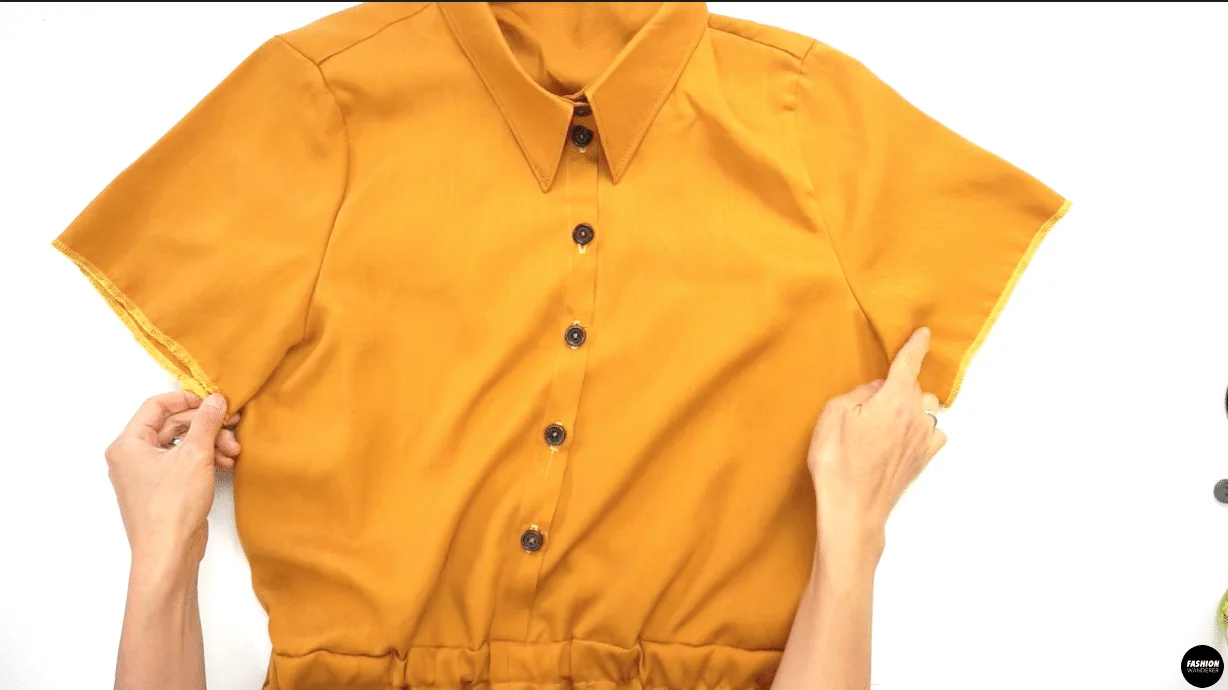
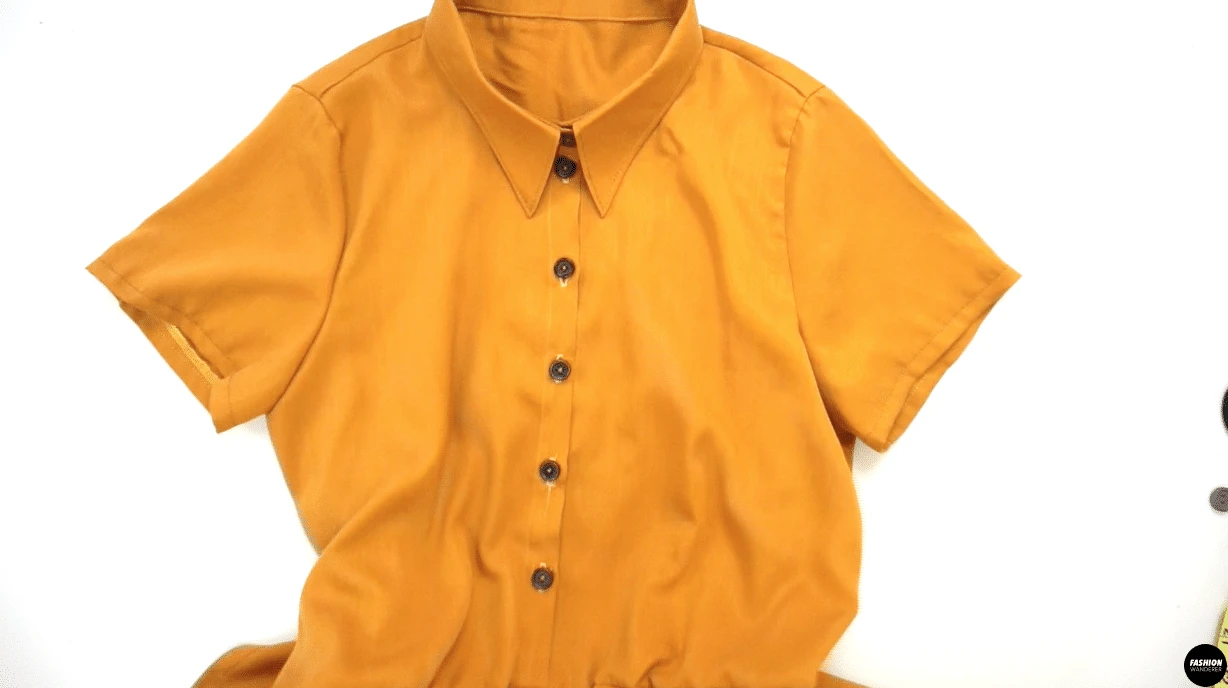
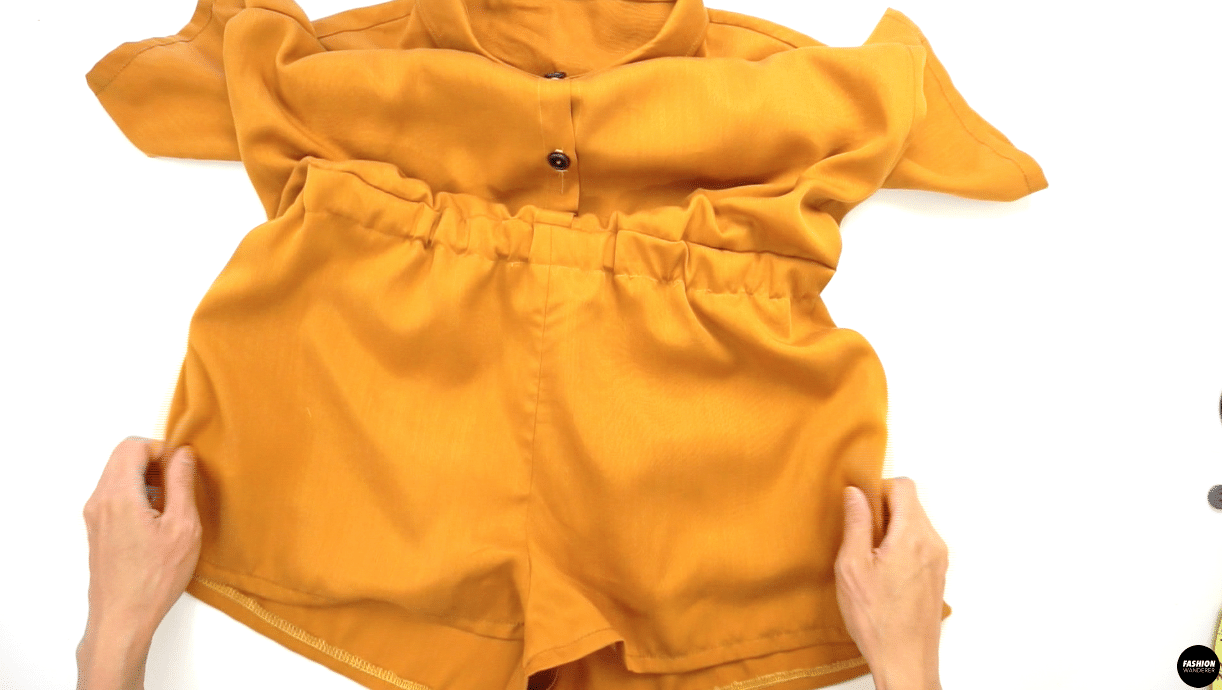
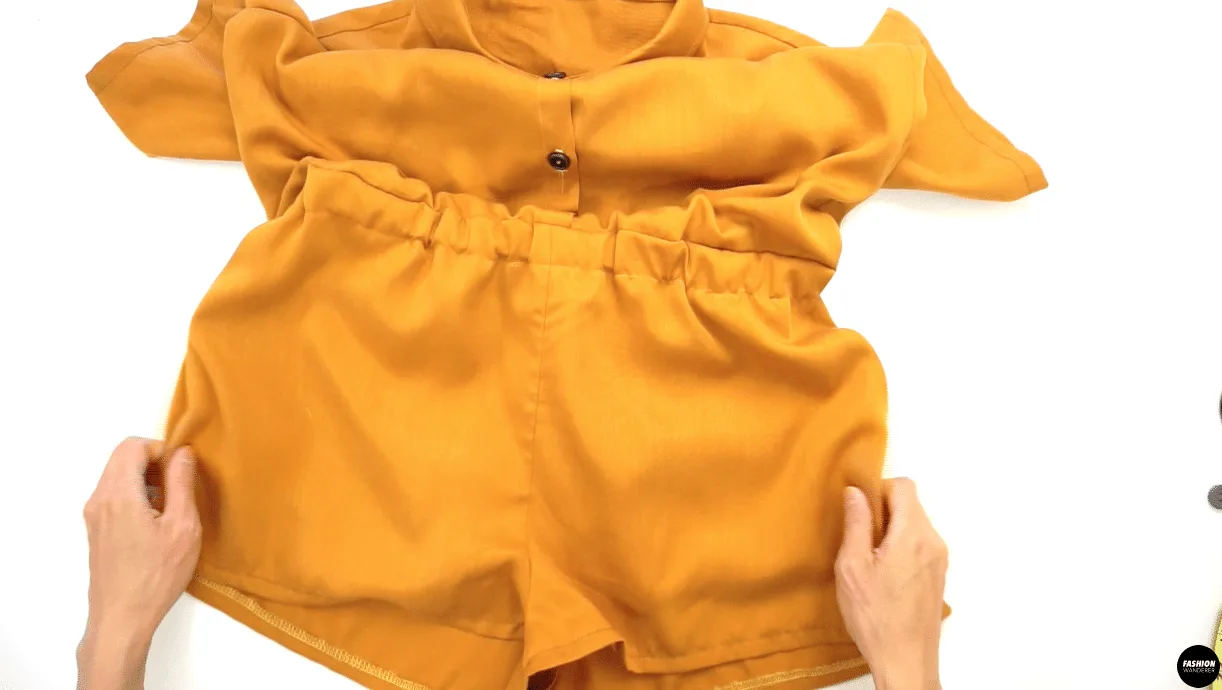
Do you have a classic shirting inspired romper in your DIY wardrobe? This Joelle romper features front button closure with comfortable elasticized waist and slit pocket on the shorts. The overall silhouette has relaxed and boxy style that is perfect for a casual look to add to your closet this season.
How do you make a button front romper? Pre-wash the fabric in cold or warm water and dry on medium heat for 20 minutes. Always use iron to remove any wrinkles that were created during the preparing process.
Fold the fabric in half along the selvage and place the sewing pattern to cut out individual pieces. Follow the sewing tutorial for the right steps to apply buttonhole, collar and assemble the diy romper together smoothly.
If you haven’t made buttonholes using sewing machine or sewn a collar and collarbone yet, this sewing pattern and instructions will help. Included below are each step to create this relaxed classic summer playsuit to add to your DIY wardrobe.
Whether you are new to Fashion Wanderer or a returning fan, every sewing project includes step by step video and picture instructions, followed by sewing tips for each fabric. The how-to tutorials are there for you to complete the garment without a doubt.
If you are stuck in any steps or have questions about this tutorial, feel free to reach out. I’m here to help!


DIY Button Front Romper Sewing Pattern


You will love this DIY button front romper because…
- The Joelle romper sewing pattern ranges from size US 2 to 12 and size UK 6 to 16 to select from.
- Every sewing pattern piece already includes ⅜” width seam allowance on each size line that gives you plenty of room to adjust when it comes to fitting.
- Learn to sew buttonholes with your sewing machine and 4-hole buttons with hand stitches.
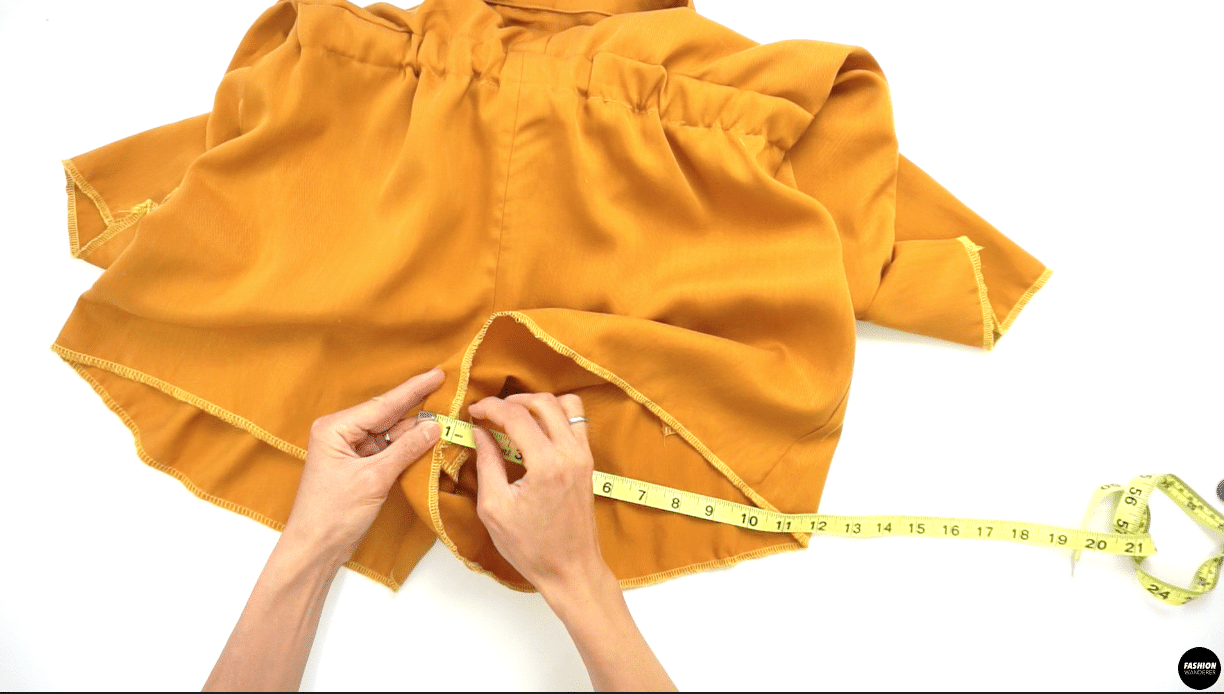
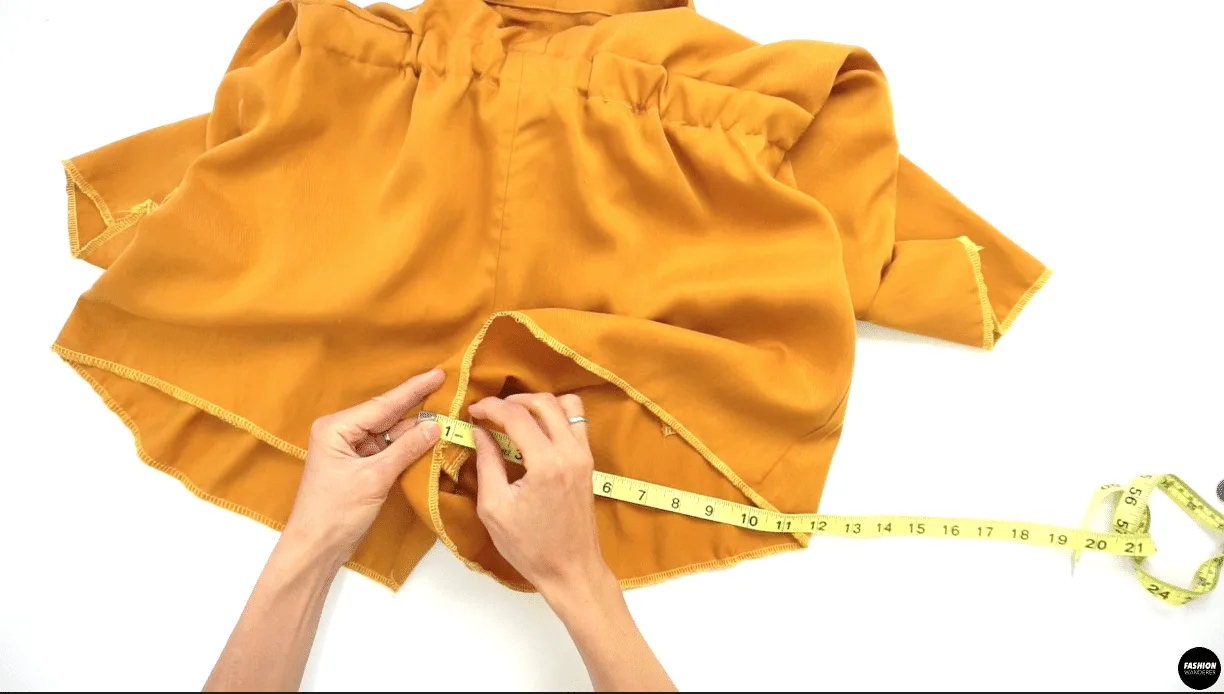
- Adding slit pockets on shorts gives enough extra room to carry phone, keys, and small wallet.
- Apply fusible interfacing correct way with steam iron on the wrong side of the fabric.
- Great beginner and intermediate sewing project to learn to sew shirting inspired romper to enhance your sewing skills.
This casual and comfortable romper features front and back top bodice with extended button placket, sets of pointy collar and collar band for you to accomplish professional looking shirting inspired playsuit. It is easy to wear with converse sneakers or cute sandals by throwing a boyfriend cardigan on for a complete outfit.
Use this DIY button front romper sewing pattern and tutorial to make into full leg length jumpsuit of your choice.


How to make button front romper from scratch
Once you have downloaded the Joelle romper, start assembling the pdf sewing pattern by matching the diamond shape on each page to get the full picture. Evaluate your body measurements and Fashion Wanderer size guide to be able to find out the correct romper size to sew.
Follow these steps to help you to avoid having fit issues later before cutting out the pattern and fabrics based on the size style line.
Know the fabric you chose for this sewing project by understanding the characteristic, types and width. If you are using soft fabric with a brushed texture such as Tencel fabric, stay with polyester thread and regular sewing needle to start your project. After selecting the right thread and needle, thread the machine properly to avoid skipping stitches while you sew.
Testing on a scrap of fabric will help you to find the correct tension, stitch length on both seams and topstitching to prevent jammed thread.
Another side you need to be aware of is to thread a bobbin accordingly to get bottom stitches even and the upper needle can catch while sewing straight stitches.
Have the manual handy to reference to get your sewing machine running smoothly for a professional outcome.
DIY Button Front Romper Tutorial Material:
- Joelle Romper Sewing Pattern
- Tencel Fabric 1½ yard for 60” width or 2 yards for 45” width
- Fusible Interfacing
- 28½” Long ¾” width Elastic
- Topstitch and Regular Thread
- Buttonhole Foot
- 6 pieces of 22L 4-Hole Wooden Button (9/16” or 14mm)
- Measuring Tape
- Water Erasable Pen
- Pins
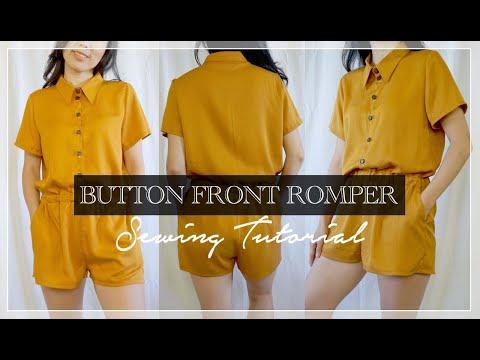
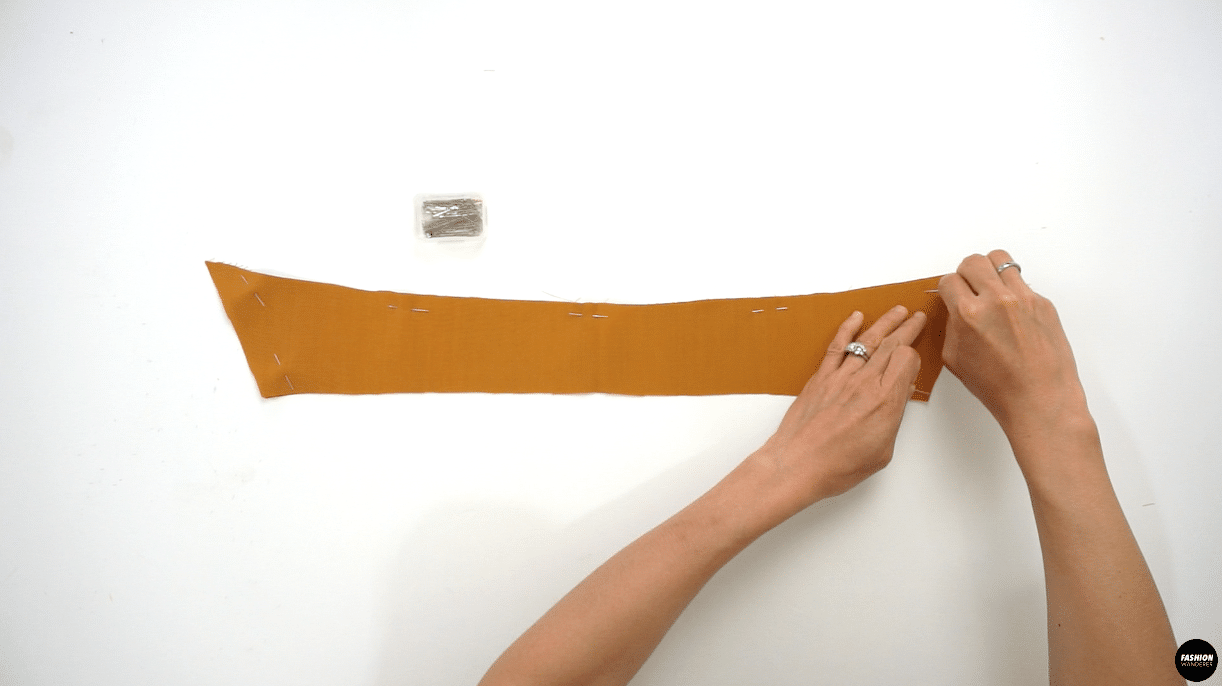
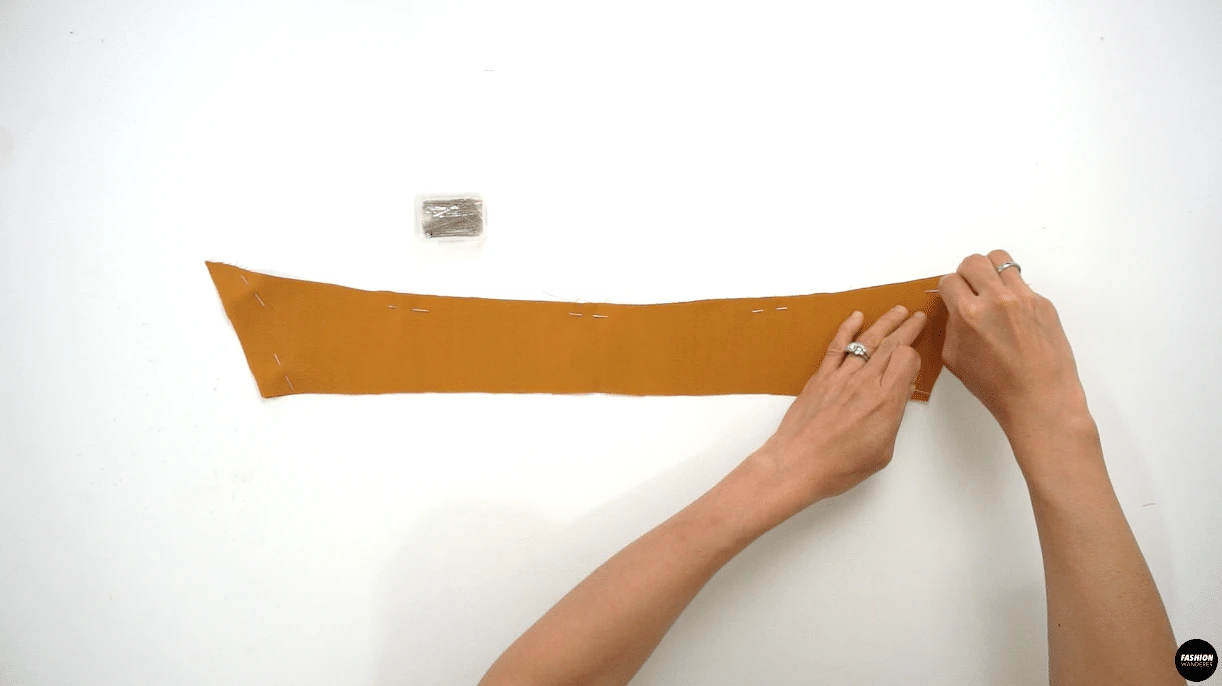
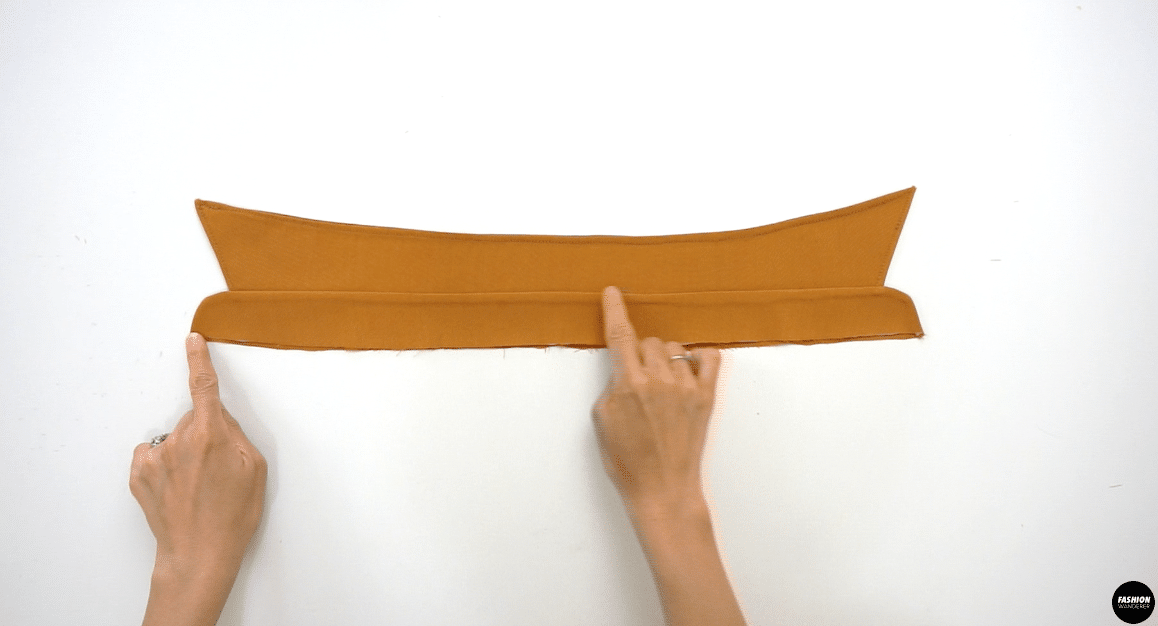
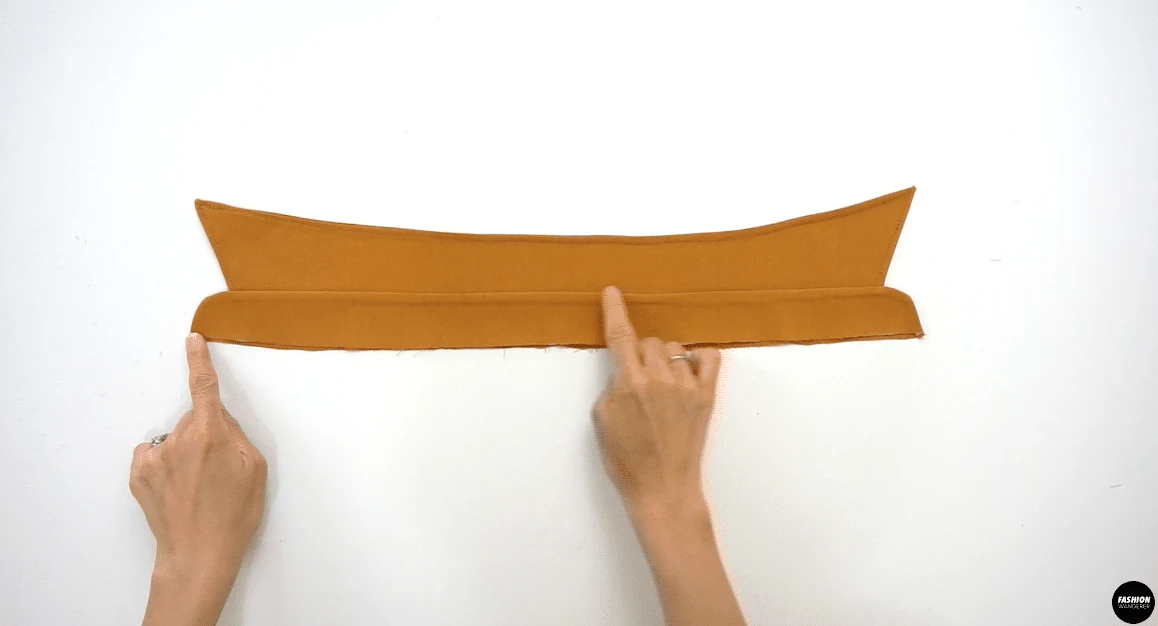
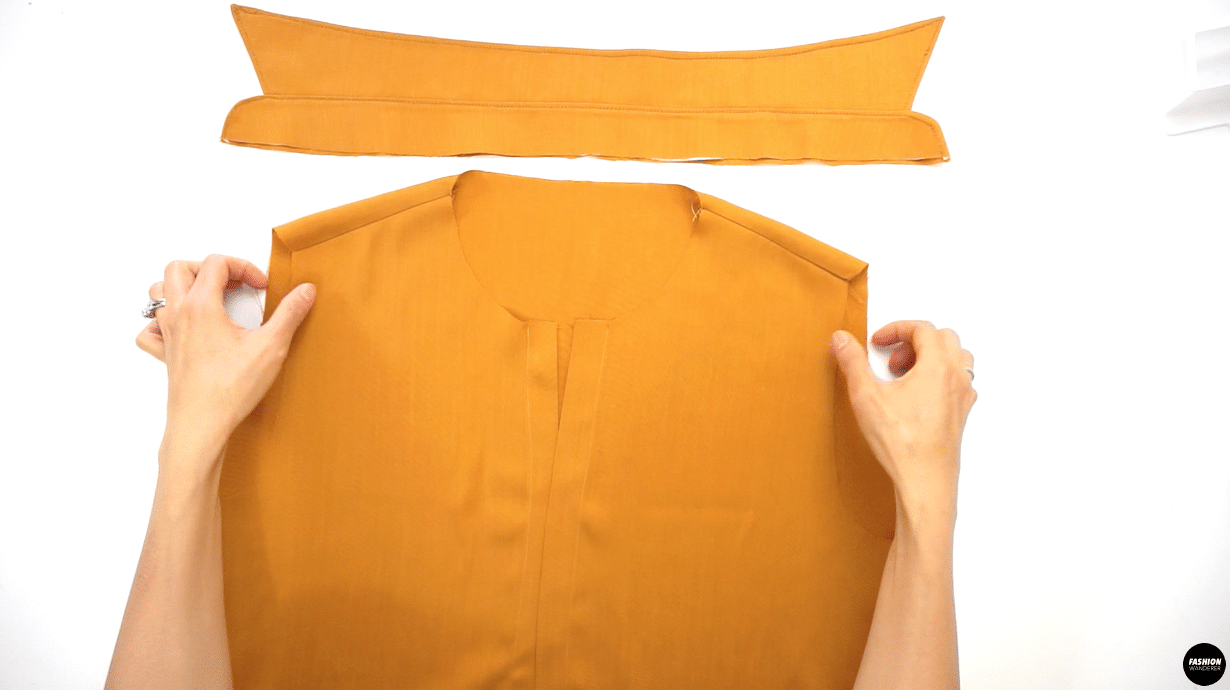
Apply fusible interfacing on Upper Collar and Outer Collar Stand. Place the right sides of Collar and sew along the seam allowance, then flip inside out. Use pointy needle or seam ripper to shape the point on both ends and trim extra seam allowance to shape the collar point easily.


Sandwich the Collar with Collar Stand and sew along the seam allowance. Trim the seam allowance and flip the Collar Stand, then give a nice press to shape. On both Collar and Collar Stand, use thicker thread to edge topstitch along the collar shape.
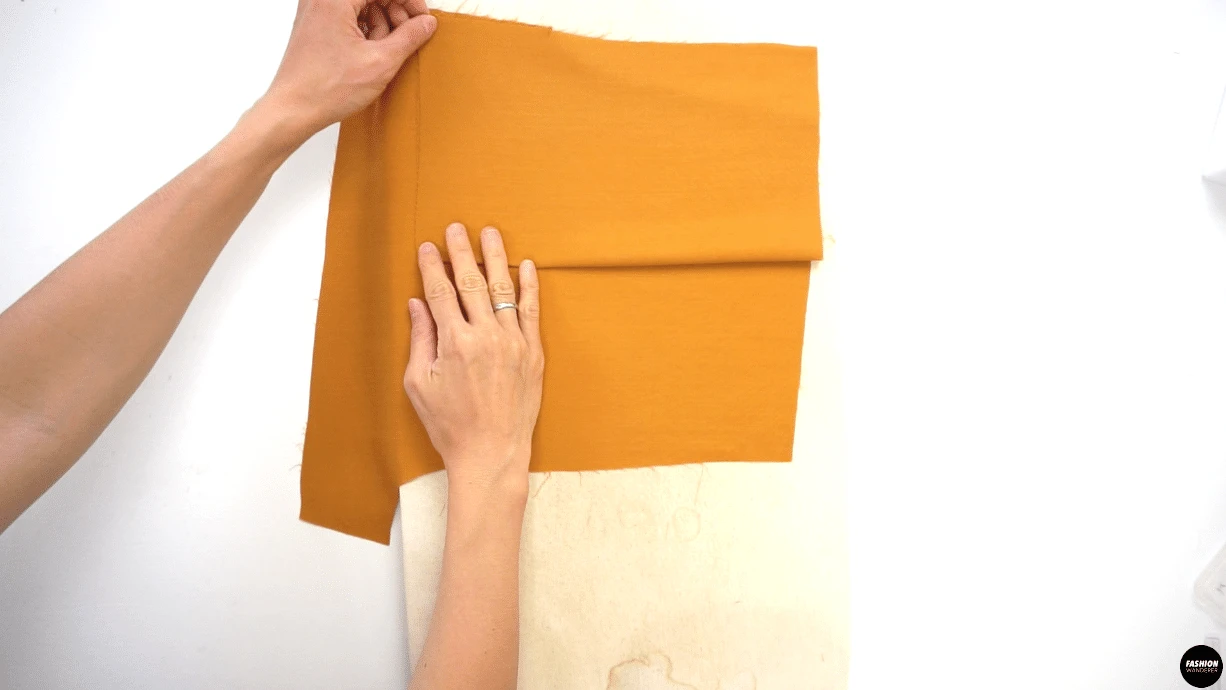
Fold and press to create button placket on Front Right Side Top and Front Left Side Top. Edge topstitch along the folded edge on both sides.
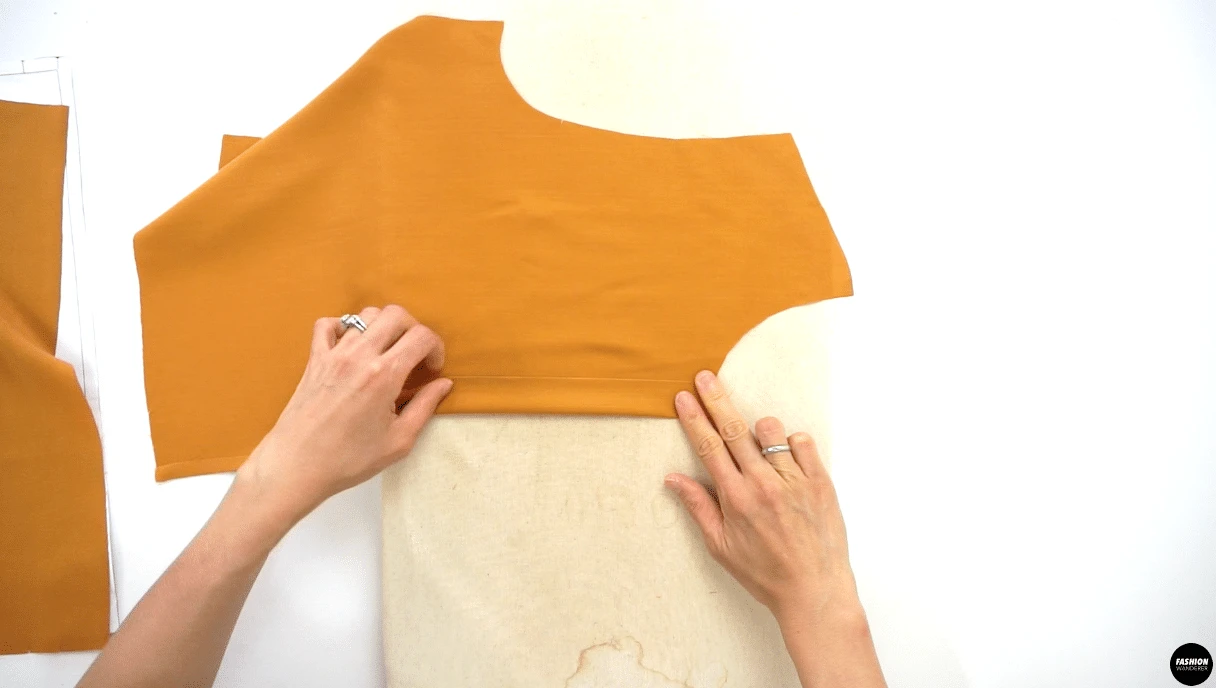
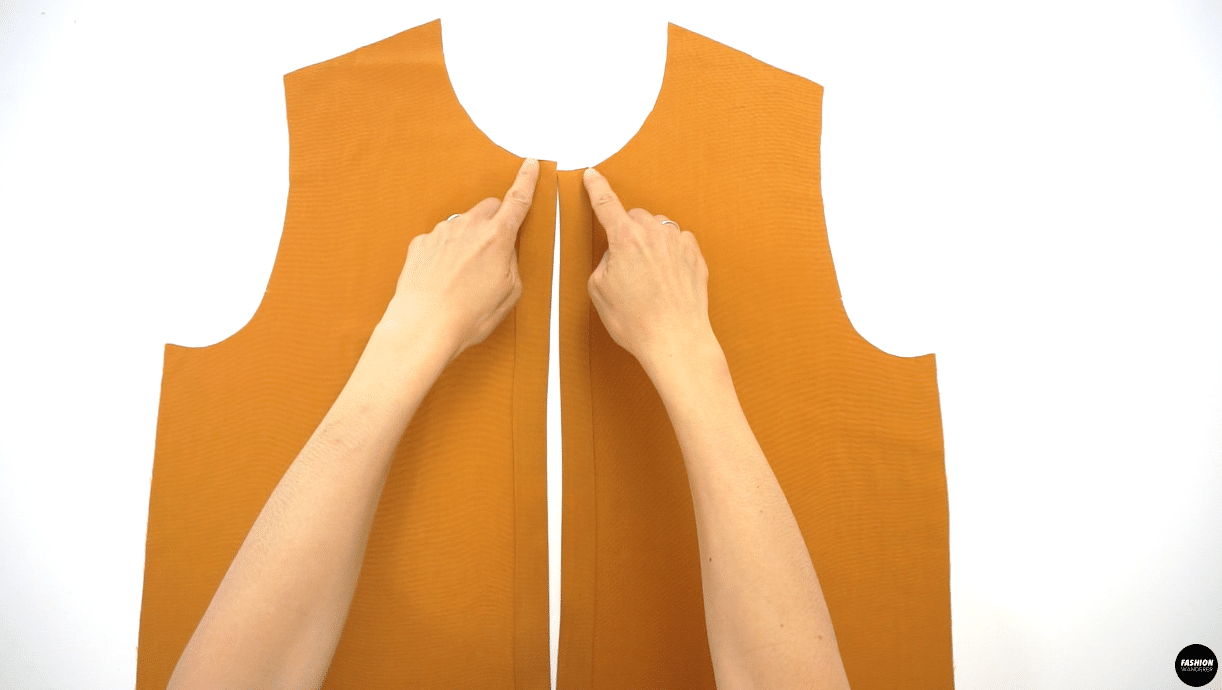
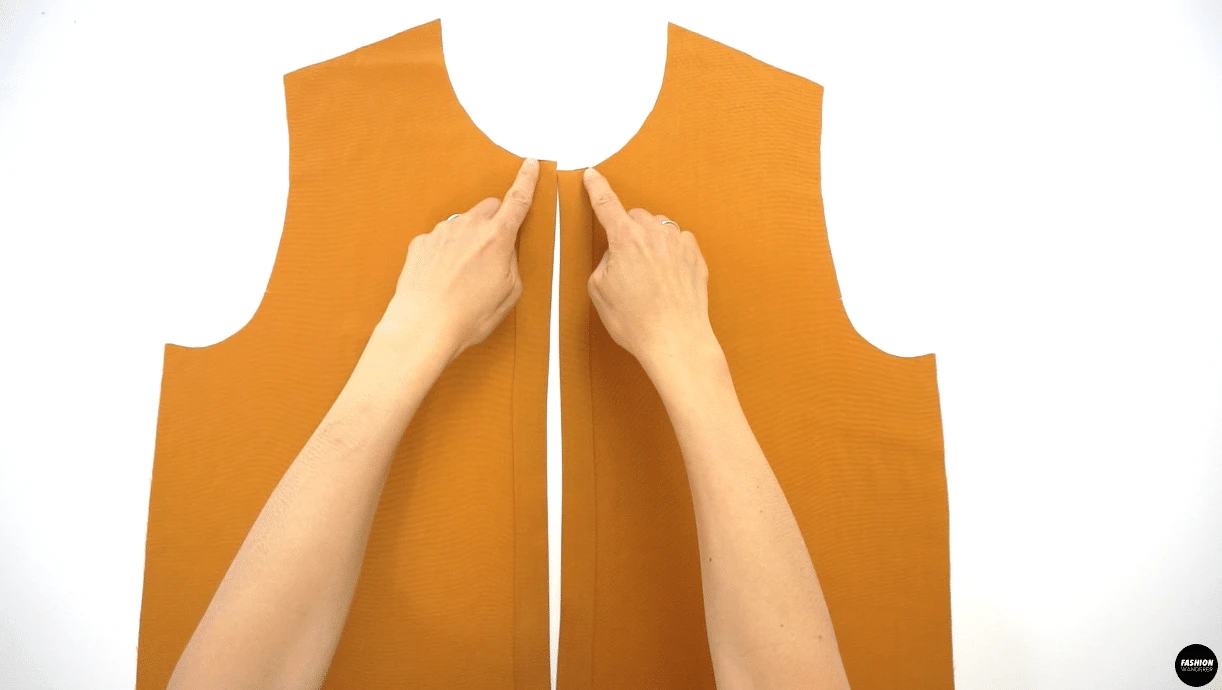
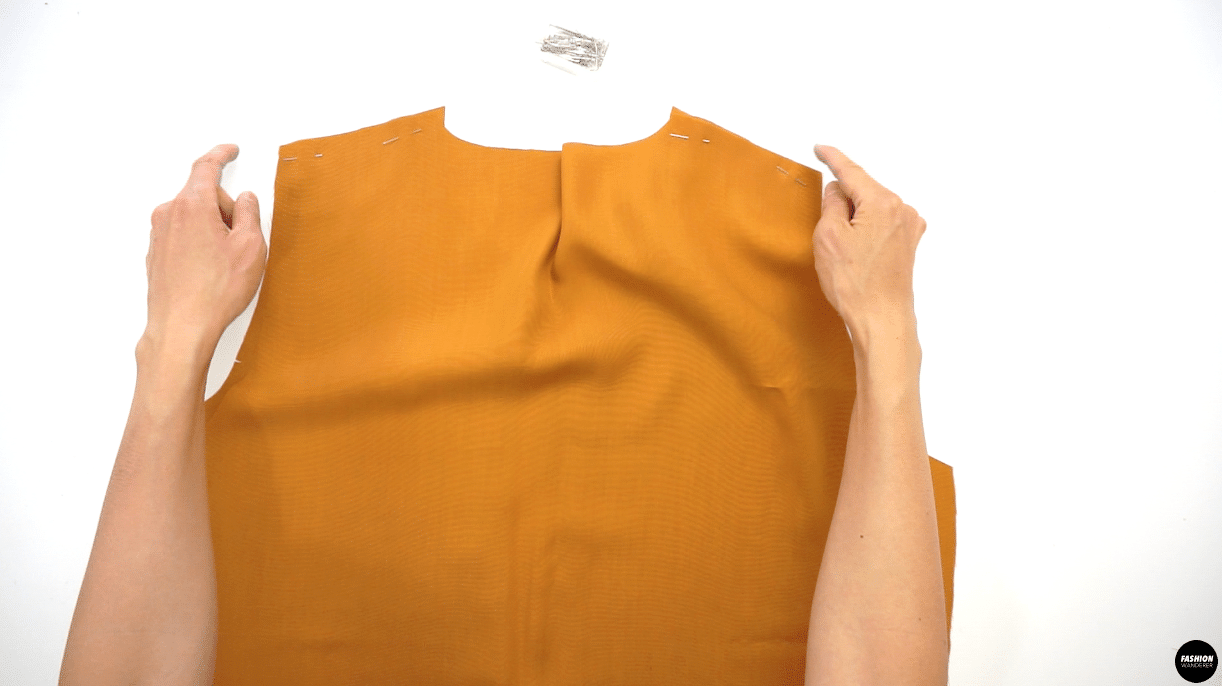
Sew along the shoulder and side seam by placing the right side of the top and back facing each other and overlock to finish. Press the seam toward the back and pin the collar and bodice along the neckline to sew ⅜” width straight stitch. Fold the Inner Collar Stand and stitch in the ditch to clean finish.
Close the sleeve by sewing the under sleeve seam and attach to the bodice by matching the notch on front, shoulder and back.


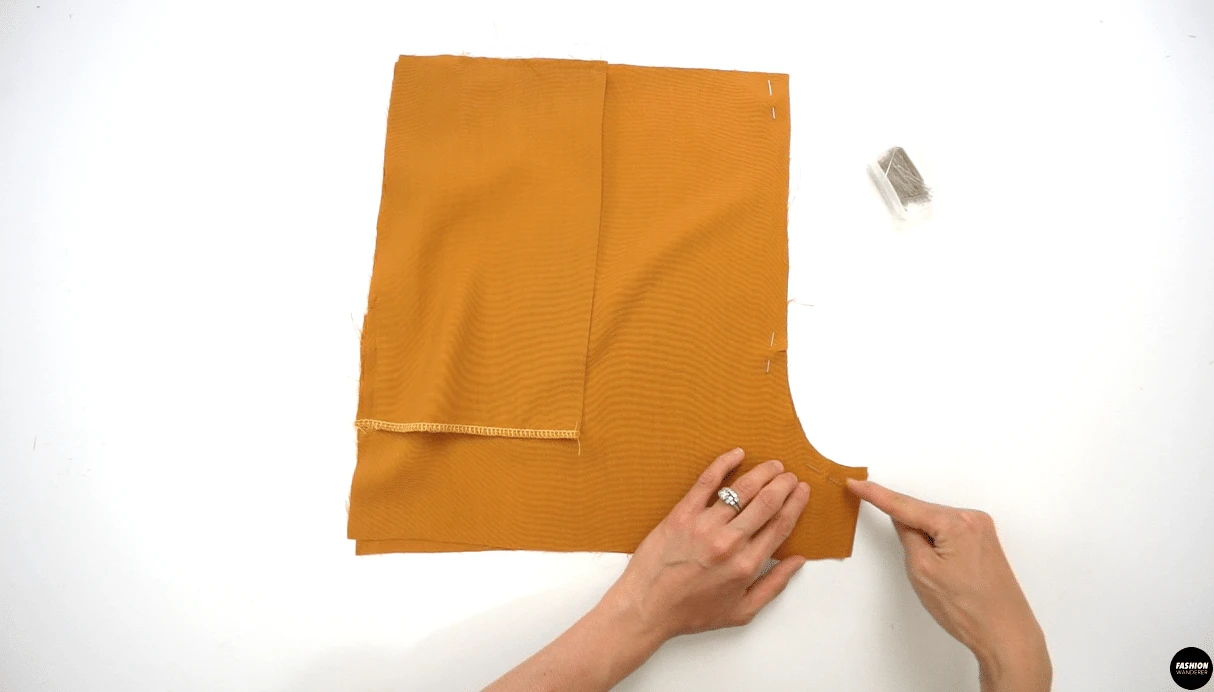
Sew the Shorts Pocket Pattern along the curved seam and fold over to the wrong side. Fold the pocket piece in half to match the notch and press the half point.
Close the pocket with overlock stitch and baste on top and side to secure to the shorts. Sew along the center front seam of the Front Shorts and center back seam of the Back Shorts, then sew the Shorts and Bodice along the waistline.
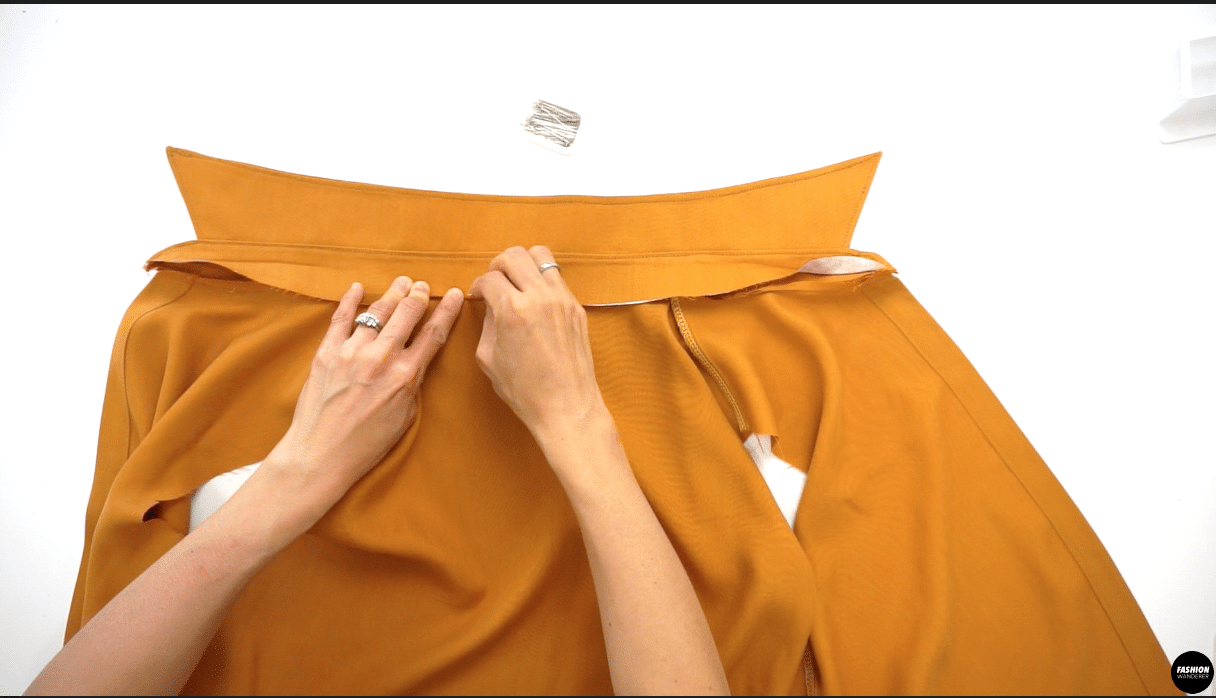
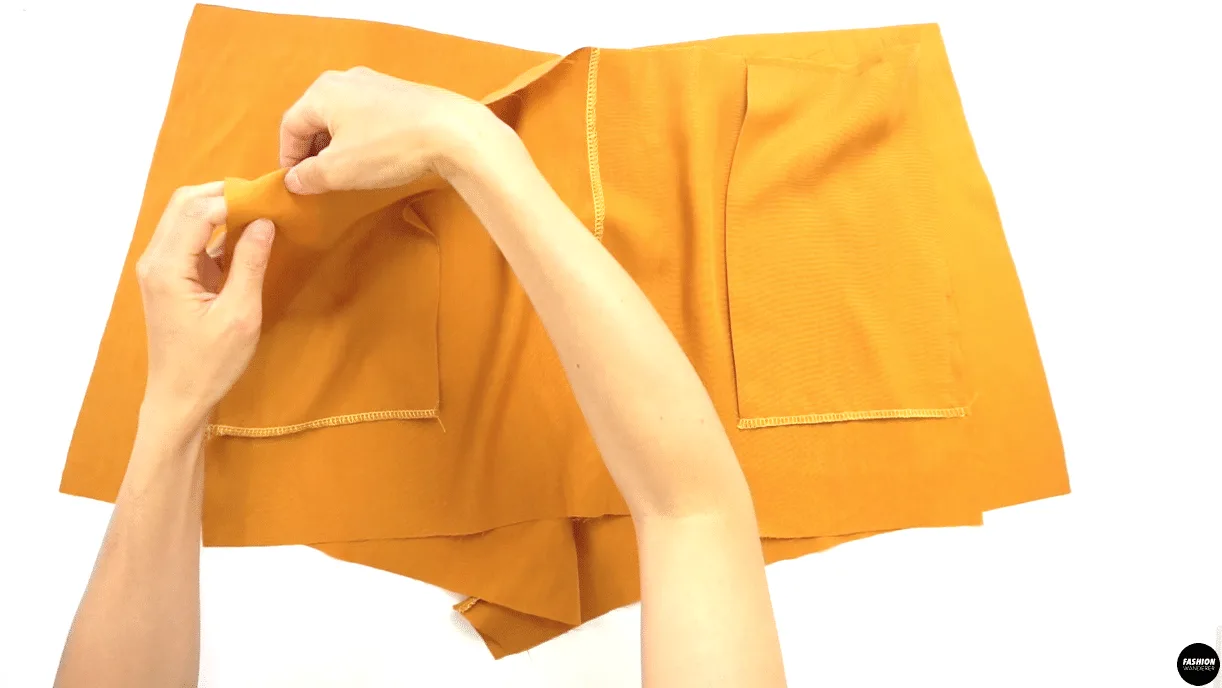
Assemble the front and back of the shorts by stitching along the side seams. Place the Waist Casing facing each other and close the side seams. Slide the Waist Casing through the opening of the Shorts and leave opening for elastic.
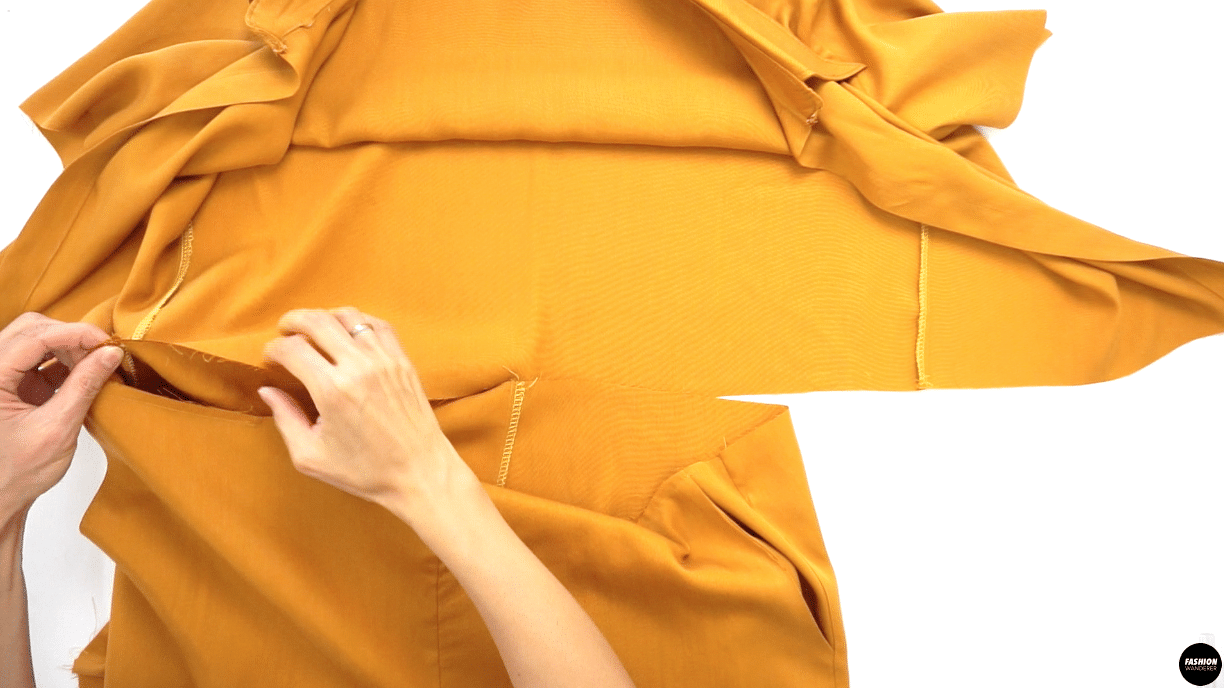
Slide elastic through the tunnel with the help of a safety pin and join the elastic with straight stitch or zigzag stitch. Close the gap opening of Waist Casing with edge topstitch. Make buttonhole on the Right Side Front Bodice and hand sew button on Left Side Front Bodice.
Overlock stitch along the opening of the Sleeve and Shorts. Fold ¾” width inside and press. Topstitch close to the overlock stitch to finish the Joelle button front romper.


DIY Button Front Romper Sewing Tips


Making a button placket, collar, and hidden waist elastic band looks complicated and difficult to achieve to get store-bought and professional finish. However, this step by step tutorial will guide you with how to sew topstitch along the collar and collar band and correct hemming methods to finish the sleeve and shorts opening.
In addition, using Serger to complete internal seams with overlock stitch to avoid from fraying. It is easy and quick solution to finish professionally but if you do not own Serger, you can easily substitute with zigzag stitch or French seam to finish inside seams as well.
Also, for this romper style, you will use correct way to join elastic to smooth out around the waist when worn.
Review these sewing tips below to help you understand the process of making Joelle romper in the right steps so you no longer need to rip seams apart and start all over to get it right. Practice stitching straight with a sewing machine before jumping into making this garment.
- Sewing Needle: When sewing Tencel fabric, select size 70/10 or 75/11 sewing needle and for lightweight Tencel, go with size 60/8 needle to avoid creating holes.
- Thread: Use regular polyester or all-purpose thread when sewing this type of fabric. If the fabric tends to stretch a lot more, change to cotton thread since it doesn’t stretch as it goes through the sewing machine to prevent from puckering.
- Stitches: Tencel can be difficult to sew without the right tension and stitch length. Loosen the thread tension a bit to avoid from puckering stitches. Also, adjust the stitch length to 1½ to 2mm. When topstitching along the collar and collar band, change to longer stitch length at 3.5 to ease between the stitch.
- Button: To sew button and buttonhole, using sewing machine will give you clean finish and look. Replace the regular sewing foot with buttonhole foot to get the exact opening to use button that you choose. If your fabric is bit flimsy or thin, you may add interfacing along the wrong side of the extended button placket to get the buttonhole right. Refer the manual how to replace the button and select option on your machine to get the right stitch for buttonhole and button.
- Elastic: Use safety pin to slide the elastic through the hidden internal waistband. It is easy to feel the metal piece to slide forward to completely pull the elastic to the other end. Slightly overlap the elastic ¼” width and straight stitch or zigzag stitch to join the ends. If your sewing machine won’t sew elastic, identify the issue beforehand and hand stitch if needed.
- Fusible Interfacing: Adding interfacing on collar, collar band, or even button placket gives a nice rigid look overall to your garment. The most convenient is to use fusible interfacing that attaches to the wrong side of the fabric by ironing. However, if fusible interfacing is not available and looking for an alternative way, use fabric instead of interfacing.
The Tencel fabric is uniquely manufactured by brushing the polyester fiber to give the fabric a soft suede-like feel and subtle ribbed appearance. It comes in light to medium weight with elegant flowing drape that meld on body when worn. The surface has matte sheen which is perfect for to sew this easy and loose romper silhouette.
Working with Tencel can be tough, especially when sewing. It is slippery and shifty because of densely weaved woven fabric so you do need to take a few precautions before sewing.
Use walking foot will help you control two layers when sewing to avoid shifting in-between the feed.
Also, dull needles do not pierce through the Tencel very well, including pushing the fabric down into the plate. So always double check the condition of your needle and replace new sewing needle when possible when sewing this type of fabric.
Furthermore, use the 0mm place on sewing machine. It prevents the flimsy and slippery fabric from getting sucked down when you begin a row of stitching.
Use these sewing tips and techniques to complete the Joelle romper mistake and stress free.


DIY Button Front Romper
Have you tried to make shirting inspired button front romper before? If it is your first time sewing button placket shirt or elastic waistband shorts, you will love this romper sewing pattern and step by step instructions to follow.
This Joelle romper features front button closure with comfortable elasticized waist and slit pockets on the shorts. It is classic style and design to add to your DIY wardrobe.
From button placket to collar, the garment consist of detailed design elements. Following the sewing pattern and complete tutorial will help you sew buttonhole, use interfacing to make rigid collar and input proper seam finishes.
Materials
- Joelle Romper Sewing Pattern
- Tencel Fabric 1½ yard for 60” width or 2 yards for 45” width
- Fusible Interfacing
- 28½” Long ¾” width Elastic
- Topstitch and Regular Thread
- 6 pieces of 22L 4-Hole Wooden Button (9/16” or 14mm)
Tools
- Sewing Machine
- Serger
- Straight Pins
- Fabric Scissors
- Buttonhole Foot
- Measuring Tape
- Water Erasable Pen
Instructions
For this Joelle romper tutorial, start by assembling the pattern pieces.
2 pieces of Front Top
1 piece of Back Top
2 pieces of Front Shorts
2 pieces of Back Shorts
2 pieces of Sleeve
2 pieces of Shorts Pocket
2 pieces of Collar (1 piece of Fusible Interfacing)
2 pieces of Collar Stand (1 piece of Fusible Interfacing)
2 pieces of Waist Casing
How to Make Collar and Collar Stand
- Attach Upper Collar with fusible interfacing on the wrong side of the fabric. Place the right side of the Upper Collar and Under Collar facing each other, pin along the edges and sew ⅜” width seam allowance.
- Trim the seam allowance from ⅜” to ¼”, and ⅛” width around the point. Flip the collar inside out and use sharp needle or seam ripper to pull out the point on both ends. Press with iron to shape the collar. Replace with Topstitch Thread, adjust the stitch length to 3.5 and edge topstitch around the Collar.

- Apply interfacing on Outer Collar Stand piece. Next, place right side of Inner Collar Stand upwards, and lay the collar on top. Match the center notch on both pieces and pin. Stay stitch the two pieces together with ¼” width to secure the position.
- Lay the right sides of the Inner Collar Stand facing the Collar together and sew ⅜” width along the seam allowance.
- Trim the seam allowance less than ¼” width and flip inside out. Press with steam iron to shape the Collar Stand, and edge topstitch around the Collar Stand.
How to Sew Button Placket
- Lay the Front Right Side Top bodice wrong side up on the ironing board, fold along the first notch and press. Then, fold another time to reach to the next notch and press. Do the same on the Front Left Side Top bodice.

- Lastly, edge topstitch ⅛” away from the folded edge to secure the button placket on both bodice pieces.
How to Make Shirt Bodice
- Place right side of the Front and Back Bodice facing each other, then pin along the shoulder seam and side seam.

- Sew ⅜” width along the seam allowance and finish with overlock stitch. Press the finished seam facing toward the back bodice.

- Open the bodice and pin along the neckline with Collar Stand from one side to the other end. Sew ⅜” width along seam allowance. With Inner Collar Stand, fold ⅜” width and stitch in the ditch along the neckline seam.

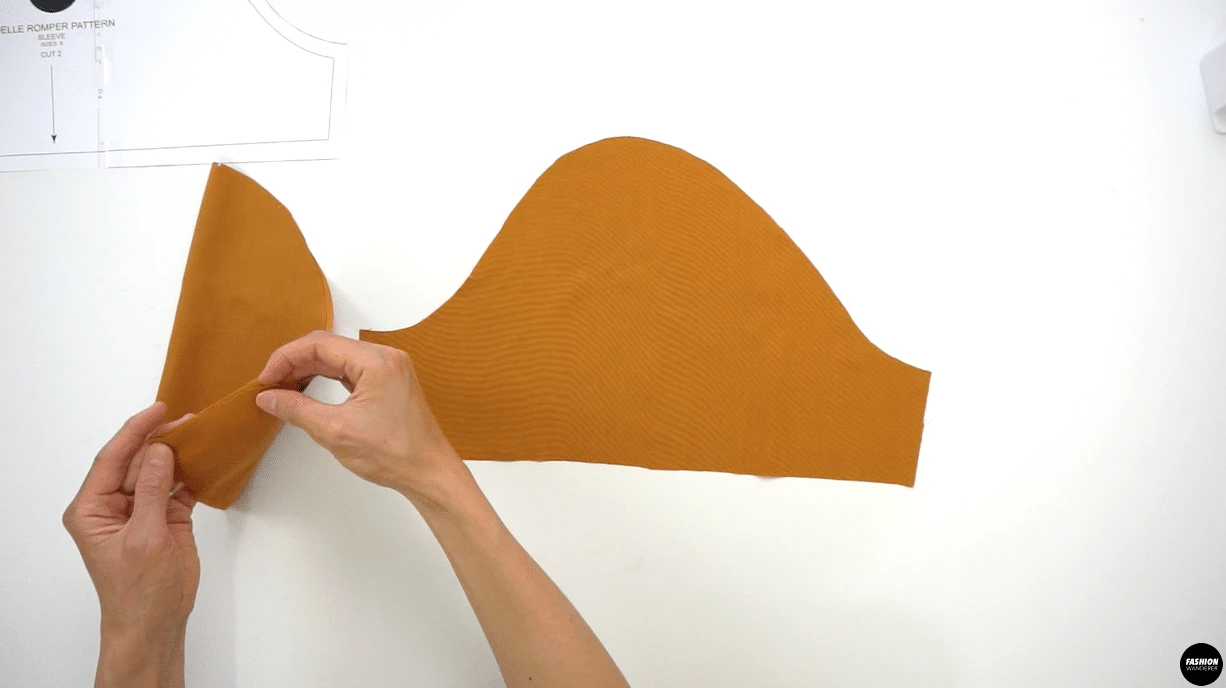
How to Sew Sleeve
- Fold the Sleeve in half facing right sides towards each other and sew ⅜” width along seam allowance on the underarm seam. Finish with overlock stitch and press the seam toward the back of the sleeve.

How to Assemble Shirt Bodice
- Match the front notch of the Sleeve to the notch on Front Bodice and back notch of the Sleeve to the notch on Back Bodice, then pin around the armhole. Sew ⅜” width along seam allowance and finish with overlock stitch.

How to Sew Shorts
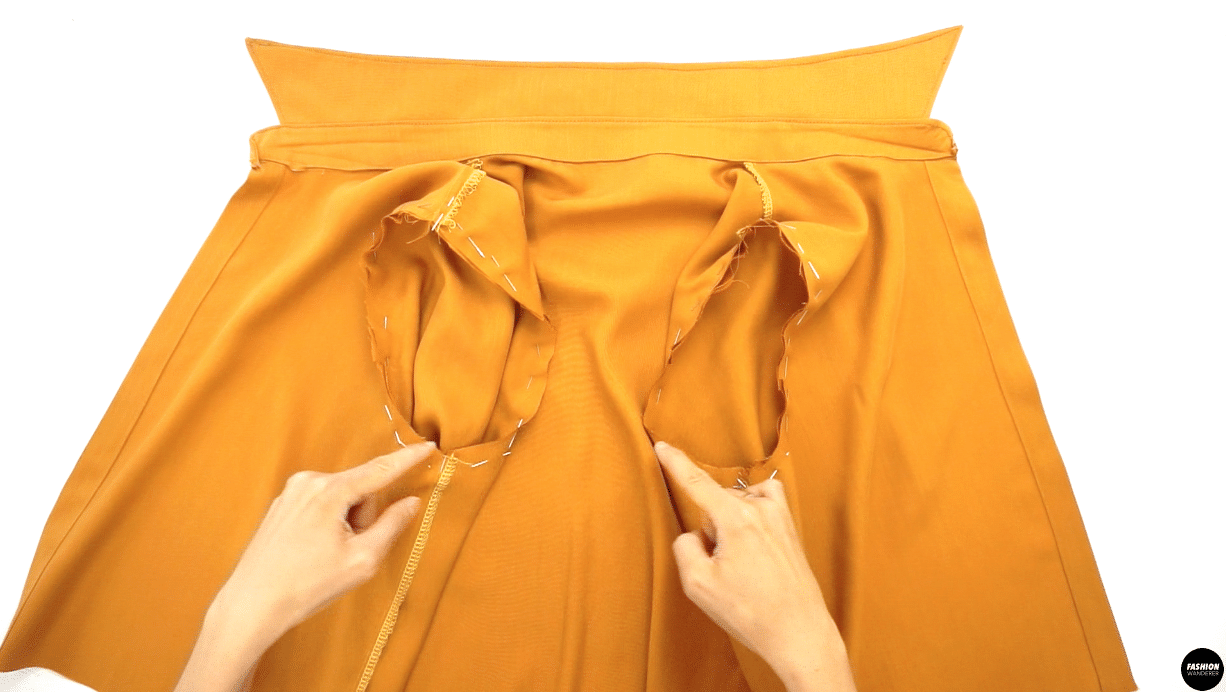
- Grab Shorts Pocket pattern piece and lay on top of wrong side of Front Shorts pieces, then pin along the curved pocket opening. Sew ⅜” width, then fold over along the seam and press.
- Fold the Pocket piece in half and match with notches on top and on the side, then press to crease the center of the pocket. Overlock stitch the bottom of the Pocket and stay stitch on top and side to secure the Pocket and Shorts pieces.

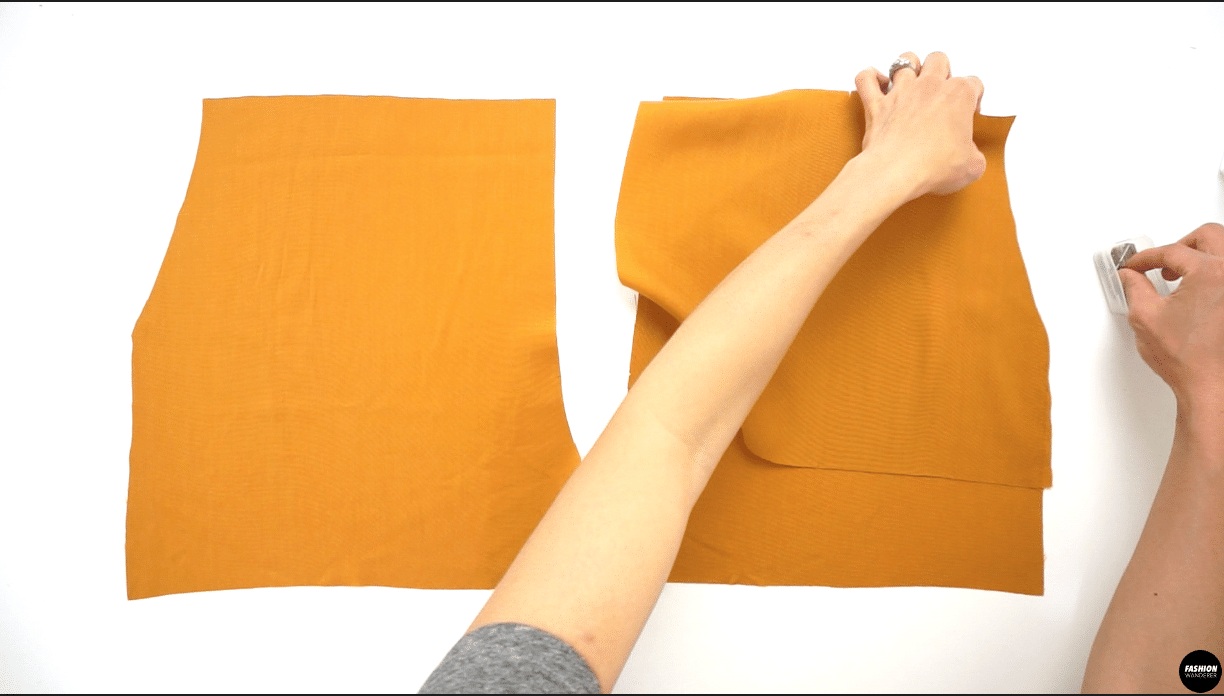
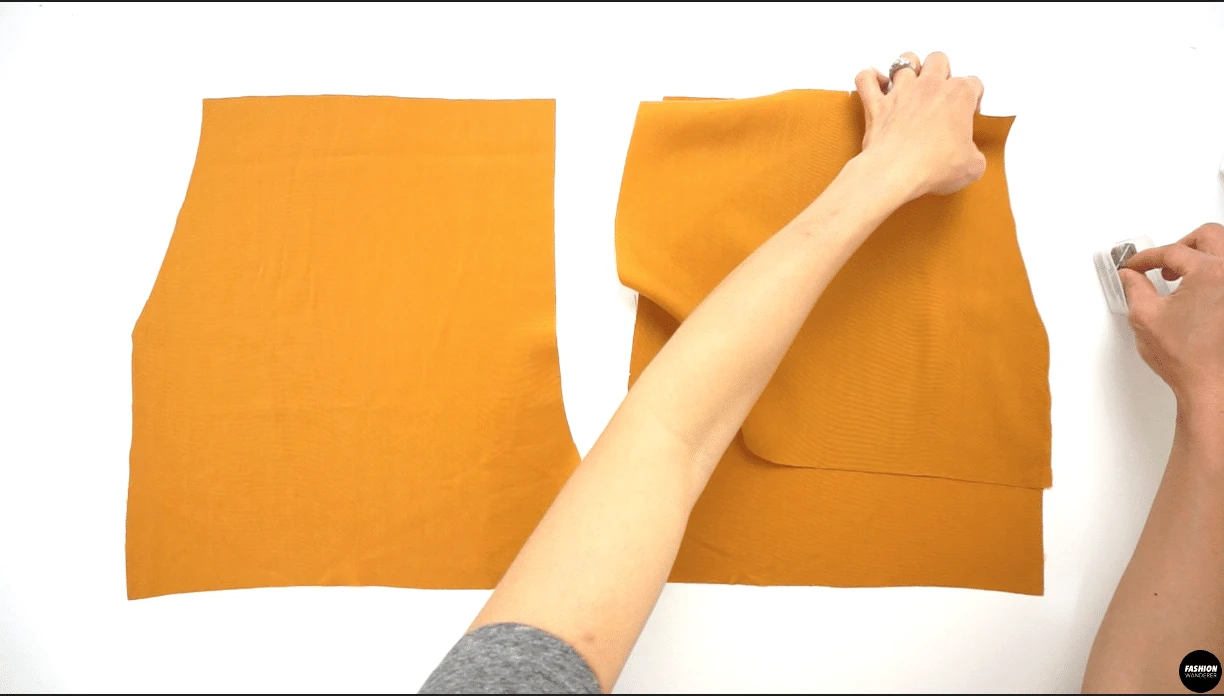
- Pin the Front Shorts together at the center front seams and sew ⅜” width along seam allowance, then finish the edges with overlock stitch. Do the same on the Back Shorts pieces.

- Place the right side of the Front Shorts and Back Shorts facing each other and sew ⅜” width along seam allowance, then finish with overlock stitch. Open the shorts and press the seam toward the back.

- Next, open the Top Bodice and pin along the waistline by pinning right side facing each other. Sew ⅜” straight stitch and complete with overlock stitch.

- Pull out 2 pieces of Waist Casing, place right side facing each other and sew ⅜” straight stitch on both ends. Press the seam open and then press the bottom edge with ⅜” width fold.

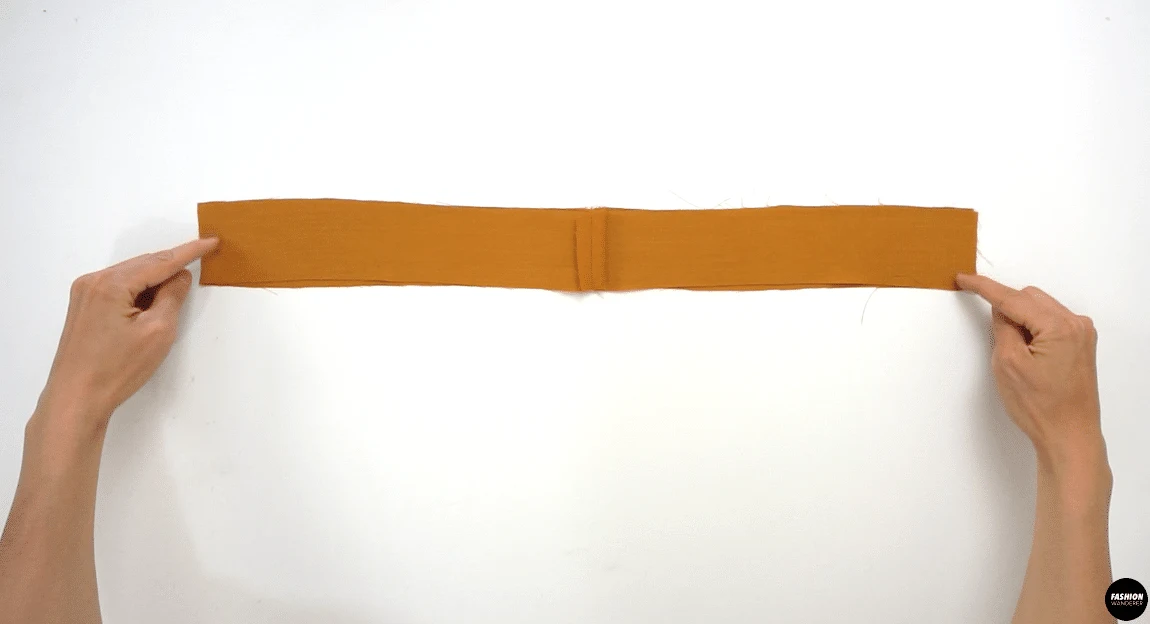
- Slide the Waist Casing piece through the Shorts and match the side seam and notches on front and back to pin. Sew ⅜” width along seam allowance and leave about 2-3” opening. Sew edge topstitch ⅛” width along the folded side of the Waist Casing.

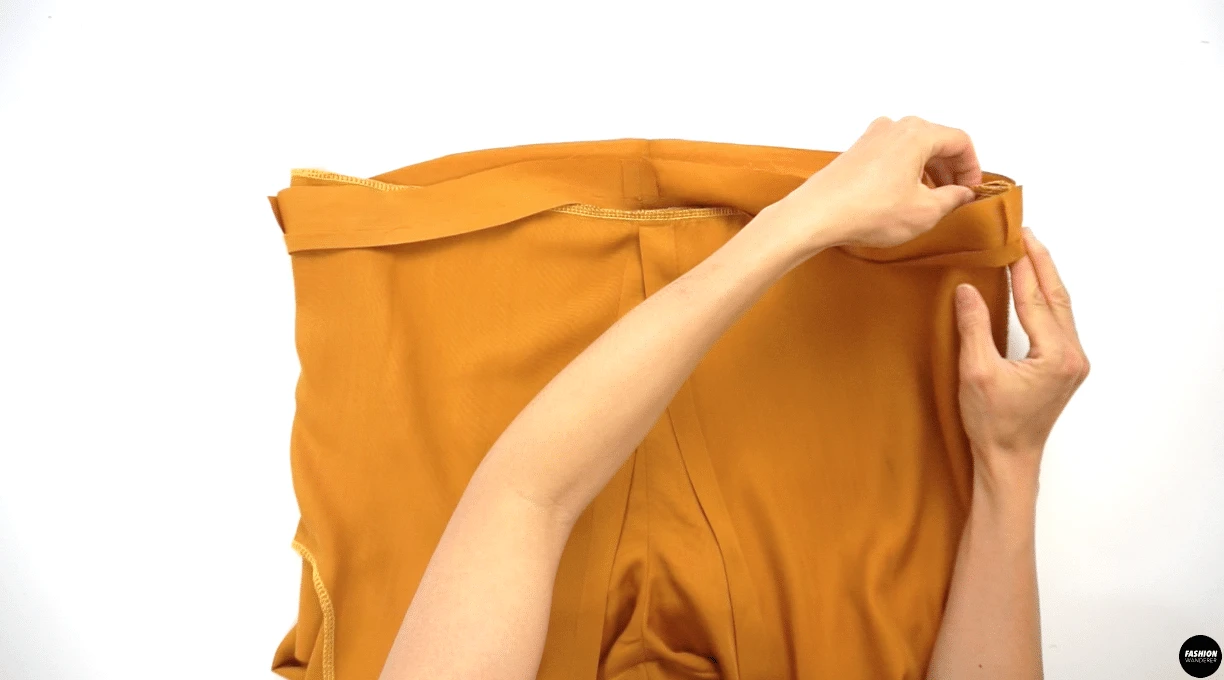
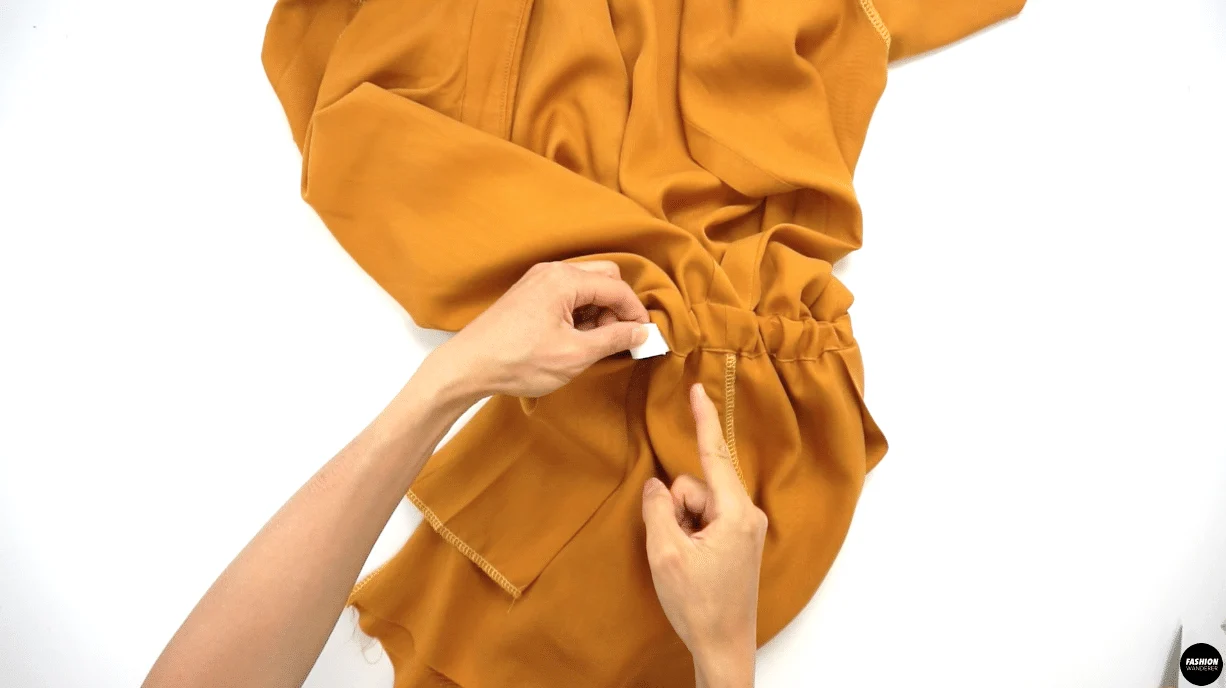
- Prepare 1 piece of 28½” long by ¾” width Elastic. Use safety pin to attach one end of elastic and slide through the tunnel of Waist Casing. Slowly push the safety pin until you reach the opening on the other side. Overlap the elastic about ¼” and straight stitch or zigzag stitch to join the elastic. After joining elastic, gently distribute the gathering around the waist and close the opening of the Waist Casing by edge topstitching.

- Mark the buttonhole position on the Right Side Front Bodice. The center of the button to the next center of the button should be 3” apart. Use buttonhole foot and setting of your machine, refer to the manual and Fashion Wanderer sewing tips on the website. Open the buttonhole with seam ripper and mark the button position with water erasable pen.

- Hand sew the buttons on the Left Side Front Bodice.

- Overlock stitch along the opening of the sleeve. Fold the opening of the sleeve ¾” width inside and press. This will help you to mark the hemline correctly all around. Topstitch to finish and give another press.

- Next, overlock stitch around the opening of the shorts. Again, fold ¾” width and press. Topstitch along the overlock stitch to create hemline around the shorts. Lastly, press on all hemline, shoulder, and sleeve seams to give finish touch. Now you have it, this cute shirt inspired button front romper is season-less classic piece that you can add to your classic wardrobe.

Recommended Products
As an Amazon Associate and member of other affiliate programs, I earn from qualifying purchases.


Trendy, Affordable Sewing Patterns for All Sizes


Tie Shoulder Jumpsuit Pattern


Palazzo Pants Sewing Pattern


Pocket Overall Romper Pattern


Wrap Maxi Skirt Sewing Pattern


Tie Back Top Sewing Pattern